The Two Knights Defence with 4.Ng5- Sidelines
With 4.Ng5 White defends the e4-pawn and attacks f7, and Black must do something to address the threat.
Probably the most controversial try is the Traxler Counterattack with 4...Bc5!?, which invites White to grab the pawn on f7, and gives Black dangerous attacking chances after 5.Nxf7 Bxf2+, in tremendously complicated positions. After 5.Bxf7+, I think Black's kingside attacking chances probably offer only partial compensation for the sacrificed pawn and misplaced king, but on the other hand, there is no clear refutation and Black tends to score well in practice. Black will usually continue with ...Rf8 and ...Qe8. Similarly promising for White is 5.d4, which leads to positions where Black has plenty of piece activity in return for the sacrificed pawn but Black has to be more careful of the potential for the black king to become exposed, following 5...d5 6.Bxd5 Nxd4 7.Bxf7+.
Most logical is 4...d5, striking out in the centre, but one of the key points behind 4.Ng5 is that Black can only take advantage of White's loss of time by sacrificing a pawn. If Black meets 5.exd5 with 5...Nxd5, then this leaves Black open to dangerous knight sacrifices on f7. White can afford to sacrifice the knight immediately if desired, with 6.Nxf7, the Fegatello or Fried Liver Attack, which is the most forcing way to send Black's king out into the middle of the board. This sacrifice appears to be fully sound, though it is unclear whether it gives White a theoretical advantage. One word of warning: many sources recommend the rook sacrifice line 6.Nxf7 Kxf7 7.Qf3+ Ke6 8.Nc3 Ncb4 9.a3?!, but this is unsound, and White should continue with 9.Qe4, 9.0-0 or 9.Bb3 instead. White can also defer the sacrifice with 6.d4, the Lolli Attack, which is more likely to give a theoretical edge with best play, though there are some responses from Black that prevent White from carrying out the knight sacrifice on f7.
The other important sidelines are 4...d5 5.exd5 b5!?, the Ulvestad Variation, and 5...Nd4, the Fritz Variation. With best play the two lines transpose to each other, but White has to be prepared to retreat the king's bishop to its starting square, after 5...b5 6.Bf1, or 5...Nd4 6.c3 b5 7.Bf1, which is not easy to find without preparation. The bad news for Black is that with best play Black probably doesn't get full compensation for the pawn following 7...Nxd5 8.cxd4 Qxg5 9.Bxb5+, though in practice White tends to deviate, especially at club level, and many of White's alternative options allow Black to generate very dangerous attacking chances, particularly utilising the a8-h1 diagonal with bishops on b7 and d6 bearing down on White's king. My personal view is that 5...b5 gives White more scope to go wrong than 5...Nd4 does.
However, none of these lines are as sound as 4...d5 5.exd5 Na5, which due to its importance is covered on a separate page.
Games and analysis
The coverage is divided as follows:
1. 4...Bc5 5.Nxf7 (and other fifth moves)
2. 4...Bc5 5.Bxf7+
3. 4...d5 5.exd5 Nxd5 6.Nxf7
4. 4...d5 5.exd5 Nxd5 6.d4
5. 4...d5 5.exd5 Nd4 6.c3 b5 7.Bf1 h6 8.Ne4 (with discussion of sidelines along the way)
6. 4...d5 5.exd5 b5 6.Bf1 Nd4 7.c3 h6 8.cxd4 (also discussing sidelines along the way)
1. 4...Bc5 5.Nxf7 (and other fifth moves)
2. 4...Bc5 5.Bxf7+
3. 4...d5 5.exd5 Nxd5 6.Nxf7
4. 4...d5 5.exd5 Nxd5 6.d4
5. 4...d5 5.exd5 Nd4 6.c3 b5 7.Bf1 h6 8.Ne4 (with discussion of sidelines along the way)
6. 4...d5 5.exd5 b5 6.Bf1 Nd4 7.c3 h6 8.cxd4 (also discussing sidelines along the way)
[Event "Antonio Barrios Memorial-B email"]
[Site "ICCF email"]
[Date "2010.12.01"]
[Round "?"]
[White "Saglione, Eduardo"]
[Black "Moreno Carretero, Carlos"]
[Result "1-0"]
[ECO "C57"]
[WhiteElo "2547"]
[BlackElo "2450"]
[PlyCount "101"]
[EventDate "2010.??.??"]
[EventType "tourn (corr)"]
[EventRounds "14"]
[Source "ChessBase"]
[SourceDate "2012.11.12"]
1. e4 e5 2. Nf3 Nc6 3. Bc4 Nf6 {This is the starting position of the Two
Knights Defence.} 4. Ng5 {White defends the e4-pawn and attacks f7. Black
generally plays 4...d5 here to prevent White from capturing on f7, but there
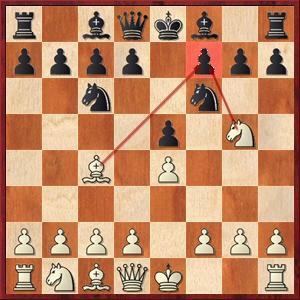
is an important alternative.} Bc5 $5 {Diagram [#] Black decides to
counterattack against f2. Frank Marshall, unaware of its prior history,
named this line the Wilkes-Barre Variation but it is more commonly named after
Karel Traxler, who introduced the line into master play in 1890.} (4... Nxe4 {
is an interesting, though unsound, attempt to circumvent White's plan.} 5.
Bxf7+ {is the best response, forcing Black to give up castling rights and not
being tempted by the potential win of the rook on h8.} (5. Nxe4 $6 d5 {[%cal
Rd5e4,Rd5c4] is the "fork trick", regaining the piece by forking the bishop on
c4 and the knight on e4, which is a common motif for Black in the Two Knights
Defence.}) (5. Nxf7 $6 Qh4 {gives Black a strong attack.} 6. O-O Bc5 7. Nxh8
Nxf2 $17) 5... Ke7 6. d4 {This is probably even better than the immediate
knight recapture on e4.} (6. Nxe4 Kxf7 7. Qf3+ Ke8 8. Nbc3 {is better for
White due to Black's loss of castling rights, but Black is still well in the
game.}) 6... h6 7. Nxe4 Kxf7 8. d5 {with a large advantage for White, Sanner,Z
(2081)-Simmelink,J (2182) FICGS email 2010}) 5. Nxf7 {White wants to win the
rook on h8, but more reliable is the bishop capture on f7, while White has a
third option which is also worth considering.} (5. d4 {is an interesting
alternative. Stefan Bucker in one of his online articles suggested that "if
there is a refutation of the Traxler, it may well begin 5.d4".} d5 {is Black's
only way to avoid conceding a significant disadvantage} (5... exd4 $2 6. Nxf7 {
leaves Black unable to sacrifice the bishop on f2 as it is blocked by the
d4-pawn.} Qe7 7. Nxh8 {and Black has no convincing follow-up, since if} Qxe4+
8. Qe2 {forces the queens off.}) 6. Bxd5 Nxd4 7. Bxf7+ (7. Nxf7 $6 Qe7 8. Nxh8
Bg4 {gives Black very dangerous attacking chances, and White's results from
this position have been dismal.}) 7... Ke7 (7... Kf8 8. Bc4 b5 9. Be2 {This
move works here because the black king is potentially exposed to attacks down
the f-file in some lines.} h6 10. Nf3 Nxe4 11. O-O Bb7 (11... Nxf3+ 12. Bxf3
Qxd1 13. Rxd1 {threatens Rd8+, leaving Black in a mess.}) 12. Nbd2) 8. Bc4 b5
9. Bd3 (9. Be2 {leaves the e4-pawn without sufficient protection:} h6 10. Nf3
Nxe4 11. Be3 (11. O-O Nxf3+ 12. Bxf3 Qxd1 13. Rxd1 Bb7) 11... Bb7 {gives
approximately equal chances.}) 9... h6 10. Nf3 Bg4 11. Be3 {and I agree with
Stefan Bucker that White has a slight advantage. Black has plenty of open
lines and the more active pieces, offering some compensation for the pawn, but
Black has to be careful of the potential for the black king to become exposed.}
) 5... Bxf2+ {The point of Black's fourth move- otherwise Black loses the rook
on h8 for nothing.} 6. Kf1 (6. Kxf2 {is also playable and leads to
considerable complications, but there are also many forced draws by perpetual
check. Some sample lines:} Nxe4+ {Diagram [#]} 7. Ke3 $5 {Exposing the white
king, but hoping to eventually retreat the white king to a safe spot and then
win with the extra material.} (7. Kg1 {usually leads to a draw although in
practice White sometimes goes wrong and loses, e.g.} Qh4 8. g3 (8. Qf1 $6 Rf8
9. d3 $6 Nd6 {is one way in which White can get into trouble.}) 8... Nxg3 9.
Nxh8 Nd4 10. Bf7+ Kf8 11. hxg3 Qxg3+ {with a draw.}) 7... Qh4 8. g3 (8. Rf1 Rf8
) 8... Nxg3 9. hxg3 Qd4+ (9... Qxg3+ $2 {leads nowhere after} 10. Qf3) 10. Kf3
d5 11. Rh4 e4+ 12. Kg2 O-O {Diagram [#] and Black will win back one piece and
emerge with sufficient compensation for the other piece due to White's lack of
development and exposed king, Simmelink,J (2270)-Elburg,J (2235) SEMI email
2002}) 6... Qe7 7. Nxh8 d5 {Diagram [#] A critical position for the assessment
of the Traxler. Black is a whole rook down but is relying upon piece play and
White's misplaced king to provide compensation. Black has a plus score in
practice in this variation, so it is probably inadvisable for White to enter
it without preparation.} (7... Nxe4 $2 8. Qh5+ {is embarrassing for Black.}) 8.
exd5 Nd4 9. d6 {"Seems best" according to Stefan Bucker, and this may well be
right. White uncovers a path for the bishop to f7, thus threatening to bring
the h8-knight out to safety. Despite White's large material advantage, it is
doubtful if any of White's alternatives are sufficient even for equality.} (9.
c3 {is the computer's initial preference, but there follows} Bg4 10. Qa4+ Nd7 {
and White is close to losing, e.g.} 11. Kxf2 (11. cxd4 Qf6 12. dxe5 Qf4) 11...
Qh4+ 12. g3 Qf6+ 13. Ke1 Qf5) (9. Be2 {was also suggested as a possible
refutation by Maarten de Zeeuw, but it is not convincing:} Bh4 10. c3 Nxe2 11.
Qxe2 Bg4 12. Qb5+ Nd7 {and Black is likely to pick up the knight on h8, with
at least sufficient compensation for the exchange. For example,} 13. Kg1 O-O-O
14. h3 Bf5 15. d3 Nb6 {(this is stronger than the immediate rook capture on
h8- the knight isn't going anywhere) and Black is doing well.}) (9. h3 {
prevents a piece from landing on g4.} Bh4 10. d6 cxd6 11. g3 {was another
suggested attempt at refutation by de Zeeuw, but Black has numerous ways to
obtain at least sufficient compensation for the material (and probably more).}
Bxg3 (11... b5 $5 {- Stefan Bucker, citing analysis by Pietro Pastore, also
appears to be good for Black}) 12. Kg2 d5 13. Be2 Bh4) 9... Qxd6 (9... cxd6 {
allows White to get away with} 10. Kxf2 $1 {and this should leave White on top,
for example,} Bg4 11. Qf1 Nxc2 (11... O-O-O 12. Nf7 d5 13. Nc3) 12. Nc3 Nxa1
13. Nd5 $16) 10. Nf7 {White gets the knight out of the corner, hoping to
remain a full rook ahead.} (10. Kxf2 $2 Bg4 11. Qf1 $2 {no longer works
because of} Ne4+ 12. Kg1 Ne2+ {forcing White to give up the queen.}) 10... Qc5
{This appears to be best, attacking the bishop on c4 and thus undermining the
protection of the knight on f7.} 11. d3 Bg4 {Black attacks the white queen
with tempo.} (11... b5 {is an alternative, continuing to try and harass the
c4-bishop to remove the defence of the knight on f7, but it is probably
inferior.} 12. b4 Qf8 13. Bxb5+ Kxf7 14. Kxf2 Nxb5 {is the usual continuation,
but I am not convinced that Black is left with sufficient compensation for the
exchange, as Black's attacking forces have retreated.}) (11... Bh4 {is Stefan
Bucker's main line, which has been extensively analysed by Dan Heisnman, who
claims sufficient compensation for Black.} 12. b4 Qe7 (12... Qxb4 $2 13. c3)
13. Nd2 Bg4 14. Nf3 Bxf3 15. gxf3 b5 {and in this complicated position Black
probably has sufficient compensation for the material, as White cannot avoid
giving a piece back, leaving White just an exchange ahead.}) 12. Qd2 Bh4 13.
Nc3 b5 14. b4 Qe7 {Diagram [#] Black has a fair amount of compensation for the
material here too.} 15. Bb3 Nd5 ({Less convincing is the materialistic} 15...
Nxb3 16. axb3 Kxf7 17. g3 Bh3+ 18. Ke2 {and Black's attack is fizzling out.})
16. Bxd5 Qf6+ 17. Kg1 Be2 18. Bf3 Bxf3 19. Qe3 ({The computer's first choice is
} 19. Nxe5 {which forces the queens off, but leads to quite a complicated
ending in which Black has a fair share of the chances, e.g.} Qxe5 20. Qe3 Qxe3+
21. Bxe3 Nxc2 22. gxf3 Nxa1 23. Nxb5 O-O-O 24. Bxa7 Rxd3 {and Black's piece
activity offers compensation for the pawn.}) 19... Kxf7 20. gxf3 Nxf3+ 21. Kg2
Qg6+ 22. Kxf3 Qh5+ 23. Kg2 Qg4+ {Diagram [#]} 24. Qg3 {White could have taken
a draw here, but argues that White has such a large material advantage that
White can afford to give up the queen here.} Bxg3 25. hxg3 Qxb4 26. Bd2 Qc5 27.
Rxh7 {White is better here, as the rook, knight and bishop are worth more than
the queen and pawn.} Kg6 28. Rh4 Rf8 29. Kh3 a5 30. Rc1 Qc6 31. Ne4 b4 32. Rg4+
Kf7 33. Ng5+ Ke8 34. Re4 Rf5 35. Kg2 Qf6 36. Nh3 Qe6 37. g4 Rf6 38. Ng5 Qd5 39.
Nf3 Qxa2 {The problem with this move is that Black's queen ends up offside and
White is able to develop a strong attack against the black king, but there
does not appear to be anything better.} 40. Rxe5+ Kd8 41. Kg3 Kc8 42. Rc5 a4
43. Re1 Kb7 44. Re4 b3 45. Rec4 c6 46. Rb4+ Kc8 47. Bf4 g5 48. Be5 Rxf3+ 49.
Kxf3 Qb1 50. Rxc6+ Kd7 51. Rd6+ 1-0
[Event "IECG CP.1999.F.00002 email"]
[Site "IECG email"]
[Date "2002.10.01"]
[Round "?"]
[White "Stefanov, Plamen"]
[Black "Efendiyev, Enver Mikhailovich"]
[Result "1-0"]
[ECO "C57"]
[WhiteElo "2198"]
[BlackElo "2511"]
[PlyCount "47"]
[EventDate "2002.10.01"]
[EventType "tourn (corr)"]
[EventRounds "6"]
[Source "ChessBase"]
[SourceDate "2008.06.24"]
1. e4 e5 2. Nf3 Nc6 3. Bc4 Nf6 4. Ng5 Bc5 5. Bxf7+ {Instead of the greedy
knight capture on f7, White takes on f7 with the bishop, forcing Black to give
up castling rights, and settling for being one pawn ahead. Black will try to
generate a kingside attack, making use of the half-open f-file and lead in
development.} Ke7 6. Bb3 (6. Bd5 {is the main alternative., but it tends to
lead to similar play.} Rf8 (6... Nxd5 $6 {grabs the bishop-pair but loses the
initiative, e.g.} 7. exd5 Nd4 8. c3) 7. O-O d6 8. c3 (8. Nc3 Bg4 9. Nf3 Nd4 $44
) 8... Bg4 9. Qb3 h6 10. Qxb7 (10. d4 Bb6 11. h3 hxg5 12. hxg4 Qd7 {and Black
Black is set to regain the sacrificed pawn by taking on g4, leading to a
dynamically balanced position, Koller,G (1930)-Rezzuti,V (2340) Italy 1999})
10... Rb8 (10... Na5 {is untested but is interesting, trading two rooks for
the white queen but relying upon piece play to compensate, e.g.} 11. Qxa8 Qd7
12. b4 c6 13. Qxf8+ Kxf8) 11. Qxc6 Bd7 12. Ne6 Bxc6 13. Nxd8 Bxd5 14. exd5 Kxd8
$14 {Van Vugt,W-Garlant,C corr 1998}) 6... Rf8 7. O-O (7. d3 {is the main
alternative and it scores well for White.} d6 8. Be3 Qe8 9. Bxc5 (9. Nf3 {is
the main alternative and is probably a slight improvement for White, e.g.} Bg4
(9... Qg6 10. O-O Bg4 11. Nbd2 $14) 10. Nbd2 Nd4 11. Bxd4 Bxd4 12. c3 {with a
slight advantage for White, Karjakin,S (2460)-Zubov,O (2306) Kramatorsk 2002})
9... dxc5 10. Nc3 {is the line examined by Maarten De Zeeuw, according to
Stefan Bucker, but Black haas reasonable chances after} Qg6 {(Bucker)}) 7... d6
8. Nc3 Qe8 9. Nd5+ Kd8 10. c3 {Diagram [#] Preparing to play d2-d4. Although
this position looks good for White at first glance, as White has an extra pawn
and the more active pieces, White has to be careful as Black is preparing to
force White into retreat.} h6 11. d4 (11. Nf3 Bg4 {makes it difficult for
White to avoid the shattering of the white kingside pawn structure following
an exchange on f3, for recapturing with the queen will leave the queen exposed
to the discovered attack with ...Nf6xd5, though White can still keep an edge.}
12. Bc2 (12. d3 Nxd5 13. exd5 Qg6 14. Nh4 Qh5 $44) 12... Bxf3 13. gxf3 (13.
Qxf3 Nxd5 {[%cal Rf8f3]}) 13... Qf7 $14) 11... exd4 12. Nxf6 gxf6 {This gives
Black the half-open g-file pointing at White's king, but the damage to Black's
kingside pawn structure is probably too large a price to pay for this.} (12...
Rxf6 {is more normal, which should lead to just a small edge for White in a
complicated position, e.g.} 13. e5 Rf5 14. Nf3 {Howell,J (2525)-David,A (2465)
Groningen 1995}) 13. Nf3 Bg4 14. Bxh6 Rh8 (14... dxc3 {sacrificing the
exchange doesn't work for Black:} 15. Bxf8 cxb2 16. Rb1 Qxf8 17. h3) 15. Bg7
Rh7 16. Bxf6+ Kd7 17. e5 Qh5 {Counterattacking on the kingside, but Black
doesn't have enough behind the attack to compensate for the material.} 18. e6+
Kc8 19. Re1 Bxf3 20. Qxf3 Qxh2+ 21. Kf1 d3 22. Qxd3 Qf4 23. Qf3 Qd2 (23... Qxf3
24. gxf3 {is probably a loing endgame for Black due to the strength of the
pawn on e6, e.g.} Rh2 25. Kg1 Rxf2 26. Kh1 Rxf3 27. Bg5) 24. g4 1-0
[Event "Liape Cup Magistral A email"]
[Site "Liape email"]
[Date "2004.03.25"]
[Round "13"]
[White "Malmstroem, Jan"]
[Black "Sorroche Lupion, Francisco"]
[Result "1-0"]
[ECO "C57"]
[WhiteElo "2200"]
[BlackElo "2271"]
[PlyCount "85"]
[EventDate "2004.03.13"]
[EventType "corr"]
[EventRounds "14"]
[EventCountry "ARG"]
[Source "ChessBase"]
[SourceDate "2006.04.01"]
1. e4 e5 2. Nf3 Nc6 3. Bc4 Nf6 4. Ng5 d5 {The standard response. Black strikes
out in the centre.} 5. exd5 Nxd5 {Diagram [#] I mention that Black should
sacrifice material for compensation here. Recapturing on d5 gives White two
attractive attacking continuations.} 6. Nxf7 {The notorious Fegatello or Fried
Liver Attack. 6.d4, as features in the next game, is arguably even stronger,
but the knight sacrifice forces the black king into the middle of the board.}
Kxf7 {Black is forced to take due to the fork on the queen on d8 and rook on
h8.} 7. Qf3+ {This move puts extra pressure on the knight on d5 and thus
forces Black to bring the king into the centre of the board to defend it.} Ke6
8. Nc3 {White puts more pressure on the knight on d5, again limiting Black's
options.} Ncb4 {Diagram [#] The only move that creates significant problems
for White, due to the threat to c2.} (8... Nce7 $6 9. d4 $16 {leaves Black
with a passive position while White is preparing to break through in the
centre.} c6 10. dxe5 Kd7 11. Bg5 {is one example of how Black can soon get
into serious trouble.}) 9. Qe4 {Statistically the most popular of White's
options, and probably gives White at least sufficient compensation for the
sacrificed knight. White centralises the queen and prepares to pressure e5
with d2-d4 or f2-f4. There are also two other good options, and a third
dubious option.} (9. a3 $6 {has long been established as the "book"
recommendation, offering to sacrifice the rook on a1 in return for an
accelerated initiative, but analysis by Stefan Bücker and "Master_Om" at the
Chesspublishing.com forum has demonstrated that the idea is dubious.} Nxc2+ 10.
Kd1 Nxa1 11. Nxd5 Qh4 {Diagram [#] This move was suggested by "Master_Om" at
the Chesspublishing.com forum. Surprisingly White cannot do a great deal of
damage with the discovered checks and Black ends up with some advantage.} (
11... Kd6 $6 {is the most popular move, after which play typically continues}
12. d4 Be6 13. Re1 {with a very dangerous attack for White.}) 12. Nb6+ (12.
Nxc7+ Kd7 13. Qf7+ Qe7 14. Nxa8 Qxf7 15. Bxf7 Bc5 {with some advantage for
Black.}) 12... Ke7 13. Qf7+ Kd8 14. Nxa8 Bd7 {and Black is over the worst.}) (
9. O-O {is a promising alternative, since Black no longer has time to take on
c2 since it doesn't give check. For example,} c6 10. d4 Qf6 (10... Kd7 11. a3
$44) 11. Qe2 (11. Qe4 $6 {is met by} Qf5) 11... Kd7 12. dxe5 Qg6 13. a3 $44) ({
The quiet retreat} 9. Bb3 {is also worth considering, e. g.} c6 10. a3 Na6 11.
Nxd5 cxd5 12. d4 {with good compensation for the sacrificed knight, Van Doorn,
J (2237)-Ikegami,O (2092) ICCF email 2009}) 9... c6 {Black adds further
support to the d5-knight.} 10. a3 {This move forces Black's b4-knight to a
passive position since the c2-pawn is now guarded by the queen.} Na6 11. d4 {
Attacking e5 and freeing up the c1-bishop. This move forces the win of a
second pawn for the piece, since Black cannot defend both d5 and e5.} Nac7 {
Black adds further support to the d5-knight.} 12. Bf4 (12. Qxe5+ $6 Kf7 {
leaves White's queen exposed to a subsequent ...Bf8-d6, and drives the black
king to a relatively safe position.}) (12. f4 {is the main alternative, which
leads to a similar position to the game continuation:} Kf7 13. fxe5 Be6 14.
O-O+ Kg8 {and White's two pawns and strong centre and attacking chances down
the f-file offer good compensation for the sacrificed knight, but there is
nothing decisive.}) 12... Kf7 {Black prepares to tuck the king away on g8,
where it will be relatively safe, but will block in the h8-rook.} 13. Bxe5 Be6
14. Qf3+ (14. O-O Nf6 $1 {is a line that "Master_Om" gave at the
Chesspublishing.com forum. Black prepares to exchange off some pieces and/or
gain time against the white queen, and White will struggle to maintain full
compensation for the sacrificed knight, for example,} 15. Bxe6+ Nxe6 16. Qd3
Qb6) 14... Kg8 {Diagram [#] This is arguably a slightly better version for
Black of the position that arises from 12.f4, since although White's
dark-squared bishop is quite well-placed on e5, White doesn't have a half-open
f-file for the king's rook and a strong centre with pawns on d4 and e5.
However, White's compensation for the sacrificed knight is probably still
sufficient.} 15. Ne4 Qh4 16. O-O Re8 {White has completed development and
Black has created a solid defence, so the question now is how White makes
progress from here.} 17. Rae1 Re7 {This allows White to bring the e4-knight to
a strong outpost on d6, but the knight can quite easily be challenged.} 18. Nd6
(18. Qd1 {is a computer suggestion, with the idea of following up with f2-f4.})
18... b5 19. Re4 Qg5 20. h4 Qh6 21. Bd3 Ne8 {This prepares to swap off White's
dangerous knight.} 22. Rfe1 Bd7 23. Nxe8 Bxe8 24. c4 bxc4 25. Bxc4 {White
still has dangerous compensation for the piece as Black's forces are mostly
bottled up on the back rank, though there is still nothing decisive.} Bg6 26.
R4e2 Bf7 27. Re4 a5 (27... Bg6 {attacking the rook on e4 may have been a more
secure way of restricting White from making progress.}) 28. Qb3 {Diagram [#]
This prepares to move the white queen up to b8, further cramping Black's
position.} Rd7 29. Qb8 {Although Black is still just about surviving here,
Black now has to be careful because of how tied up the black forces are.} a4 {
This leads to a probably losing position.} (29... Qd2 {is a counterattacking
alternative which may improve over the game, but Black's defence remains
difficult, e.g.} 30. f3 Re7 31. Qc8) 30. Qa8 Nb6 31. Bxf7+ Rxf7 32. Qa6 c5 33.
dxc5 {The computer initially prefers 33.d5 here, which is also strong, but the
game continuation is probably strongest.} Bxc5 34. Bd4 Bxd4 35. Rxd4 Rf8 36.
Rb4 Nd5 37. Qc4 {The pin on the d5-knight proves to be fatal for Black.} Qd2
38. Re2 Qd1+ 39. Kh2 h5 40. Rb5 Rd8 41. Re5 Qg4 42. Re4 Qf5 43. Rd4 1-0
[Event "FIN-ch5 WS email"]
[Site "ICCF email"]
[Date "2005.11.20"]
[Round "?"]
[White "Arppi, Heikki"]
[Black "Eloranta, Kari"]
[Result "1-0"]
[ECO "C57"]
[WhiteElo "2332"]
[BlackElo "2271"]
[PlyCount "61"]
[EventDate "2005.??.??"]
[EventType "corr"]
[EventRounds "14"]
[EventCountry "FIN"]
[Source "ChessBase"]
[SourceDate "2006.04.01"]
1. e4 e5 2. Nf3 Nc6 3. Bc4 Nf6 4. Ng5 d5 5. exd5 Nxd5 6. d4 {Diagram [#] This
is generally known as the Lolli Attack and is widely considered to be stronger
than 6.Nxf7, although I'm not entirely sure. White strikes out in the centre
and waits for a better moment to sacrifice the knight on f7.} Be6 {Possibly
Black's most secure continuation, which prevents any knight sacrifices on f7,
but White can get a small advantage thanks to the better development.} (6...
Nxd4 {is tricky, as Black can seek compensation for a piece in some lines, but
probably not fully sound.} 7. c3 {This aims to win the knight on d5 after the
d4-knight moves out of the way.} b5 (7... h6 {avoids losing a piece but is
less good since White can snap at the f7-pawn and bring the black king out
into the middle of the board:} 8. Nxf7 Kxf7 9. cxd4 $16 {Huebner,R (2628)
-Fischer,M (2172) Munich 2002}) (7... f6 8. cxd4 fxg5 9. O-O $16) 8. Bxd5 Qxd5
9. f3 {Diagram [#] White does not have to take the knight on d4 immediately
since it remains pinned to the queen on d5. One sample line now runs} (9. cxd4
{is met by} Qxg2) 9... f6 10. Ne4 f5 11. Ng3 Be6 12. cxd4 exd4 13. O-O {and I
don't think Black has enough compensation for the piece.}) (6... Bb4+ 7. c3 Be7
{allows White to get an improved version of the Fried Liver Attack:} 8. Nxf7
Kxf7 9. Qf3+ Ke6 10. O-O $16 {Bohak,J (2185)-Wicklund Hansen,G (2065) ICCF
email 2010}) (6... exd4 7. O-O {leaves White perfectly set up for the knight
sacrifice on f7, and if} Be6 8. Re1) 7. Nxe6 fxe6 8. dxe5 (8. O-O {is a
possible alternative, e.g.} exd4 9. Re1 Qd6 10. Qg4 e5 11. Bg5 {with a slight
advantage for White.}) 8... Bc5 {Black concentrates on getting pieces out.} (
8... Nxe5 $6 9. Qh5+ {followed by kingside castling gives White dangerous
attacking chances on the kingside light squares and the advantage of the
bishop-pair.}) (8... Bb4+ 9. c3 Bc5 {has not been tested in any high-level
games but may improve slightly over the game continuation as it takes the
c3-square away from White's b1-knight. For example, if White continues as per
the game with} 10. Qg4 Qd7 11. Nd2 {then Black has} Nxe5 {and White has
nothing better than} 12. Qh5+ Qf7 13. Qxf7+ (13. Qxe5 $4 Qxf2+ 14. Kd1 Ne3+)
13... Kxf7 14. Be2 {with a small advantage due to the bishop-pair and Black's
inferior pawn structure, but Black is well in the game.}) 9. Qg4 Qd7 10. Nc3 {
Diagram [#]} O-O {Black puts pressure on f2.} (10... Nxe5 11. Qh5+ Qf7 12. Qxe5
Qxf2+ 13. Kd1 {is fully playable for White here since White has not blocked
the c1-bishop's defence of e3.}) 11. f4 Ncb4 12. Bb3 Kh8 13. a3 Nxc3 14. axb4
Bxb4 15. O-O {White maintains a small advantage here thanks to the bishop-pair
and some attacking chances on the kingside.} Bc5+ 16. Kh1 Qb5 17. Be3 Bxe3 18.
bxc3 Rad8 19. h4 {Preparing to press forward on the kingside, taking advantage
of the fact that Black's queen is rather cut off from the kingside.} Qc6 20.
Rf3 Bd2 (20... Qxc3 21. Raf1 Qd2 22. Qxe6 {and White retains good attacking
chances, though this may have been better for Black than the game continuation.
}) 21. Rd1 Qe4 22. Rdf1 a5 {Diagram [#]} 23. Bxe6 {White's next step is to
continue pushing the h-pawn.} Qxc2 24. h5 Bxc3 25. Kh2 Qe2 (25... Rde8 26. Rg3
{is no good for Black.} Re7 27. Qg5) 26. h6 Bxe5 {Sacrificing a piece for two
pawns in order to disrupt White's attack, but White has a strong
counter-sacrifice.} 27. Bc4 (27. fxe5 Qxe5+ 28. g3 Rxf3 29. Rxf3 {is clearly
better for White, but White has to take some care because of Black's connected
queenside pawns.}) 27... Qxc4 28. fxe5 Qg8 29. e6 Rfe8 30. Rg3 Re7 31. Qf5 1-0
[Event "Moscow 07"]
[Site "Moscow"]
[Date "2009.07.14"]
[Round "2"]
[White "Bagirov, Rufat"]
[Black "Gubajdullin, Alexey"]
[Result "1-0"]
[ECO "C57"]
[WhiteElo "2467"]
[BlackElo "2455"]
[PlyCount "57"]
[EventDate "2009.07.13"]
[EventType "tourn"]
[EventRounds "11"]
[EventCountry "RUS"]
[EventCategory "7"]
[Source "ChessBase"]
[SourceDate "2009.09.03"]
1. e4 e5 2. Nf3 Nc6 3. Bc4 Nf6 4. Ng5 d5 5. exd5 Nd4 {Diagram [#] This is the
Fritz Variation, a reasonable alternative to the more standard 5...Na5, and it
offers Black better practical chances than 5...Nxd5, though probably does not
suffice for full equality.} 6. c3 {White chases the knight immediately.} (6. d6
{is a tricky alternative, trying to break through on f7.} Qxd6 {is Black's
best option, inviting White to grab the pawn on f7.} 7. Bxf7+ (7. Nxf7 $2 Qc6 {
[%cal Rc6c4,Rc6g2] and Black's threats against c4 and g2 are too strong.}) 7...
Ke7 8. Bb3 (8. c3 h6 9. cxd4 hxg5 10. Qb3 exd4 $15) 8... Nxb3 9. axb3 h6 10.
Nf3 e4 11. Ng1 Kf7 {and Black probably has more than enough for the pawn,
since White has no pieces developed, Brusila,H (2385)-Popescu Rusavat,I (2308)
ICCF email 2003}) (6. Nc3 h6 7. Nf3 Bg4 8. Be2 Bxf3 9. Bxf3 Bb4 {gives Black
reasonable compensation for the pawn, Vallejo Pons,F (2686)-Kramnik,V (2754)
Monte Carlo 2005}) (6. O-O {also doesn't work out very well for White, e.g.} h6
7. Nf3 Bg4 8. Be2 Qxd5) 6... b5 {Black counterattacks against the bishop on c4.
} (6... Nf5 7. O-O {is slightly better for White as Black has lost some of the
initiative, e.g.} h6 8. Nf3 e4 9. Ne5 (9. Re1 {may be even stronger.}) 9... Bd6
10. d4 $14 {Hatanbaatar,B (2435)-Yurtaev,L (2530) Moscow 1994}) 7. Bf1 $1 {
This retreat may be hard to find over the board for players new to this
opening, but the bishop is more prone to attacks elsewhere.} (7. cxd4 bxc4 8.
dxe5 Qxd5 {Diagram [#] is sometimes tried instead, but Black has enough
compensation for the pawn, particularly in view of the potential for dangerous
pressure down the a8-h1 diagonal. For example,} 9. O-O Bb7 10. Nf3 Nd7 11. Qe2
Nc5 12. Nc3 Qc6 13. b3 Nd3 14. bxc4 Nf4 $44 {Tsyhanchuk,S (2412)-Gorbatenko,K
(2148) Sochi 2013}) 7... Nxd5 {Diagram [#] Black counterattacks against the
g5-knight. This is a very critical position for the assessment of the Fritz
Variation, and also the Ulvestad (5...b5) which often transposes to the same
position. White has two main options and the next game features the critical
8.cxd4.} 8. Ne4 (8. Nxf7 {is a tempting alternative, bringing the black king
out into the open, but it doesn't work very well.} Kxf7 9. cxd4 exd4 10. Qf3+ {
Diagram [#]} (10. Bxb5 {is a safer option, but Black then has a choice of ways
to get good compensation for the material, e.g.} Qe7+ (10... Nf4 {is a viable
alternative:} 11. Qf3 Qf6 12. Qxa8 $2 (12. Bc4+ Be6 13. Bxe6+ Qxe6+ 14. Kd1 Bd6
$44) 12... Qe5+ 13. Kd1 Bg4+ 14. f3 Qxb5 15. Qe4 Nd3 16. Qxd4 Bc5 {and White
is close to losing.}) 11. Qe2 Qxe2+ 12. Bxe2 Nf4) 10... Nf6 {Black is prepared
to let the rook on a8 drop in order to gain an accelerated attack.} 11. Qxa8
Bc5 12. Bxb5 Re8+ 13. Kf1 Ba6) (8. h4 {is another try, reinforcing the knight
on g5, but Black has reasonable compensation for the pawn after} h6 9. Ne4 Ne6
10. Bxb5+ Bd7) 8... Qh4 $6 {This very aggressive try, where Black is not
afraid to sacrifice further material, was favoured by Hans Berliner. It will
probably continue to pick up many points in over-the-board play below master
level, as Black has very good practical chances, but be warned: objectively it
is almost certainly unsound.} (8... Ne6 {is Black's most reliable way to get
compensation for the pawn.} 9. Bxb5+ Bd7 10. Bxd7+ Qxd7 11. O-O f5 (11... Be7 {
may also give Black reasonable compensation for the pawn, but strikes me as
rather more restrained.} 12. d4 exd4 13. cxd4 O-O {and White's pawn plus has
been significantly devalued, and Black is ahead in development, so White's
advantage, if any, is very small, Narciso Dublan,M (2450)-Kuzmin,A (2525)
Balaguer 1997}) 12. Ng3 g6 13. d4 exd4 14. Ne2 (14. cxd4 Bg7 $44) 14... Bg7 {
This appears to be untested, but is a good way for Black to keep some tension
in the position.} (14... dxc3 15. Nbxc3 Nxc3 16. Nxc3 Qxd1 17. Rxd1 Bg7 {with
a rather drawish endgame, Rodriguez,K (2435)-Hill,G (2397) ICCF email 2008})
15. Nxd4 Nxd4 16. cxd4 O-O {and I think that Black has sufficient compensation
for the pawn.}) 9. Ng3 (9. cxd4 $2 {is refuted with} Qxe4+ 10. Qe2 Qxd4) 9...
Bg4 (9... Bb7 10. cxd4 O-O-O {is an interesting alternative, relying upon
development to compensate for the sacrificed piece, but it is probably
somewhat unsound. Some sample lines:} 11. dxe5 Nf4 12. Nc3 Bxg2 (12... Nxg2+
13. Bxg2 Bxg2 14. Rg1 Qxh2 15. Qg4+ {with a large advantage for White, as
Ng3-e2 will follow, Losev,D (2350)-Gavritenkov,S Tula 1995}) 13. Bxg2 Nxg2+ 14.
Kf1 Qh3 15. Qh5 Nh4+ 16. Ke1 Bc5 17. Nxb5 {and although the position remains
complicated, I don't think Black has much to show for the piece, Werner,G
(2296)-Kranzl,A (2405) ICCF email 2001}) 10. f3 {Forced, as White's queen
doesn't have an escape square.} e4 (10... Bd7 11. cxd4 exd4 12. Qe2+ {and
Black does not have enough compensation for the piece.}) 11. cxd4 Bd6 12. Bxb5+
Kd8 {Diagram [#] This is a critical position for the assessment of what is
often known as the Berliner variation.} 13. O-O (13. Qb3 {is the other main
line. Play then usually continues} Bxg3+ 14. Kd1 Be6 15. Bc6 exf3 (15... Ne7 {
is a possible improvement for Black, e.g.} 16. d5 Nxc6 17. dxe6 Ke7) 16. Bxd5
fxg2 17. Qxg3 Qxg3 (17... gxh1=Q+ 18. Bxh1 Qxg3 19. hxg3 Rb8 20. d3 {and Black
has very little compensation for the exchange, Pilgaard,K (2400)-Pedersen,N
(2441) Greve 2002}) 18. hxg3 Bxd5 19. Rg1 {and although White is quite tied up
and hasn't got any pieces out, I think White must be better in this position
due to the extra piece and lack of a strong attack against the white king.
White has won all of the games that I can find from this position.}) 13... exf3
14. Rxf3 Rb8 (14... Bxf3 15. Qxf3 Qxd4+ 16. Kh1 {and White's attack is set to
become stronger than Black's.}) 15. Bf1 (15. Be2 $2 Bxf3 16. Bxf3 Qxd4+ 17. Kh1
Bxg3 18. hxg3 Rb6 $15 {Estrin,Y-Berliner,H ICCF corr 1965}) (15. a4 {is most
often played.} a6 16. Bf1 (16. Bxa6 $6 {is too greedy, e.g.} Re8 17. Nc3 Nf6
18. Be2 Bxf3 19. Bxf3 Qxd4+ 20. Kh1 Bxg3 21. hxg3 Qf2 $44 {Krueger,H (2252)
-Blom,E (2406) Chessfriend.com 2005}) 16... Re8 17. Nc3 c6 {and Black retains
dangerous piece play, though it is not clear if it provides sufficient
compensation for the material.}) 15... Rb4 {Diagram [#]} (15... Re8 16. Nc3 {
scores heavily for White. For example,} Nb4 17. d3 Bxf3 18. Qxf3 Qxd4+ 19. Kh1
{and Black doesn't have enough for the piece, although there are still
practical chances in this type of position.}) 16. Na3 $1 {Arjen Oudheusden
from the Netherlands first suggested this move, modestly attributing it to
Rybka.} Re8 (16... Bxf3 17. Qxf3 Qxd4+ 18. Kh1 {is close to winning for White,
e.g.} Bxg3 19. Nc2 $1 Qh4 20. Qxd5+ Ke7 21. Qc5+ Bd6 22. Qg1 {(Tim Harding)})
17. Nc2 Bxf3 18. Qxf3 Rxd4 19. Bb5 ({White must still be careful. Here, for
example, White has to avoid} 19. Nxd4 $2 Qxd4+ 20. Qf2 Bc5 21. Qxd4 Bxd4+ 22.
Kh1 Re1) 19... Re5 20. Nxd4 Qxd4+ 21. Kf1 Nf4 (21... Re6 22. Nf5 {also doesn't
offer Black much hope.}) 22. Ne2 Nxe2 23. Bxe2 Re6 24. Qf2 Rf6 25. Bf3 Qc4+ 26.
Qe2 Qd4 27. Qe3 Qh4 28. d3 Re6 29. Qg5+ 1-0
[Event "Khanty-Mansiysk ol (Men) 39th"]
[Site "Khanty-Mansiysk"]
[Date "2010.09.22"]
[Round "2.3"]
[White "Saric, Ivan"]
[Black "Georgiev, Kiril"]
[Result "1-0"]
[ECO "C57"]
[WhiteElo "2567"]
[BlackElo "2685"]
[PlyCount "69"]
[EventDate "2010.09.21"]
[EventType "team-swiss"]
[EventRounds "11"]
[EventCountry "RUS"]
[Source "ChessBase"]
[SourceDate "2010.11.18"]
[WhiteTeam "Croatia"]
[BlackTeam "Bulgaria"]
[WhiteTeamCountry "CRO"]
[BlackTeamCountry "BUL"]
1. e4 e5 2. Nf3 Nc6 3. Bc4 Nf6 4. Ng5 d5 5. exd5 b5 {This game actually used
the 5...Nd4 move-order, but I have chosen 5...b5 in order to enable myself to
take a look at some of the sidelines following 5...b5. Readers can decide for
themselves which of the two move-orders gives White the more chances to go
wrong. If I had to make a recommendation, I would nudge readers in the
direction of 5...b5 in preference to 5...Nd4. In most of the sidelines Black
gets very good attacking chances along the a8-h1 diagonal.} (5... Nd4 6. c3 b5
7. Bf1) 6. Bf1 (6. Bxb5 Qxd5 {is quite a common alternative, but it scores
badly for White. Batsford Chess Openings 2 recommended giving the pawn back
on g2, but this is unconvincing:} 7. Nc3 (7. Bxc6+ Qxc6 {leaves Black with
excellent compensation for a pawn, and here is one line illustrating how White
can go wrong by being too greedy:} 8. O-O Bb7 9. Qf3 (9. Nf3 Bd6 10. d3 e4 {is
very reasonable for Black.}) 9... e4 10. Qb3 O-O-O 11. Qh3+ Kb8 12. Nxf7 (12.
Nc3 {is probably best.}) 12... Rd5 13. Nxh8 $2 (13. Re1) 13... Rh5 14. Qc3 (14.
Qe3 Bc5 15. Qe2 Qd6 $19) 14... Bc5 {with a winning attack for Black, Kotlar,A
(1926)-Veksler,A (2025) Essen 1999}) 7... Qxg2 8. Qf3 Qxf3 9. Nxf3 Bd7 10. d3 (
10. O-O Nd4 11. Bxd7+ Kxd7 12. Nxe5+ Ke6 13. Nc4 Nxc2 {is another plausible
line, which should be marginally better for Black.}) 10... Nd4 11. Bxd7+ Kxd7
12. Nxd4 exd4 13. Ne2 Re8 {and Black has slightly the better of the queenless
middlegame, Nezar,M (2398)-Fressinet,L (2670) Guingamp 2010}) (6. dxc6 bxc4 {
is also fine for Black, e.g.} 7. Qe2 Qd5 8. f4 Qxc6 {and if} 9. Qxe5+ Be7) (6.
Bb3 Nd4 {also doesn't work for White, e.g.} 7. c3 (7. d3 Nxb3 8. axb3 Qxd5 {is
at least equal for Black}) 7... Nxb3 8. Qxb3 Qxd5 (8... Nxd5 {fails to avoid a
queen trade anyway after} 9. Qxb5+) 9. Qxd5 Nxd5 {and Black has the advantage
due to the central space and better development.}) 6... Nd4 (6... h6 {is an
interesting, though probably insufficient, alternative.} 7. Nxf7 Kxf7 8. dxc6
Bc5 9. Be2 Bxf2+ {A tricky but unsound piece sacrifice.} (9... Qd5 10. O-O Qxc6
11. Nc3 {and Black has some, but probably insufficient, compensation for the
pawn.}) 10. Kxf2 Ne4+ 11. Kf1 Rf8 12. d3 Qd4 13. Qe1 Kg8+ 14. Bf3 Ng5 15. Bxg5
hxg5 16. Ke2 {and Black doesn't have enough for the piece, Vallejo Pons,F
(2660)-Naiditsch,A (2639) Heraklio 2007}) 7. c3 Nxd5 {This leads to the same
position as in the previous game, but now White deviates with the most
critical try.} 8. cxd4 Qxg5 9. Bxb5+ Kd8 {Diagram [#] White is currently two
pawns ahead, but must deal with the threat to g2, and it will be impossible to
maintain one of the two extra pawns. However, in this line, it is difficult
for Black to prove full compensation for the other pawn.} 10. Qf3 (10. O-O exd4
{is less convincing for White: if} 11. Qf3 Rb8) 10... Bb7 (10... exd4 {should
be met by} 11. Bc6 (11. O-O Rb8 {and if} 12. Bc6 Nb4) 11... Nf4 (11... Nb4 12.
Bxa8 Nc2+ 13. Kd1 Bg4 (13... Nxa1 14. d3 {and Black will struggle to maintain
the knight on a1.}) 14. Kxc2 Bxf3 15. Bxf3 {and White has too much material
for the queen (two rooks and a knight).}) 12. g3 (12. Bxa8 $6 Bg4) 12... Qc5
13. Nc3 {with a slight advantage for White, Sidenko,A (2257)-Johansson,K (2211)
Lechenicher SchachServer 2010}) 11. O-O exd4 (11... Rb8 {is more popular, but
only gives partial compensation for the pawn, e.g.} 12. dxe5 Ne3 (12... Nb4 13.
d4 Qg6 14. d5 $16) 13. Qh3 Qxg2+ 14. Qxg2 Nxg2 15. d4 {with advantage for
White. With the queens off the board, Black's attacking potential is limited.}
) 12. Re1 (12. d3 {is more popular and should also be better for White, e.g.}
Qe5 13. Na3 Bd6 14. g3 {and although Black has some attacking chances on the
kingside, White is better, Van der Houwen,P (2350)-Repp,H (2419) ICCF email
2003}) 12... Bd6 13. d3 Qf6 14. Qg4 {[%csl Rd7][%cal Rg4d7] Unusually for the
side with an extra pawn, it's White who dodges the possible exchange of queens.
The immediate threat is Qd7#, which limits Black's options.} (14. Qxf6+ $6 gxf6
$44 {leaves White prone to attacks down the g-file, while the black pieces are
still pointing at the white king.}) 14... Bc8 15. Qe4 c6 16. Bxc6 Bxh2+ 17.
Kxh2 Qxc6 18. Qxd4 {Diagram [#] White is clearly better in this position, as
Black's king is as exposed as White's.} Re8 19. Bg5+ f6 20. Nc3 Bb7 21. Bh4 Rc8
(21... Qd6+ 22. Bg3 {doesn't really help Black.} Qb4 {is then objectively best
but it forces Black to defend an ending a pawn down, e.g.} 23. Rxe8+ Kxe8 24.
Re1+ Kf7 25. Qxb4 Nxb4 26. Bd6) 22. Bg3 Re7 23. Ne4 Ba8 24. Nd6 Rcc7 25. f3 Qc5
26. Nf5 Red7 27. Qe4 Kc8 28. Rac1 Qb6 29. Bxc7 Rxc7 30. Ne7+ Nxe7 31. Qxa8+ Kd7
32. Rxe7+ Kxe7 33. Re1+ Kd6 34. Qf8+ Kd5 35. Qg8+ 1-0