Alekhine-Chatard Attack
The Alekhine-Chatard Attack is a white gambit against the French Defence. It runs 1.e4 e6 2.d4 d5 3.Nc3 Nf6 4.Bg5 Be7 5.e5 Nfd7 (all standard stuff so far) 6.h4!?.
Unlike many other gambits covered at this site, the Alekhine-Chatard Attack is quite often seen at grandmaster level and is widely considered fully sound. The gambit was used to good effect by Alexander Alekhine in the early 20th century, most notably against Fahrni, Mannheim 1914, when Black accepted the gambit and succumbed to a strong attack.
The idea is that if Black wins the g5-pawn, then it will open the h-file for White's rook at h1, and bring the black queen out to g5 (i.e. 6...Bxg5 7.hxg5 Qxg5), where it will prove vulnerable to attack from the white pieces. Black often refrains from taking twice on g5, but in those situations White generally continues to pursue the enemy king. The h-pawn can be advanced further, particularly if Black opts to castle to the kingside, and sometimes the g and f-pawns come forward in support. Thus, combative, knife-edge chess often results regardless of whether the gambit is accepted or declined.
The idea is that if Black wins the g5-pawn, then it will open the h-file for White's rook at h1, and bring the black queen out to g5 (i.e. 6...Bxg5 7.hxg5 Qxg5), where it will prove vulnerable to attack from the white pieces. Black often refrains from taking twice on g5, but in those situations White generally continues to pursue the enemy king. The h-pawn can be advanced further, particularly if Black opts to castle to the kingside, and sometimes the g and f-pawns come forward in support. Thus, combative, knife-edge chess often results regardless of whether the gambit is accepted or declined.
Black declines the gambit
Here I will look at the following lines:
A. 6...0-0
B. 6...c5
C. 6...a6
D. 6...h6
White should also be aware of 6...f6 and 6...Nc6, since both of those line offer Black a few tricks.
A. 6...0-0
B. 6...c5
C. 6...a6
D. 6...h6
White should also be aware of 6...f6 and 6...Nc6, since both of those line offer Black a few tricks.
Line A: 6...0-0
Since White's h2-h4 doesn't pose any immediate threats, Black has many possible ways to decline the gambit. The reply 6...f6 is somewhat weakening, but White needs to find the tactical cheapo with 7.Qh5+ g6 8.exf6! (the point being 8...Nxe5 9.fxe7) to get a significant advantage. Black can prepare it with 6...Nc6 covering e7, and if 7.Qg4?! then 7...f6 is very good for Black, but instead White can get a small advantage and long-term attacking chances with 7.Qd2 or 7.Nf3. The 6...Nc6 line is, however, quite solid for Black and unlikely to allow White to get a quick win.
The first of Black's important options is 6...0-0, which "castles into the attack" but it is not easy for White to blow Black off the board. White generally follows up with 7.Qg4 putting further pressure on the kingside and preparing queenside castling. White gets long-term attacking chances in this line, but having castled kingside, Black can set about developing compensatory queenside counterplay. In the following illustrative game White actually lost, but the notes show that White had a reasonable position in the early middlegame. This line is one of Black's better tries regarding attempting to level the chances.
The first of Black's important options is 6...0-0, which "castles into the attack" but it is not easy for White to blow Black off the board. White generally follows up with 7.Qg4 putting further pressure on the kingside and preparing queenside castling. White gets long-term attacking chances in this line, but having castled kingside, Black can set about developing compensatory queenside counterplay. In the following illustrative game White actually lost, but the notes show that White had a reasonable position in the early middlegame. This line is one of Black's better tries regarding attempting to level the chances.
[Event "Sigeman & Co 19th"]
[Site "Malmo"]
[Date "2011.06.13"]
[Round "5"]
[White "Hector, Jonny"]
[Black "So, Wesley"]
[Result "0-1"]
[ECO "C14"]
[WhiteElo "2588"]
[BlackElo "2667"]
[PlyCount "62"]
[EventDate "2011.06.09"]
[EventType "tourn"]
[EventRounds "5"]
[EventCountry "SWE"]
[EventCategory "15"]
[Source "ChessBase"]
[SourceDate "2011.07.15"]
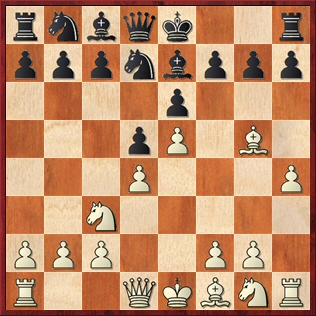
1. e4 e6 2. d4 d5 3. Nc3 Nf6 4. Bg5 Be7 5. e5 Nfd7 6. h4 O-O {Diagram [#]
Black declines the pawn sacrifice and castles, continuing development,
although White is well set-up to attack on the kingside.} (6... f6 {weakens
the black kingside. The move is alright if White takes on f6 immediately, but
White should instead throw in a disruptive queen check.} 7. Qh5+ g6 (7... Kf8
8. exf6 Nxf6 9. Qe2 {led to a quick win for White in Vitomskis,J (2595)
-Carleton,J (2465) ICCF corr 1996}) 8. exf6 {is probably the best response,
since} gxh5 (8... Nxf6 9. Qe2 {is also better for White and White went on to
win in Van der Weide,K (2469)-De Francesco,K (2345) Augsburg 2009}) 9. fxe7
Qxe7 10. Bxe7 Kxe7 {Diagram [#] remarkably results in level material, with
White enjoying some advantage thanks to the vulnerable black h-pawns.}) (6...
Nc6 {is quite sneaky because it covers the e7-square, which makes ...f7-f6
playable in most lines, since the response with Qh5+, ...g6, e5xf6 no longer
works for White. However, White should be able to get a small but persistent
advantage against it, with good long-term kingside attacking chances.} 7. Nf3 {
is probably the best move, developing and covering the d4-pawn and g5-bishop.}
(7. Qd2 {is also good, intending queenside castling, though it will often
transpose to 7.Nf3 lines.}) (7. Qg4 $6 f6 {, however, is quite good for Black.}
) 7... Nb6 (7... f6 8. exf6 Nxf6 {is consistent and not too bad for Black,
although White enjoys the better development and Black's e6-pawn is
potentially vulnerable.}) 8. Qd2 h6 9. Be3 (9. Bxe7 {is also better for White})
9... a5 {Black discourages White from castling queenside. White can still
chance it, but it is safest to play Bf1-d3 and then castle kingside instead.
However, one high-level game came to a somewhat disappointing end:} 10. a4 {
1/2-1/2 (10) Khalifman,A (2614)-Zvjaginsev,V (2678) St Petersburg 2012}) 7. Qg4
{The most aggressive response, also guarding the g5-bishop and preparing to
castle queenside.} f6 {An interesting reply, sacrificing the e6-pawn in order
to gain some time and development.} (7... f5 {is the most common reply. Black
of course hopes for White to take en passant on f6, when after ...Nd7xf6, the
white queen gets driven back.} 8. Qg3 c5 {and Black has reasonable queenside
counterplay. One high-level game continued:} 9. Bh6 Rf7 10. Nxd5 cxd4 11.
Nxe7+ Qxe7 12. O-O-O Nc6 13. Nf3 {with chances for both sides, although White
has the greater attacking threat, Barrientos Chavarriaga,S (2432)-Moskalenko,V
(2530) Badalona 2005}) 8. Nf3 $5 {Declining the e6-pawn and offering a piece
sacrifice on g5.} (8. Qxe6+ {is the obvious move, and I'd be amazed if many
club-level players were not to be tempted.} Kh8 9. exf6 Nxf6 10. Qe2 {was the
continuation of Beukema,S (2373)-Hovhanisian,M (2515) Brasschaat 2015, when
White won, but Black could improve with 10...Bb4 as played in two lower-level
games, both of which Black won. I quite like Black's compensation, in the
form of open lines and development, while White's attack has been stopped dead.
}) 8... Rf7 (8... fxg5 9. hxg5 {is dangerous for Black, but Black can survive
by sacrificing back an exchange:} Rxf3 10. gxf3 Nf8 11. f4 {The computer
prefers Black, but White has rook and pawn and attacking chances for a bishop
and knight, so I think Black was probably right not to take on g5.}) 9. exf6
Nxf6 10. Qg3 {Diagram [#] White has a fair amount of kingside pressure but
Black can look forward to reasonable counterattacking chances on the queenside.
In the long-term the e5-square will be a good outpost for a white knight.} Nc6
(10... c5 {may be a good alternative.}) 11. O-O-O Qf8 12. h5 Bb4 {Black wants
to chop off the c3-knight, forcing White to recapture with the b2-pawn and
thus exposing the white king.} 13. Bxf6 (13. Bd3 {was the right move-order.}
Bd6 (13... Bxc3 14. bxc3 Ne4 {looks quite scary for White at first sight, but
White gets the upper hand with} 15. Bxe4 dxe4 16. Nd2 {since} Qa3+ 17. Kb1 {
leaves Black without a follow-up.}) 14. Ne5 {intending to reinforce the
e5-knight with f2-f4, with advantage for White.}) 13... Rxf6 14. Bd3 {This
move involves a pawn sacrifice, though White can probably get enough attacking
chances to compensate for the pawn.} Bd6 {Black changes plans. The white
queen doesn't have a good escape square.} ({If} 14... Bxc3 15. bxc3 Qa3+ {
White could even consider} 16. Kd2) 15. Ne5 {Sacrificing a pawn, at either d4
or f2. Moving the queen would have been worse.} ({Not} 15. Qg5 $4 Bf4+) (15.
Qh4 $2 Rf4 16. Qg3 Re4) 15... Rxf2 (15... Nxd4 {is met by} 16. Bxh7+ Kxh7 17.
Rxd4 Rxf2 {and White's attacking chances are probably sufficient, although
White should avoid the immediate} 18. Qg6+ $6 Kg8 {when there is no decent
follow-up: if} 19. Ng4 e5) 16. Rdf1 Bxe5 17. dxe5 Rxf1+ 18. Rxf1 Qe7 {Diagram
[#]} 19. Bg6 {I'm not sure how to annotate this move! It is wonderfully
creative, but probably unsound. However, it would have been a good practical
try if White had followed it up correctly.} hxg6 20. hxg6 Nd4 21. Rf7 Qd8 22.
Qf4 $2 {Black can cut out the white attack after this move, leaving White a
piece down for not much.} (22. Qg4 {would have given White quite a strong
attack:} Nf5 23. Qh5 Nh6 24. g4) 22... Nf5 23. g4 Nh4 {Diagram [#]} 24. Rxg7+ {
Well, I applaud Hector's spirit, but it doesn't work for White.} Kxg7 25. Qf7+
Kh6 26. Qh7+ (26. g7 Bd7 {is a vital resource for Black.}) 26... Kg5 27. Qh5+
Kf4 28. Ne2+ {Black has a choice of winning moves here, but goes for the most
secure option. Black's king position is precarious, but White doesn't have
enough pieces left on the board to be able to deliver checkmate.} Ke3 {With
the idea ...Nh4-f3 shielding the black king.} 29. g5 Nf3 30. Kd1 Qxg5 31. Qh7
Kf2 {The black king attacks its white counterpart and now it's White who gets
mated.} 0-1
Line B- 6...c5
Another important option for Black at move six is 6...c5. This counterattacks immediately at White's centre, but I don't think that it equalises. White's only try for advantage against it is to exchange bishops with 7.Bxe7, and then if Black replies with 7...Qxe7, then 8.Nb5 is a problem, threatening to hop the knight into c7 or d6. Black normally sacrifices an exchange with 7...0-0 8.Nc7, but this probably does not provide enough compensation (though White does get put on the defensive). So Black often takes back with the king instead, but this leaves Black with long-term problems with king safety. Overall, I think this line must be slightly better for White, and it can lead to some quick victories if Black doesn't play accurately, but Black does get some counterplay.
[Event "Tromso ol (Women) 41st"]
[Site "Tromso"]
[Date "2014.08.08"]
[Round "6.1"]
[White "Hou, Yifan"]
[Black "Hoang, Thanh Trang"]
[Result "1-0"]
[ECO "C14"]
[WhiteElo "2661"]
[BlackElo "2485"]
[PlyCount "63"]
[EventDate "2014.08.02"]
[EventType "team-swiss"]
[EventRounds "11"]
[EventCountry "NOR"]
[Source "ChessBase"]
[SourceDate "2014.09.17"]
[WhiteTeam "China (W)"]
[BlackTeam "Hungary (W)"]
[WhiteTeamCountry "CHN"]
[BlackTeamCountry "HUN"]
1. e4 e6 2. d4 d5 3. Nc3 Nf6 4. Bg5 Be7 5. e5 Nfd7 6. h4 c5 {Diagram [#] Black
counterattacks against d4. The downside of this move is that it weakens the
d6-square.} 7. Bxe7 {White's best way to take advantage of Black's sixth move.
Otherwise Black gets a very comfortable game with queenside counterplay.} Kxe7
{Black forgoes castling rights. The move looks surprising, but to see why
Black took with the king, it is worth taking a look at the alternative
recapture.} (7... Qxe7 8. Nb5 {is the main idea for White. The knight
threatens to hop into either c7 or d6. In this line Black often sacrifices
the exchange, with} O-O (8... Kd8 9. f4 {is very pleasant for White.}) 9. Nc7 (
9. Nd6 $2 cxd4 {is bad for White, since White is set to lose the e5-pawn, and
will then be forced to move the knight on d6.}) 9... cxd4 10. Nxa8 {Diagram [#]
Here Black can take on e5, but Black scores better in practice by challenging
the e5-pawn with ...f7-f6.} f6 (10... Nxe5 11. Qxd4 Nbc6 12. Qd2 {Black has
compensation for the exchange (since the knight on a8 will not escape) but
White has a solid position and scores highly in over-the-board play.}) 11. Qxd4
fxe5 12. Qc3 {(probably superior to the more popular 12.Qd2, since it
threatens to bring the a8-knight out via c7 and so restricts Black's options)}
Nc6 13. Nf3 Nf6 14. O-O-O {and Black has some, but probably not enough,
compensation. Fressinet,L (2640)-Larino Nieto,D (2307) Sanxenxo 2004}) 8. Nf3
(8. Qd2 {is a good alternative, preparing queenside castling immediately.} Nc6
9. dxc5 {is the independent option, opening up the centre. Black should take
on e5:} Ndxe5 (9... Nxc5 10. O-O-O {is very powerful:} Qa5 (10... Nxe5 $6 11.
Qe3 {with an overwhelming attack following f2-f4 and Nc3xd5+}) 11. Rh3 h6 12.
Nge2 {with advantage for White, Kosteniuk,A (2457)-Danielian,E (2484) Kazan
2012}) 10. O-O-O Qa5 (10... Re8 11. Nf3 Nxf3 12. gxf3 {and White has excellent
attacking chances, Hunt,A (2461)-Schaefer,M (2411) Bratto 2007}) 11. f4 Nd7 {
and I think Black has decent counterattacking chances. In the game Gusain,H
(2271)-Kamble,V (2455) Tirupati 2012, 12.Bb5 should have been preferred.}) 8...
Qb6 9. Qd2 Nc6 (9... cxd4 {is probably better, but I only found one high-level
game with it.} 10. Nxd4 Nc6 11. Qg5+ Kf8 12. Nxc6 bxc6 13. O-O-O {was the
continuation of Fajs,B (2441)-De Vassal,T (2341) FICGS email 2011. I prefer
White since the h8-rook is hemmed in and the king on f8 is insecure, but Black
has reasonable counterattacking chances on the queenside.}) 10. O-O-O cxd4 11.
Nb5 h6 (11... f6 12. exf6+ Nxf6 13. Qg5 {is not great for Black but may have
been a lesser evil.}) 12. Qf4 a6 (12... f6 {may again be Black's best bet.})
13. Nbxd4 Nc5 14. g4 Ne4 15. Qe3 {Black is in some trouble here. The
immediate threat is the discovered attack on the black queen with Nd4-f5+.} Qa5
16. a3 Bd7 17. Bd3 Nc5 18. g5 {White wants to penetrate into the black
kingside and open up the g-file for a white rook.} Nxd4 19. Nxd4 hxg5 20. Qxg5+
Kf8 21. Rhg1 Nxd3+ 22. Rxd3 Rh7 23. Rf3 Ke8 24. Qf4 g6 25. h5 Qc5 26. hxg6 fxg6
27. Rxg6 Bc8 28. Rg8+ Kd7 29. Nxe6 Qa5 30. b4 Rh1+ 31. Kb2 Qb6 32. Qf7+ 1-0
Line C- 6...a6
Black covers the b5-square and prepares to play ...c7-c5 without allowing White to get in Nc3-b5 in response. However, I don't trust this line for Black. White plays 7.Qg4 and Black does not have a particularly ideal way of defending the kingside (the immediate threat is to play Bxe7 followed by Qxg7). Black mainly tries 7...Bxg5, which allows White to get a half-open h-file for the king's rook without having to sacrifice a pawn, or 7...h5 followed by 8...g6, which prevents any immediate attacks but is rather weakening. Moving the f-pawn (7...f6 or 7...f5) is somewhat dubious. White can look forward to good long-term attacking chances and some advantage if facing this line, although there is no immediate kill if Black plays accurately, and Black's positions are just about playable.
[Event "Cappelle op 24th"]
[Site "Cappelle la Grande"]
[Date "2008.02.17"]
[Round "2"]
[White "Vovk, Yuri"]
[Black "Naumkin, Igor"]
[Result "1-0"]
[ECO "C14"]
[WhiteElo "2561"]
[BlackElo "2475"]
[PlyCount "59"]
[EventDate "2008.02.16"]
[EventType "swiss"]
[EventRounds "9"]
[EventCountry "FRA"]
[Source "ChessBase"]
[SourceDate "2008.03.04"]
1. e4 e6 2. d4 d5 3. Nc3 Nf6 4. Bg5 Be7 5. e5 Nfd7 6. h4 a6 {Diagram [#] The
most popular response for Black (slightly ahead of grabbing the pawn by taking
twice on g5). Black aims to get in ...c7-c5 without having to worry about
Nc3-b5, while avoiding the weakening ...h7-h6.} 7. Qg4 {Usually played, and
White's best try for advantage. White presses forward on the kingside.} (7.
Bxe7 Qxe7 8. Qg4 f5 {is an inferior version of the main line for White- the
removal of the dark-squared bishops favours Black, having freed Black's
position. If} 9. Qh5+ g6 10. Qh6 c5 {and White's queen isn't going to cause
any major disruption to Black.}) (7. f4 c5 (7... h6 8. Bxe7 Qxe7 9. Qg4 {
and the insertion of f2-f4 and ...h7-h6 is to White's advantage, relative to
the aforementioned line ending with 8.Qg4 f5}) 8. Nf3 {is a decent alternative,
although it puts less immediate pressure on Black.} Nc6 9. Qd2 {Diagram [#]
and chances are equal, Nikula,R (2277)-Heimsoth,H (2220) Germany 2005}) 7...
Bxg5 {The problem with this line is that it allows White to open up the h-file
without sacrificing a pawn, but it is not clear if Black has anything better.}
(7... f5 {is met by the tactical trick} 8. Qh5+ g6 9. Qh6 {I would be worried
about Black trapping the queen with ...Be7-f8, but Black cannot get that move
in without exposing the black queen on d8 to attack.} Bxg5 (9... c5 {threatens
...Qc7 and ...Bf8, but} 10. Qg7 {forces} Rf8) 10. hxg5 {Diagram [#] and I much
prefer White's position, which has scored very well in high-level games.}) (
7... h5 8. Qg3 g6 {is the main alternative, closing off the black kingside.} 9.
Nf3 c5 10. dxc5 Nc6 11. O-O-O Nxc5 {Diagram [#] is a typical continuation.
This line may well be Black's best chance, but White has the more active
pieces and has scored well from this position, Bernasek,J (2490)-Cvek,R (2488)
Slovakia 2011}) 8. hxg5 c5 9. dxc5 (9. g6 {is the most popular and aggressive
continuation.} f5 (9... fxg6 $2 10. Qxe6+ {followed by taking the pawn on d5.})
10. Qf4 h6 11. Nf3 O-O {Diagram [#] is not too bad for Black, since Black has
a sort of blockade on the kingside but must be wary of Rxh6 sacrifices. Note
that the immediate} 12. Rxh6 $6 (12. O-O-O {is sensible and should be slightly
better for White, e.g.} Nc6 13. Ne2 Qe8 14. Qg3 {Khachiyan,M (2470)-Higa,R
(2035) Burbank 2006} (14. dxc5)) 12... gxh6 13. Qxh6 Qe7 14. g7 Qxg7 15. Qxe6+
{is quite dangerous for Black, but should not offer sufficient compensation if
Black defends accurately.}) 9... Nxe5 10. Qg3 Nbc6 11. O-O-O Qa5 12. f4 {
Diagram [#] This position has been seen in a fair number of high-level games.}
Nd7 (12... Ng6 {is risky for Black:} 13. f5 Nge7 14. f6 {and Black has to play
accurately from here to survive.}) 13. g6 Nf6 ({The apparently-untested} 13...
h6 {is probably Black's only way to make the position playable:} 14. gxf7+ Kxf7
15. Be2 Qxc5 {with the idea of playing ...Rd8 and ...Kg8, although White still
has some advantage.}) (13... fxg6 14. Rxh7 Rxh7 15. Qxg6+ {followed by picking
up the rook on h7 must be better for White, although Black can complicate
matters a little with} Kd8 16. Qxh7 d4 {when White needs to find} 17. Nb1 {
in order to keep a large advantage.}) 14. gxf7+ ({Or} 14. gxh7 $16 {when Black
will again find it difficult to defend the weakened kingside, Deschamp,G (2319)
-Kresz,L (2154) Chessfriend.com 2003}) 14... Kxf7 15. Nf3 Qxc5 16. Ne5+ Kg8 17.
Bd3 {Diagram [#]} Ne7 $2 (17... h5 {was a better defence although I don't like
Black's position after} 18. Bg6) 18. Rh6 Kf8 (18... Ng6 {is best met by the
sacrificial line} 19. Bxg6 $1 gxh6 (19... hxg6 20. Rxh8+ Kxh8 {and now
checking at h1 or h4 is completely winning, but even stronger is the attractive
} 21. Ne4) 20. Bxh7+ (20. Bf7+ Kf8 21. Qh4 {is also winning for White.}) 20...
Kf8 (20... Kxh7 $4 21. Qg6#) 21. Qg6 $18) 19. Qg5 Nfg8 20. Rxh7 ({Also winning
is} 20. Ng6+ {, for example,} Nxg6 21. Qd8+ Kf7 22. Bxg6+ hxg6 23. Rxh8 {
However, after} Qf8 {there is no chance of a quick kill; White is just an
exchange ahead.}) 20... Rxh7 21. Bxh7 Nf6 22. Bd3 b5 (22... Qe3+ 23. Kb1 Nc6 {
may be a slight improvement but White should still be winning in this position.
}) 23. Rh1 Ra7 24. Rh8+ Neg8 25. Bh7 Qe3+ 26. Kd1 Qb6 27. Bxg8 Nxg8 28. Ne2 d4
29. Qg6 d3 30. cxd3 1-0
Line D- 6...h6
Like 6...0-0, this line is not a certain "equaliser" for Black, but gives Black good chances of equalising, usually in a double-edged position where both sides have attacking chances. Black kicks away the g5-bishop. White can either retreat it to e3, or exchange bishops on e7, and I am not sure which is better. In both cases, White usually castles queenside and Black's king ends up in the centre or on the kingside, with Black getting counterplay by advancing the queenside pawns. Black usually plays ...c7-c5 at some stage, challenging the d4-pawn, and White chooses between letting Black exchange pawns on d4 and holding onto the strong-point on e5, or letting the e5-pawn drop with d4xc5, ceding some central control to Black in return for increased piece activity.
[Event "Asia Chess Cup"]
[Site "Tabriz"]
[Date "2014.05.24"]
[Round "4.4"]
[White "Yu, Yangyi"]
[Black "Nguyen, Ngoc Truong Son"]
[Result "1/2-1/2"]
[ECO "C14"]
[WhiteElo "2675"]
[BlackElo "2621"]
[PlyCount "84"]
[EventDate "2014.05.22"]
[EventType "team-tourn"]
[EventRounds "9"]
[EventCountry "IRI"]
[Source "ChessBase"]
[SourceDate "2014.07.01"]
[WhiteTeam "China"]
[BlackTeam "Vietnam"]
[WhiteTeamCountry "CHN"]
[BlackTeamCountry "VIE"]
1. e4 e6 2. d4 d5 3. Nc3 Nf6 4. Bg5 Be7 5. e5 Nfd7 6. h4 h6 {Diagram [#] Black
is not interested in grabbing White's h-pawn and simply attacks the white
bishop.} 7. Bxe7 {White avoids the loss of time, but this exchange of bishops
probably doesn't promise more than equality, albeit usually in a double-edged
position.} (7. Be3 {is the main alternative, keeping bishops on the board.
John Watson considers this response preferable to 7.Bxe7 (as of December 2015).
He is probably right.} c5 {is usually played in response, counterattacking
against d4.} 8. Qg4 {Diagram [#] Putting the c3-knight on b5 makes little
sense here because Black's bishop on e7 guards the d6-square and so Black can
safely castle out of trouble. Instead, White puts pressure on the black
kingside and threatens to take on g7, a common motif in the 3.Nc3 lines of the
French Defence.} g6 {This weakens the black kingside but ensures that Black
retains the right to castle. It scores well for Black in the database, but it
is debatable whether it is better than moving the king to f8.} (8... Kf8 {
leads to similar positions to the line 6...c5 7.Bxe7 Kxe7.} 9. f4 {is the most
common response.} (9. Nf3 {is the main alternative, but most likely inferior.
Black has a fairly forcing response based on the vulnerability of the e5-pawn
once its defender on d4 has been eliminated:} Nc6 10. O-O-O cxd4 11. Bxd4 Nxd4
12. Qxd4 {with some initiative for White but Black has the bishop-pair and
White's e5-pawn is a long-term vulnerability, Penkin,V (2264)-Savoca,A (2394)
ICCF email 2011}) 9... cxd4 10. Bxd4 Nc6 11. Nf3 {and now if ...Nc6xd4 then
Nf3xd4 is possible since the white e5-pawn is protected, though White cannot
claim much advantage, Mazur,S (2426)-Repka,C (2379) Prievidza 2014}) 9. dxc5 {
is then an interesting response.} ({Or} 9. f4 cxd4 10. Bxd4 h5) (9. h5 g5 10.
f4 cxd4 11. Bxd4 Nc6 12. Nf3 {Diagram [#] with equal chances, although White's
kingside build-up has to be dealt with carefully, Hunt,A (2428)-Gleizerov,E
(2552) Bratto 2014}) 9... Nxe5 10. Qg3 Nbc6 11. Bb5 (11. O-O-O {is a good
alternative}) 11... Bd7 (11... Nd7 {is probably an improvement for Black}) 12.
Bf4 Bf6 13. Nge2 a6 14. Bxc6 Nxc6 15. Bc7 {and White had the upper hand,
though went on to lose in the game Kosteniuk,A (2489)-Hoang,T (2467) Belgrade
2013}) 7... Qxe7 8. Qd2 {White prepares queenside castling. This is not the
most aggressive square for the queen, but has its plus points, since putting
the queen on g4 makes it harder to engineer an advance of the white g-pawn. I
suspect, though, that the more popular 8.Qg4 offers White better long-term
chances.} ({If} 8. Nb5 Nb6 {and Black's c7-pawn stops the white knight from
hopping into d6. Black will follow up with ...a7-a6 and gain some time.}) (8.
Qg4 {is more common, whereupon Black's best is to counter-intuitively "castle
into the attack".} O-O (8... g6 9. h5 g5 10. O-O-O {followed by f2-f4
undermining Black's kingside blockade is very strong here.}) 9. f4 c5 10. Nf3
Nc6 11. O-O-O {Diagram [#] is the usual continuation, whereupon both sides
have decent attacking chances, and White may have a very small edge, Amonatov,
F (2592)-Levin,E (2508) St Petersburg 2015}) 8... a6 {Black wants to play ...
c7-c5 without White being able to get in Nc3-b5 and hop the knight into d6.} (
8... O-O {is, however, fully playable, since the threat of Nc3-b5-d6 is less
potent when the knight coming into d6 doesn't give check.} 9. f4 c5 10. Nf3 (
10. Nb5 $6 a6 11. Nd6 cxd4 {followed by ...f7-f6, despite looking strong for
White at first sight, is actually better for Black. White won't be able to
keep the knight on d6 for much longer.}) 10... Nc6 11. O-O-O cxd4 12. Nxd4 {
Diagram [#] led to the usual situation of mutual attacking chances and a
slight edge for White, Ma,Q (2613)-Zvjaginsev,V (2649) China 2014}) 9. f4 {
As in the 7.Be3 lines, it is advisable to push the f-pawn before bringing the
g1-knight out to f3, to help with the defence of the e5-pawn for when Black
undermines White's centre with ...c7-c5.} c5 10. Nf3 b5 {Not often played, but
interesting. Black starts up a queenside pawn roller, noting that White is
set up to castle queenside, as the kingside is rather draughty with the h and
f-pawns having both advanced.} (10... Nc6 {is usually played, whereupon White
has a wide range of possible options.} 11. O-O-O b5 12. g4 b4 (12... Nb6 {
is a decent alternative.}) 13. Na4 {looks quite scary but Black's queenside
build-up is rather slow. The "knight on the rim" could become quite powerful
on c5 or b6. However, White again probably has just a slight edge. Novikov,S
(2550)-Stella,A (2427) Budapest 2015}) 11. Ne2 {White has more
aggressive-looking options such as castling and playing g2-g4, but those will
tend to transpose to the game, since the c3-knight will be kicked back to e2
with ...b5-b4.} Nc6 {Diagram [#]} 12. dxc5 {This makes sense, since the
e5-pawn is guarded by the pawn on f4, and Black is threatening to play ...
c5-c4 at some point. However, it doesn't appear to be forced.} (12. O-O-O {
is a reasonable alternative, though following} b4 13. g4 a5 {White should take
on c5, since} 14. Kb1 a4 {is starting to get very dangerous for White.}) 12...
Nxc5 13. O-O-O b4 14. Ned4 Bd7 15. Nxc6 Bxc6 16. Nd4 Bd7 17. Kb1 a5 18. g4 {
Diagram [#] An attacking race is developing, which is typical of this whole
variation.} O-O {Black appears to be "castling into the attack", but Black
argues that connecting the rooks and the ability to place the rooks on b8 and
c8 is of greater significance than the potentially vulnerable black king.} 19.
Bd3 (19. Bg2 {is the main alternative. From g2 the white bishop cannot be
exchanged off, but it could get in the way if White wishes to bring rooks to
the f and g-files.}) 19... Rab8 {Probably not the best reply.} (19... Nxd3 20.
Qxd3 {is a very tempting alternative for Black, gaining the bishop-pair.
However, Black ends up exchanging off quite an important attacking piece. It
seems that Black can keep the chances level with} a4 21. g5 h5) 20. Qe3 {
White opens up a path for the white rook on d1 to recapture if Black plays ...
Nc5xd3.} (20. Qe2 {may be a slight improvement.}) 20... b3 {An interesting
pawn sacrifice which aims to speed up the black queenside initiative.} (20...
a4 21. f5 {favours White.}) (20... Nxd3 21. Rxd3 {leaves Black with nothing
better than} a4 22. f5) 21. Nxb3 Nxb3 22. cxb3 a4 {Diagram [#]} 23. f5 {
White pushes further on the kingside.} (23. Bc2 axb3 24. Bxb3 {is White's most
secure continuation, though it may not be better than what was played in the
game.}) 23... axb3 24. a3 Rfc8 {Diagram [#]} 25. Rc1 {After taking the
aggressive route a few moves ago, White takes time out for defence, and ends
up losing an important kingside pawn, although White's compensation is
probably sufficient to draw.} ({It's true that Black can engineer a queen
exchange with} 25. g5 h5 26. f6 Qc5 {(in fact, this is the only way for Black
to stay alive in this position)} 27. Qxc5 (27. Qf3 g6) 27... Rxc5 28. Rc1 Rxc1+
29. Kxc1 g6 {but White is better in the resulting endgame. The passed a-pawn
will be more of a problem for Black than the black d-pawn will be for White.})
25... Rxc1+ 26. Rxc1 Qxh4 27. Qa7 Rc8 (27... Rd8 {is probably a better winning
attempt, e.g.} 28. Qb6 exf5 29. gxf5 Re8 30. Qxb3 Rxe5 {but White has the
greater piece activity.}) 28. Rxc8+ Bxc8 29. Ka1 Qxg4 30. Qb6 Qg5 {Black is
prepared to let White have the c8-bishop in return for pushing the h-pawn
further forward, threatening to promote at h1.} 31. f6 gxf6 32. Qd8+ Kg7 33.
exf6+ Qxf6 34. Qxc8 h5 35. a4 h4 36. Qc3 e5 ({I imagine that many club-level
players would be tempted by the queen exchange on c3.} 36... Qxc3 $2 37. bxc3
h3 {leads to a winning endgame for White as long as White finds the "only move"
} 38. Bf1 $1 {with the idea} h2 39. Bg2 {and White can stop all of the black
pawns with a little care:} e5 40. Kb2 e4 41. Kxb3 f5 42. Kc2 ({Not} 42. c4 $4
f4) 42... f4 43. Kd2 f3 44. Bh1 f2 45. Ke2 $18 {since the a4-pawn now races
forward.}) 37. Qxb3 e4 38. Bc2 Qd4 39. Qh3 Qf2 40. Bb3 Qg3 41. Qf5 {White now
gives the piece back in order to get a perpetual check.} Qxb3 42. Qg5+ Kf8
1/2-1/2
Black accepts the gambit
Black can win White's h-pawn with 6...Bxg5 7.hxg5 Qxg5, but this brings Black's queen out into the open and opens up the h-file for White's rook. Black can probably equalise the chances with accurate play, but even here, that is not totally clear, since White has a few good ways to set about generating compensation for the pawn.
I look at
E1. 8.Nh3 (with some notes on the unusual 8.Nb5!?) and
E2. 8.Qd3.
I look at
E1. 8.Nh3 (with some notes on the unusual 8.Nb5!?) and
E2. 8.Qd3.
Line E1- 8.Nh3, the old main line
. The original approach was 8.Nh3 attacking the black queen, followed by 9.Nf4, envisaging sacrifices on d5, as famously played by Alekhine against Fahrni, Mannheim 1914. However, I don't trust it, because Black appears to have a solid response with ...g6, ...Nd7-b6, ...Bd7 and ...0-0-0, where I am not convinced that White has enough for the pawn. Even the main lines with White getting in the Nxd5 sacrifice can often lead to level endgames (though at club level both sides may go wrong, of course).
Therefore, I suggest that White takes a closer look at 9.Qg4 intending Nf3-g5, which seems to give White better long-term attacking chances. Another interesting alternative is the rare 8.Nb5, targeting Black's weak point at c7- this move has come to the attention of French Defence expert John Watson. The knight move is justified because it forces Black to play an undesirable move, ...Qg5-d8 or ...Nb8-a6, before setting about kicking the knight away from b5, and stops ...c7-c5 because of Nb5-d6+. White again follows up with Qg4.
Therefore, I suggest that White takes a closer look at 9.Qg4 intending Nf3-g5, which seems to give White better long-term attacking chances. Another interesting alternative is the rare 8.Nb5, targeting Black's weak point at c7- this move has come to the attention of French Defence expert John Watson. The knight move is justified because it forces Black to play an undesirable move, ...Qg5-d8 or ...Nb8-a6, before setting about kicking the knight away from b5, and stops ...c7-c5 because of Nb5-d6+. White again follows up with Qg4.
[Event "USA-ch"]
[Site "Stillwater"]
[Date "2007.05.16"]
[Round "2"]
[White "Khachiyan, Melikset"]
[Black "Akobian, Varuzhan"]
[Result "1/2-1/2"]
[ECO "C14"]
[WhiteElo "2475"]
[BlackElo "2574"]
[PlyCount "61"]
[EventDate "2007.05.15"]
[EventType "swiss"]
[EventRounds "9"]
[EventCountry "USA"]
[Source "ChessBase"]
[SourceDate "2007.05.31"]
1. e4 e6 2. d4 d5 3. Nc3 Nf6 4. Bg5 Be7 5. e5 Nfd7 6. h4 Bxg5 {Black accepts
the gambit pawn.} 7. hxg5 Qxg5 {Diagram [#] White has succeeded in opening the
h-file and bringing the black queen out into the open, but Black now has an
extra pawn. White now has two main options.} 8. Nh3 {This is the old main
line, played successfully by Alexander Alekhine. White attacks the black
queen. Alekhine followed up by bringing the knight to f4, but I suspect that
if Black defends accurately (a big "if" at club level of course) White's
compensation is not quite enough, so White should consider following up with
Qd1-g4 and then Nf3-g5. Of course playing 8.Nf3 makes little sense as it
blocks the white queen's path to g4 and h5.} (8. Nb5 {is rarely mentioned
(though it has been briefly discussed at the Chesspublishing.com forum and by
John Watson). It appears to be a good alternative.} Qd8 {is usually played,
covering c7 and getting the queen out of the way of any potential attacks.} (
8... Na6 {is also worth considering with the idea of bringing the black queen
back to e7, but I think White gets the upper hand:} 9. Nh3 Qe7 10. Qg4 f5 11.
Qg3 Nf8 12. O-O-O $44 {was very promising for White, Vouldis,A (2515)-Luther,T
(2551) Fuerth 2002}) 9. Qg4 {then puts pressure on the black kingside, forcing
Black into taking one of three evils: move the king, castle into the attack,
or play the potentially weakening ...g7-g6.} g6 {is logical becuase White no
longer has a dark-squared bishop to pressure the kingside dark squares with.} (
9... Kf8 {deserves attention according to John Watson. White has lost the two
fairly low-level games with it that I can find in the database, but White
seems to have reasonable compensation for the pawn, e.g.} 10. f4 h6 11. Nf3 a6
12. Nc3 c5 {and instead of the inferior 13.dxc5 played in the game, White can
simply respond with} 13. O-O-O $44) 10. Nf3 a6 11. Nc3 c5 12. O-O-O {Diagram
[#]} Nc6 (12... cxd4 13. Qxd4 Nc6 {may be a slight improvement for Black.} 14.
Qf4 $44 {is still quite promising for White though.}) 13. dxc5 Nxc5 14. Qf4 $44
{gives White excellent compensation for the pawn due to the long-term
attacking threats against the deserted black kingside, Velimirovic,D (2472)
-Stamenkovic,Z (2421) Serbia 2005}) 8... Qe7 (8... Qh6 {is a rarely-seen
alternative which prevents Nh3-f4 but potentially leaves the black queen short
of squares. It doesn't score very well for Black in the database.} 9. Nb5 Na6
10. g3 {makes a lot of sense, threatening to bring the knight to f4. White
has reasonable compensation.} f6 11. exf6 {(this continuation appears to be
untested)} Nxf6 12. Bg2) 9. Nf4 (9. Qg4 {is probably best, with the idea of
playing Nh3-g5 rather than Nh3-f4.} g6 (9... f5 {is the main independent
continuation, when} 10. Qh5+ g6 11. Qh6 {is quite strong: if} Qf8 12. Qh4) 10.
Ng5 (10. Nf4 Nc6 11. O-O-O h5 {scores well for Black; Black will follow up
with ...Nb6, ...Bd7 and ...0-0-0 with a solid position}) (10. O-O-O Nc6 {
tends to transpose after} 11. Ng5) 10... h5 11. Qf4 Nc6 12. O-O-O {and Black
is quite solid but has to be careful of possible sacrifices on d5. White has
decent compensation due to the superior activity. Sychev,K (2362)-Obolenskikh,
D (2510) Moscow 2012}) 9... Nc6 {This is probably best, counterattacking
against the d4-pawn, so that if White plays Qd1-g4 then the d4-pawn is
unprotected.} (9... Nf8 $2 {is passive and led to a quick loss in the
following "stem game":} 10. Qg4 f5 11. exf6 gxf6 12. O-O-O c6 13. Re1 Kd8 14.
Rh6 e5 15. Qh4 Nbd7 16. Bd3 e4 17. Qg3 Qf7 18. Bxe4 dxe4 19. Nxe4 Rg8 (19...
Qg8 20. Qe3 $16) 20. Qa3 Qg7 21. Nd6 Nb6 22. Ne8 Qf7 23. Qd6+ Qd7 24. Qxf6+ {
1-0 (24) Alekhine,A-Fahrni,H Mannheim 1914}) (9... a6 {prevents Nc3-b5. White
continues} 10. Qg4 g6 11. Qg3 {Diagram [#] (to help take the sting out of ...
c7-c5, which can now be met by a very strong knight sacrifice on d5)} Nc6 (
11... c5 $6 12. Ncxd5 exd5 (12... Qd8 13. dxc5 exd5 14. Nxd5 {is a slight
improvement for Black, since the c5-pawn drops, but White's initiative is
still extremely dangerous}) 13. Nxd5 Qd8 14. O-O-O $16 {Despite temporarily
being a piece down, White has the upper hand since e5-e6 is coming, with the
idea of Nc7+}) 12. O-O-O {with reasonable compensation for the pawn, though
Black is quite solid.}) (9... g6 {discourages Qd1-g4.} 10. Bd3 {is probably
the best reaction, threatening sacrifices on g6.} (10. Qg4 Nc6 11. O-O-O h5 {
is probably better for Black, with the ...Nb6, ...Bd7 and ...0-0-0 plan}) (10.
Qd2 {may be a reasonable option though.}) 10... Nc6 (10... Nf8 11. Ncxd5 $1)
11. Bxg6 fxg6 12. Nxg6 hxg6 13. Rxh8+ Nf8 {Diagram [#] is not disastrous for
Black, with two pieces for rook and pawn, but White retains the better-placed
pieces.}) 10. Qg4 (10. Qd2 {scores fairly badly for White.} g6 11. O-O-O Nb6
$15 {followed by ...Bd7 and ...0-0-0 and Black can start to think about
consolidating the extra pawn.}) 10... Nxd4 {This is tempting, and leads to
considerable complications.} (10... g6 {is probably the main problem,
transposing into a line that has come up twice already. Black plays ...Nb6, ..
.Bd7 and ...0-0-0 and gets a very solid position.}) 11. O-O-O (11. Qxg7 Qf8 12.
Qxf8+ Kxf8 {leaves White having to fight for equality, though with best play
starting with} 13. O-O-O {it may be possible to win the pawn back.}) 11... Nf5
{Diagram [#] Black's best way to prepare for the upcoming piece sacrifice on
d5.} 12. Nfxd5 {Otherwise White ends up with insufficient compensation for two
pawns. White can take with the other knight, but it merely transposes to the
game.} exd5 13. Nxd5 {Persisting in sacrificing a piece for compensation.} (13.
Qxf5 Nxe5 {is not convincing for White, who must deal with the attack on the
white queen.} 14. Rxh7 (14. Qf4 c6 {leaves White with little to show for the
pawn.}) 14... Bxf5 15. Rxh8+ Qf8 $1 (15... Kd7 16. Rxd5+ {followed by Rxa8 and
the two rooks are stronger than the queen}) 16. Rxf8+ Kxf8 17. Rxd5 f6 {
with a very level ending.}) 13... Qxe5 (13... Nxe5 {is inferior because of} 14.
Qa4+ (14. Qe4 Qd6 15. f4 {is a good alternative, if White would rather avoid
an ending. Black cannot hold onto the extra piece.}) 14... Bd7 {(necessary,
since the black queen is still attacked)} 15. Bb5 Bxb5 16. Qxb5+ c6 17. Nxe7
cxb5 18. Nxf5 {Diagram [#] and White is set to regain the sacrificed pawn,
with superior chances in the endgame}) 14. Bb5 {Otherwise Black unravels with .
..Nd7-f6.} O-O {There is no good alternative since White threatens Rh1-e1
pinning the black queen to the king.} 15. Qh5 ({More often played is} 15. Bxd7
Bxd7 {and only then threatening mate with} 16. Qh5 {Then} f6 {is then Black's
only way to make matters tricky for White. The very tempting and obvious} 17.
Qxh7+ (17. Rhe1 Ng3 18. Qxe5 fxe5 19. fxg3 {regains the pawn but this ending
is at best equal for White, and probably less, due to the doubled g-pawns.})
17... Kf7 18. Qh5+ g6 19. Qh7+ Ng7 {leads nowhere for White.}) 15... h6 (15...
Nh6 {looks tempting but White gets the upper hand with} 16. Bxd7 {removing the
defender of the black queen, and} Qxh5 17. Ne7+ Kh8 18. Rxh5 Bxd7 19. Rxd7 {
leaves White better despite the temporary pawn minus. White has a very
powerful rook on the seventh rank.}) 16. Rhe1 Qxd5 $5 {This involves a
tactical trick which allows Black to pick up rook, minor piece and pawn for
the queen.} (16... Nf6 17. Rxe5 Nxh5 18. Nxc7 {is another equal endgame.}) 17.
Rxd5 Nf6 {This is the point, the queen and rook are forked.} 18. Qf3 Nxd5 19.
g4 Nfe7 20. c4 Nb6 21. Rxe7 {I think at club level there will be plenty of
scope for further play in this position, but this game soon petered out into a
draw.} c6 22. c5 cxb5 23. cxb6 axb6 24. Qe2 Be6 25. b3 Ra5 26. f4 Rfa8 27. f5
Rxa2 28. Qxb5 R2a5 29. Qxb6 Bd5 30. Rd7 R5a6 31. Qe3 {White could still press
in this position at mortal levels but at grandmaster level White won't be able
to make progress here.} 1/2-1/2
Line E2- 8.Qd3, the "modern" way to play the gambit
White immediately attacks Black's h7-pawn. This move generally aims for longer-term positional compensation rather than an immediate attack, and offering to trade queens with 8...Qg6 doesn't appear to help Black; both 8.Qxg6 and 8.Qd2 give White enough compensation. Thus Black usually parries the threat to the h7-pawn with 8...h6 or 8...g6. After 8...h6 White should play 9.Nh3 intending Nf4 or f4, since meeting this with ...g7-g6 would now weaken the kingside considerably. After 8...g6, the same plan is again playable, but White can also consider 9.Nf3 preventing the sneaky retreat 9...Qh6 which makes queenside castling temporarily problematic if White plays 9.Nh3. White appears to get enough compensation for the pawn, although Black's position is reasonably solid.
[Event "SWE-chT 0607"]
[Site "Sweden"]
[Date "2007.03.18"]
[Round "11"]
[White "Berg, Emanuel"]
[Black "Brynell, Stellan"]
[Result "1-0"]
[ECO "C14"]
[WhiteElo "2649"]
[BlackElo "2619"]
[PlyCount "77"]
[EventDate "2006.10.20"]
[EventType "team-tourn"]
[EventRounds "11"]
[EventCountry "SWE"]
[Source "ChessBase"]
[SourceDate "2008.11.26"]
[WhiteTeam "Sollentuna"]
[BlackTeam "Limhamn"]
[WhiteTeamCountry "SWE"]
[BlackTeamCountry "SWE"]
1. e4 e6 2. Nc3 d5 3. d4 Nf6 4. Bg5 Be7 5. e5 Nfd7 6. h4 Bxg5 7. hxg5 Qxg5 8.
Qd3 {This is the "modern" way to play the gambit. White attacks Black's weak
spot at h7 and prepares queenside castling.} g6 (8... h6 {also prevents White
from taking on h7, but potentially leaves Black's kingside light squares weak.}
9. Nh3 {is most often played in response, since with Black's ...h7-h6 adding
more control to the g5-square, it makes sense to aim for Nh3-f4.} Qe7 {is best
met by} (9... Qh4 {covers the f4-square, so White should probably play} 10.
O-O-O {followed by g2-g3 intending Bf1-g2 and Nh3-f4, discovering an attack on
the black queen. For example,} a6 11. g3 Qe7 12. Nf4 Nc6 (12... c5 13. Nfxd5
$1) 13. a3 {Diagram [#] This looks weakening, but it is more important to
prevent ...Nc6-b4. White has good compensation for the pawn. Johansson,K
(2211)-Mary,P (2161) LSS email 2009}) 10. Qg3 {attacking g7, whereupon Black
should probably play the slightly weakening} g6 11. O-O-O Nc6 12. f4 {as per
Shabaev,V (2123)-Podvoysky,E (2263) ICCF email 2010}) (8... Qg6 {is rare but
looks like the most "obvious" reply to me, with the aim of exchanging queens,
so it is likely to be seen at club level.} 9. Qxg6 (9. Qh3 $5 {intending
Bf1-d3 appears to be untested, offering a second pawn sacrifice, though it is
debatable whether White gets two pawns' worth of compensation if Black defends
accurately.} Qxc2 (9... Qh6 $6 10. Qxh6 gxh6 11. Rxh6 {is not what Black wants!
}) 10. Rb1 {Now Bf1-d3 would win the queen, so Black must take action against
it.} Qg6 11. Bd3 Qg5 12. Nf3 Qe7 13. Nb5) (9. Qd2 {has rarely been seen but
appears to be playable:} f6 (9... c5) 10. O-O-O fxe5 11. dxe5 Nxe5 $6 {
(Stengelin,M (2406)-Hausdorf,H (2247) ICCF email 2010)} (11... h6 12. f4 $44)
12. f4 {is very risky for Black, since White is set to gain a large lead in
development.}) 9... fxg6 {Despite the exchange of queens, White is scoring
100% from this position, and has long-term positional compensation for the
pawn due to the crippled black kingside pawn structure. However, with queens
off the board, Black is in less danger of being mated.} 10. Nf3 {is probably
the best response, with the idea of playing Nf3-g5 and bringing the c3-knight
around to f4 via e2, or maybe Nc3-b5 at a good moment.} (10. Nh3 Nf8 (10... Nb6
{defending e6 with the c8-bishop looks most sensible, e.g.} 11. O-O-O Bd7 12.
Ne2 O-O {and I think Black has everything covered and is at least equal.}) 11.
O-O-O Bd7 12. Ne2 Nc6 13. Nef4 {left Black under a fair amount of pressure in
Ivekovic,Z (2320)-Bajarani,U (2446) Athens 2012.}) 10... a6 (10... Nb6 11. Bd3
O-O 12. O-O-O {and it is still hard for Black to untangle, since after} Nc6 13.
Nb5 {Black cannot defend the c7-pawn: if} Rf7 14. Ng5) 11. Bd3 Nf8 12. Ne2 Nc6
13. c3 Bd7 14. Nf4 {was strong for White in Le Borgne,P (2181)-Salaun,M (2045)
France 2005}) 9. Nf3 {Why put the knight here after 8...g6? The problem with
9.Nh3 is that 9...Qh6 makes it difficult for White to castle queenside. 9.Nf3
keeps the h6-square covered by the h1-rook.} ({That said,} 9. Nh3 Qh6 10. Nb5
Na6 (10... Kd8 11. g3 (11. f4 {looks like an even stronger alternative}) 11...
a6 12. Nc3 c5 13. dxc5 Nxe5 14. Qe2 Nbc6 15. Bg2 {led to a quick White win in
Wegener,D (2342)-Schenk,A (2282) Germany 2010}) 11. f4 {Diagram [#] is quite
promising for White.}) 9... Qe7 10. O-O-O Nb6 (10... a6 {is probably of equal
value, although Alexander Grischuk scored a very quick win against it. Black
starts to get counterplay going on the queenside and prevents Nc3-b5.} 11. Qe3
{(White plays this to reduce the impetus of Black's ...c7-c5 advance and
prepares Bf1-d3)} c5 12. dxc5 Qxc5 13. Qf4 Nc6 14. Bd3 {with good compensation
for the pawn, as taking on f2 with the queen is very risky for Black becuase
it loses time and opens the f-file for one of White's rooks. Grischuk,A (2702)
-Brynell,S (2508) Germany 2002}) 11. Qe3 {Diagram [#] Again, White just wants
to develolp the f1-bishop to d3 and set about increasing the pressure on the
black kingside until something gives way.} Bd7 (11... h5 {might be better as
it prevents White's next move, but that said, this advance is asking to be hit
by a subsequent g2-g4.}) 12. Rh6 {The idea in the long run is to double rooks
on the h-file. I recall winning a nice game with a similar plan, in one of
the declined variations of the gambit.} Nc6 13. Bd3 Nb4 (13... O-O-O {would
have been better than what happened in the game, though} 14. Rdh1 {is still
good for White, e.g.} f6 15. exf6 Qxf6 16. Rxh7 Rxh7 17. Rxh7 Rh8 18. Qh6 Rxh7
19. Qxh7 {and Black gets tied to the defence of the g6-pawn.}) 14. Be2 Na4 15.
Nxa4 Bxa4 16. b3 Bd7 17. Kb2 {Black's queenside play has fizzled out.} O-O-O
18. Rdh1 {Diagram [#] The plan of doubling rooks on the h-file is completed
and Black cannot save the h7-pawn, or find a way of giving it up and achieving
equality.} Rdf8 19. c3 (19. Rxh7 Rxh7 20. Rxh7 {followed by Nf3-g5 is also
very strong for White.}) 19... Nc6 20. Ng5 {A clever plan- the idea is to
capture on h7 with a knight, and then the knight can hop into f6.} Nd8 21. Nxh7
Re8 22. g4 {Probably even stronger than bringing the knight straight into f6.
White wants to get the pawn onto g5 so that if Black meets Nh7-f6 by swapping
rooks on h6, g5xh6 is possible, getting a strong passed pawn.} b6 ({Black is
probably lost here, so Black may as well have tried to generate some trouble
on the queenside with} 22... a5) 23. g5 c5 {This is Black's idea behind ...b6,
but it makes the light squares around the king very weak.} 24. Nf6 Rxh6 25.
gxh6 {And White has succeeded in establishing that desired passed h-pawn.} Rh8
26. h7 Qf8 27. Ba6+ Kc7 28. Qf4 Nc6 29. c4 Nb4 30. cxd5 Nxa6 31. d6+ Kc8 32.
Qf3 {Black's weak queenside light squares prove very costly.} Qd8 33. Qa8+ Nb8
34. Qxa7 Bc6 35. Rc1 Nd7 36. dxc5 Nxe5 37. cxb6 Nd3+ 38. Kb1 Nxc1 39. d7+ {
A picturesque final position. Black cannot avoid a quick checkmate.} 1-0