Introduction
 Position after 3.Nc3 Position after 3.Nc3
The Blackmar-Diemer Gambit is a very controversial gambit starting with 1.d4 d5 2.e4 dxe4 3.Nc3 intending 3...Nf6 4.f3. It can also be used against the Scandinavian Defence: 1.e4 d5 2.d4!?.
Blackmar's original idea, 3.f3, is ineffective because of 3...e5, so Diemer improved upon the idea by interposing the knight moves 3.Nc3 Nf6, so that if 4.f3 e5?!, 5.dxe5 hits Black's knight on f6. Black can still play 3...e5 against 3.Nc3, but then I quite like White's chances after 4.Nxe4, which is a significant advantage of having played 3.Nc3 instead of 3.f3. |
 Position after 5.Nxf3 Position after 5.Nxf3
The main accepted line of the gambit arises after 1.d4 d5 2.e4 dxe4 3.Nc3 Nf6 4.f3 exf3 5.Nxf3. White has an extra developing move and a half-open f-file in return for the sacrificed pawn.
I believe that the Blackmar-Diemer is very dangerous, but of marginal soundness - Black can probably get a theoretical edge against it with precise defence. However, it has what Tim McGrew called a high "caltrop coefficient": White can get some very fine attacking wins if Black goes wrong. |
Black plays ...g6 and ...Bg7
One common plan for Black against the Blackmar-Diemer is to play ...g6 and ...Bg7. The most common version arises in the line 1.d4 d5 2.e4 dxe4 3.Nc3 Nf6 4.f3 exf3 5.Nxf3 g6, which is known as the Bogoljubov Defence. Against this, White has two main plans:
The Studier Attack
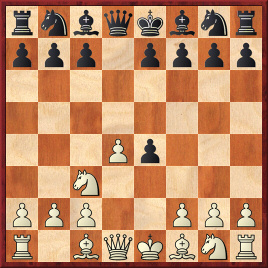
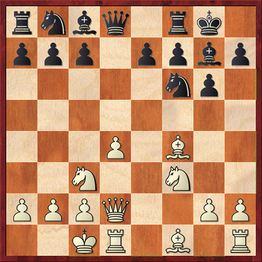
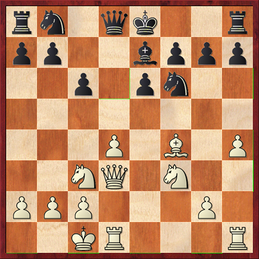
 Position after 5...g6 6.Bc4 Bg7 7.0-0 0-0 8.Qe1 Nc6 9.Qh4 Position after 5...g6 6.Bc4 Bg7 7.0-0 0-0 8.Qe1 Nc6 9.Qh4
The most popular way for White to meet this is the Studier Attack with Bc4, 0-0, Qe1, Qh4 and Bh6. The typical attacking position is illustrated in the diagram on the left. White aims to play Bh6 and exchange off the bishop on g7, and then follow up with Ng5, Rxf6 (making good use of the f-file) and Qxh7#.
Black will want to disrupt this attacking plan in some way. In this position, the most reliable response is to play ...Bg4, with the threat of ...Bxf3 followed by ...Qxd4+. After White attends to that threat, Black can aim for ...e7-e5 or ...Qd8-d7-g4. |
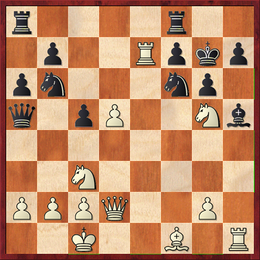
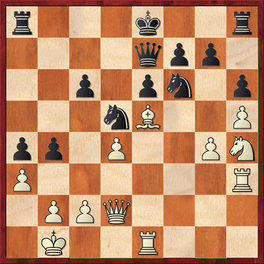
 Position after 16.Ng5, Leisebein-Zielinski, email 2004. Position after 16.Ng5, Leisebein-Zielinski, email 2004.
This diagram illustrates the kind of attacking position that White wants. White is threatening to play Nxd5 or Nce4, threatening to exchange off the knight on f6 and play Qxh7 mate. In the game, Black tried 16...c6, but after 17.Nce4!, White still had a winning attack.
The Studier Attack is very dangerous, but personally I have never been that big a fan, as it's rather inflexible and predictable, and White has been having difficulties getting adequate compensation for the pawn against the aforementioned ...Bg4xf3 idea. |
The "Long Bogo"
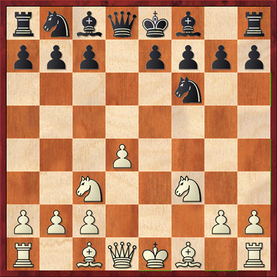
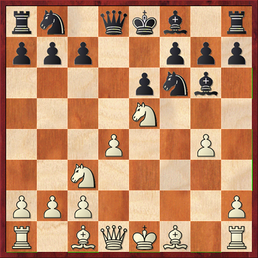
 Position after 5...g6 6.Bf4 Bg7 7.Qd2 0-0 8.0-0-0 Position after 5...g6 6.Bf4 Bg7 7.Qd2 0-0 8.0-0-0
My main recommendation for White against the ...g6 setups is instead to play Bf4, Qd2 and 0-0-0. If Black decides to leave the king in the centre, then White can get good play using the half-open e and f-files, and by playing Bh6 at a good moment, leaving Black's kingside bare.
Thus, Black's most challenging reply to the "Long Bogo" is to play ...Bg7 and ...0-0 immediately (which in practice Black usually does), leading to the position on the left, and to aim for queenside counterplay against the centre and the white king with ...c5, ...a6 and ...b5-b4. |
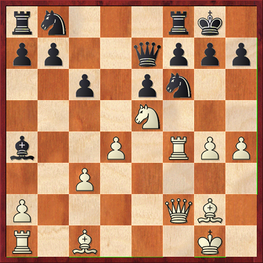
 Position after 16.Ng5, Weingarz-Baeckstroem, email 2007. Position after 16.Ng5, Weingarz-Baeckstroem, email 2007.
In many lines White can use the standard h-pawn hack with h2-h4-h5, and if Black captures on h5 with a piece, a Rxh5 exchange sacrifice is sometimes strong. However, as White is missing an f-pawn, White should generally play Bh6 before playing h4, because if Black can meet h4 with ...h5, it is then hard to engineer g2-g4, and this takes a lot of the sting out of White's attack. If Black plays ...Bg4 or ...Bf5, then White can refine this plan and play h3 and g4, and then aim for h3-h4-h5.
The diagram on the right is a good illustration of the kind of attacking position that White is after. |
Black's approaches with an early ...Bf5
Gunderam Defence - White goes for an early g4
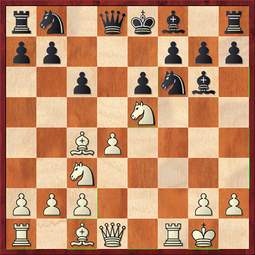
 Position after 5...Bf5 6.Ne5 e6 7.g4 Bg6 Position after 5...Bf5 6.Ne5 e6 7.g4 Bg6
After 1.d4 d5 2.e4 dxe4 3.Nc3 Nf6 4.f3 exf3 5.Nxf3, Black can play 5...Bf5 immediately. I believe that this is one of the most critical replies. When Black puts the bishop on this square, a standard plan is to kick the bishop back to g6 by playing g2-g4, and then follow up with Nf3-e5 and h2-h4.
In the line with 5...Bf5, White isn't ready to play 6.g4 at once, so White needs to start with 6.Ne5, intending 7.g4. Most often, play will reach the diagram on the left. White will follow up with Bg2 or Qf3 to disrupt Black's ideas of ...Bb4 followed by ...Be4, and then go for h2-h4. It is generally a good idea to wait until Black plays ...h6 or ...Nbd7 before playing Nxg6. |
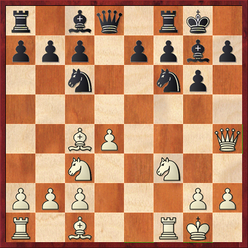
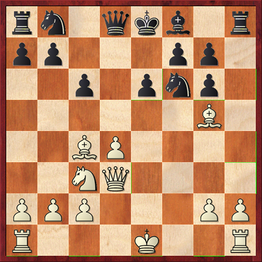
 Position after 14...Qe7, Bondick-Igney, EU-ch 2005 Position after 14...Qe7, Bondick-Igney, EU-ch 2005
This position shows the kind of attack that White is looking to build up in the 5...Bf5 6.Ne5 line and similar lines where White kicks the black light squared bishop back to g6. Here White has tempted Black into grabbing the pawn on c2, leaving the bishop rather offside on a4, while White threatens to storm the black king with the kingside pawns (despite having also castled to the kingside!).
I think White generally has good compensation for the pawn in these lines. The main problem with 6.Ne5, although this response is rarely encountered in practice as it looks rather odd, is that 6...c6!? 7.g4 Be6! is hard to crack. |
An alternative approach: exchanging light squared bishops
 Position after 5...Bf5 6.Bd3 Bxd3 7.Qxd3 c6 8.Bf4 e6 9.0-0-0 Be7 10.h4 Position after 5...Bf5 6.Bd3 Bxd3 7.Qxd3 c6 8.Bf4 e6 9.0-0-0 Be7 10.h4
The main alternative, which has been examined by Stefan Bücker, is to offer to exchange off the light squared bishops with 6.Bd3. White argues that this trade helps White's development, bringing White a move closer to castling queenside, and removes a useful defensive piece.
It's still debatable if White's lead in development and attacking chances are worth a pawn, but in the diagram position on the left, White has ideas of engineering the disruptive d4-d5 pawn push, and playing Ne5 or Ng5. |
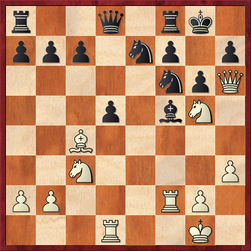
 Position after 20.Nh4 in Jarecki-Geryk, email 2005. Position after 20.Nh4 in Jarecki-Geryk, email 2005.
The diagram position on the right reflects the kind of chaos that White can hope to generate in this variation.
Black has started a queenside attack, but in the meantime White is attacking through the centre and has the ongoing threat of g4-g5 and ideas of Nh4-f5. The position is rather difficult to assess. However, practical examples with this 6.Bd3 line have been sparse, as most players have stuck with Diemer's preference 6.Ne5. |
Ziegler Defence
 Position after 5...c6 6.Bc4 Bf5 7.0-0 e6 8.Ne5 Bg6 Position after 5...c6 6.Bc4 Bf5 7.0-0 e6 8.Ne5 Bg6
Black argues that by playing 1.d4 d5 2.e4 dxe4 3.Nc3 Nf6 4.f3 exf3 5.Nxf3 c6, Black can wait for White to commit the bishop on f1 before playing ...Bf5. If 6.Ne5 Nbd7, 6.Bc4 Bf5, or 6.Bd3 Bg4.
It's worth noting that Black can avoid the 6.Bd3 Bg4 line by playing 4...c6 first, whereupon White's best continuation is 5.Bc4, and then 5...exf3 6.Nxf3 Bf5 transposes to the 6.Bc4 Bf5 line, so 6.Bc4 Bf5 is by far the most important continuation. Then White most often plays 7.0-0 e6 8.Ne5, but then Black plays 8...Bg6! (diagram). White can refine this idea with 8.Ng5!?, with ideas of sacrificing on e6 or f7, but again after 8...Bg6!, although Black has to defend more accurately here, White still doesn't have enough compensation for a pawn. |
 Position after 5...c6 6.Bc4 Bf5 7.Bg5 e6 8.Nh4 Bg6 9.Nxg6 hxg6 10.Qd3 Position after 5...c6 6.Bc4 Bf5 7.Bg5 e6 8.Nh4 Bg6 9.Nxg6 hxg6 10.Qd3
Thus, after 5...c6 6.Bc4 Bf5, White should probably instead try 7.Bg5, as recommended by Stefan Bücker. Again, the idea is generally to castle queenside, and to tie Black down on the kingside, while threatening the d4-d5 push in various positions.
Then if Black plays something like 7...Nbd7, White continues with 8.Qe2 and 9.0-0-0. If 7...e6, however, 8.Qe2 can be met by 8...Bb4!, which stops 9.0-0-0, as then 9...Bxc3 10.bxc3 would leave White's king exposed. But as 7...e6 stops the bishop on f5 from retreating to e6 or d7, 8.Nh4!? now forces the exchange of this bishop: 8...Bg6 9.Nxg6 hxg6 10.Qd3 (diagram), an idea that comes from Lev Gutman. In this position Black has to beware of possible sacrifices on e6, and White will continue with 0-0-0, h4 and Rhf1, tying Black down to the defence of f7. |
Teichmann Defence - 5...Bg4
|
The most popular defence to the Blackmar-Diemer Gambit is 5...Bg4, pinning the knight on f3, and keeping open the possibility of swapping it off at the right moment. I don't think it's one of the most critical, though. After 6.h3!, 6...Bh5 7.g4! Bg6 8.Ne5 tends to transpose into the variations with 5...Bf5 6.Ne5 e6 7.g4 Bg6, but denying Black the critical alternative 6...c6 7.g4 Be6. I think White has enough for the pawn here.
You might wonder, why play 6.h3, isn't it just a waste of a tempo to provoke Black into exchanging? Well, not quite, because if White just develops normally, Black is more likely to just leave the bishop on g4, keeping the knight on f3 in an awkward pin. Also, the move 6.h3 prepares g2-g4, which threatens to kick the black knight away from f6 at a good moment with g4-g5. Then in various lines the bishop on f1 can come out to g2, rather than its more traditional post on c4. |
More consistent is to meet 6.h3 with 6...Bxf3 7.Qxf3 c6 (7...Nc6 walks into an awkward pin after 8.Bb5, threatening 9.d5).
Then it's not clear if White can get enough compensation for the pawn with the routine 8.Be3, but White has a more violent alternative in 8.g4!?, sacrificing a second pawn on d4, with the idea of quickly bringing a rook to f1, playing g5 and then breaking through to Black's weak point on f7 (this highlights another useful point behind 6.h3). If Black takes on d4, White can play Be3 and 0-0-0 and gets very dangerous compensation, while if Black doesn't take, White tends to get into favourable versions of the 8.Be3 lines. |
Euwe Defence - 5...e6
|
5...e6 is a solid but passive defence to the Blackmar-Diemer, shutting in the bishop on c8, and aiming for rapid kingside development. If White plays 6.Bd3, 6...c5! is quite awkward to meet, so White does best to pin the knight on f6 with 6.Bg5. Then if 6...c5, 7.Bxf6, intending 7...Qxf6 8.Bb5+ followed by 0-0 and/or Ne5, gives White a dangerous initiative. Thus, Black tends to continue with 6...Be7 (diagram).
Here White has two main options. |
7.Bd3 is the traditional main line. Joe Gallagher and James Rizzitano have recommended 7...c5, but I think White can get away with 8.dxc5, followed by either 9.0-0, or 9.Qe2 and 10.0-0-0, with plenty of compensation for the pawn in either case. Also, Black should probably avoid the "automatic" 7...0-0, because then 8.0-0 followed by Qe1 and Qh4 gives White a dangerous attack, with the bishop on d3 pointing at h7, and the threat of Rxf6 sacrifices.
The most challenging reply to 7.Bd3 is rather 7...Nc6, with the idea of exchanging off the bishop on d3 with ...Nb4 and ...Nxd3. White can continue with either 8.a3 (preventing ...Nb4, but at the cost of time) or 8.Qd2 (allowing the exchange). Lev Zilbermints has favoured 8.0-0 Nxd4 9.Kh1, sacrificing a second pawn, but if Black isn't tempted by 9...Nxf3?! 10.Qxf3, which is dangerous for Black, Black has good chances of getting the upper hand. |
|
The other way to continue is 7.Qd2, preparing queenside castling. Here White can continue with Qd2-f4-h4, and get the queen across that way. White has had many nice wins where Black has played ...0-0 and ...h6, and fallen for a very strong Bxh6 sacrifice.
|
Some intriguing comparisons with the 3...Qd8 Scandinavian - what to make of that missing pawn on f2?
 Position after 5.Nf3 Position after 5.Nf3
I find it interesting to compare the Blackmar-Diemer Gambit with the main line of the 3...Qd8 Scandinavian. After 1.e4 d5 2.exd5 Qxd5 3.Nc3 Qd8 4.d4 Nf6 5.Nf3, we reach the position in the diagram on the left. Yes, it's a Blackmar-Diemer Gambit but with an extra pawn on f2!
However, there are certainly some lines where that pawn on f2 gets in the way - it reduces White's scope for ganging up on f7, and it stops White from playing Qe1 followed by Qh4 or Qg3 in various lines. |
In the 3...Qd8 Scandinavian White thus often plays more positionally than is normal in the Blackmar-Diemer, e.g. 5...g6 6.Bc4 Bg7 7.0-0 0-0 8.a4, or 5...Bg4 6.h3 Bxf3 7.Qxf3 c6 8.Be3 followed by normal development. That said, as I like to mix things, if you gave me that extra pawn on f2, I'd still prefer Bf4, Qd2 and 0-0-0 in the first line, and 8.g4 (sacrificing the d4-pawn) in the second line.
So, let's get on to looking at the accepted lines of the gambit, starting with 1.d4 d5 2.e4 dxe4 3.Nc3 Nf6 4.f3 exf3, and now 5.Nxf3 or 5.Qxf3. In the next chapter, I'll look at the 3rd and 4th move alternatives for both sides. Of these, the Vienna Defence (4...Bf5), as recommended by David Smerdon in Smerdon's Scandinavian, is as critical a test of White's gambit as taking on f3 and then following up with ...Bf5. |
4th-move alternatives
After 3...Nf6, White doesn't get very far with 4.Bg5, and so should prefer the main line with 4.f3. Then Black can consider 4...Bf5, the Vienna Defence, which allows White to charge forward with the kingside pawns after 5.g4, but this leaves White's kingside weak, so White probably does best to persist in sacrificing a pawn with 5.fxe4 Nxe4 6.Qf3, after which White can get sufficient compensation.
4...c6, the O'Kelly Defence, is quite challenging, since 5.Nxe4 gives Black a few reasonable equalising options including 5...Nbd7 and 5...Nxe4 6.fxe4 e5 7.Nf3 Be6, and 5.fxe4 runs into 5...e5. Therefore White should prefer 5.Bc4, whereupon 5...exf3 6.Nxf3 Bf5 transposes into the Ziegler Defence. Black can also try 5...b5!? (Short-Bareev, Sarajevo 2000) whereupon White can improve over Short's play and get enough compensation for the pawn, but has to play accurately for a few moves.
4...c6, the O'Kelly Defence, is quite challenging, since 5.Nxe4 gives Black a few reasonable equalising options including 5...Nbd7 and 5...Nxe4 6.fxe4 e5 7.Nf3 Be6, and 5.fxe4 runs into 5...e5. Therefore White should prefer 5.Bc4, whereupon 5...exf3 6.Nxf3 Bf5 transposes into the Ziegler Defence. Black can also try 5...b5!? (Short-Bareev, Sarajevo 2000) whereupon White can improve over Short's play and get enough compensation for the pawn, but has to play accurately for a few moves.
Ryder Gambit: 3...Nf6 4.f3 exf3 5.Qxf3
With 5.Qxf3 White sacrifices a second pawn, but the move is rather dubious. If Black simply declines the second pawn, say, with 5...c6, then White is probably worse off than after the knight recapture, while the traditional "book" recommendation, 5...Qxd4 6.Be3 Qg4 7.Qf2 e5, is favourable for Black. Mark Nieuweboer's preference 6...Qh4+ 7.g3 (taking the g3-square away from the white queen) 7...Qb4 may be even stronger. However, White's score in the databases is quite good, suggesting that the line offers practical chances.
3...Nf6 4.f3 exf3 5.Nxf3 Bg4 and 5th-move alternatives
5...Bg4 is the most popular of Black's 5th-move options, pinning the f3-knight and weakening White's control of the centre, but it is not one of the more theoretically challenging options. White generally kicks the bishop immediately with 6.h3, which is quite a useful pawn move as it also prepares g2-g4. Then after 6...Bxf3 7.Qxf3 c6 (6...Nc6 runs into 7.Bb5) White chooses between the solid 8.Be3, defending d4, 8.Qf2, and the bolder 8.g4!?, which offers the sacrifice of a second pawn at d4, which Black probably does best to accept, since if Black declines it, then White has few problems getting enough compensation for the pawn.
Instead Black can retreat the bishop with 6...Bh5, whereupon 7.g4 Bg6 8.Ne5 usually follows. White will follow up with Bf1-g2 and h3-h4 in most cases, threatening h4-h5, and White's pressure provides sufficient compensation for the pawn.
Other 5th moves for Black are not too challenging, e.g. 5...Nc6 6.Bb5, 5...Qd6 6.Ne5.
3...Nf6 4.f3 exf3 5.Nxf3 e6
This is generally known as the Euwe Defence and it is solid but rather passive. Play usually continues 6.Bg5 Be7 and White can choose between 7.Bd3 and 7.Qd2. I think 7.Qd2 is the more promising of the two options, since I'm not sure about White's compensation in the 7.Bd3 Nc6 variation, counterattacking against d4, where White has to either spend a tempo with 8.a3, allow the exchange of the important d3-bishop with 8.Qd2 Nb4, or boldly sacrifice a second pawn with the Zilbermints Gambit, 8.0-0, which is dangerous but most likely insufficient. After 7.Qd2, preparing to castle queenside, White is probably able to get enough compensation.
3...Nf6 4.f3 exf3 5.Nxf3 Bf5
This is known as the Gunderam Defence, as Gerhart Gunderam played and analysed this defence extensively and was also pretty objective in his coverage, unlike many other sources on the Blackmar-Diemer Gambit. The most usual response is 6.Ne5, preparing g2-g4 hitting the bishop on f5, whereupon 6...e6 7.g4 Bg6 is similar to the variation with 5...Bg4 6.h3 Bh5 7.g4 Bg6 8.Ne5, but White's h-pawn is on h2 rather than h3, which doesn't make much of a difference to the objective assessment of the line. Black has a few wilder, but probably unsound, options such as 7...Be4!?. The hardest line for White to crack is 6...c6 7.g4 Be6!?, which is pretty solid.
White's main alternative is to exchange off the f5-bishop with 6.Bd3, but after 6...Bxd3 7.Qxd3 c6 it is not clear if White can get enough compensation for the pawn.
White's main alternative is to exchange off the f5-bishop with 6.Bd3, but after 6...Bxd3 7.Qxd3 c6 it is not clear if White can get enough compensation for the pawn.
3...Nf6 4.f3 exf3 5.Nxf3 g6
This is generally known as the Bogoljubov Defence, although the main stem game saw Bogoljubov on the white side against Diemer. The idea is to fianchetto the king's bishop and put pressure on d4. White's most common response is to launch a quick kingside offensive with the Studier Attack, 6.Bc4 Bg7 7.0-0 0-0 8.Qe1, but after 8...Nc6 9.Qh4 Bg4, White's attack is probably insufficient.
Hence a lot of attention has shifted to the "Long Bogo" with 6.Bf4 intending Qd2, 0-0-0, Bh6 and a h-pawn hack. If Black tries to delay kingside castling, then White can generate tricks down the e and f-files, so Black does best to head into the main line with 6...Bg7 7.Qd2 0-0 8.0-0-0, and aim to generate enough counterplay on the queenside to offset White's kingside play, making good use of the extra pawn. A key idea of developing the bishop to f4, as Christoph Scheerer has noted, is the d4-d5-d6 push, although note that in the line 8...c5 9.d5 a6, White is probably better off completing development with 10.Be2 rather than the rather hasty 10.d6. White gets attacking chances in all lines, but it is not clear if they are sufficient- in particular Mark Nieuweboer's suggestion 8...a5!?, causing queenside disruption immediately, is hard to crack.
Hence a lot of attention has shifted to the "Long Bogo" with 6.Bf4 intending Qd2, 0-0-0, Bh6 and a h-pawn hack. If Black tries to delay kingside castling, then White can generate tricks down the e and f-files, so Black does best to head into the main line with 6...Bg7 7.Qd2 0-0 8.0-0-0, and aim to generate enough counterplay on the queenside to offset White's kingside play, making good use of the extra pawn. A key idea of developing the bishop to f4, as Christoph Scheerer has noted, is the d4-d5-d6 push, although note that in the line 8...c5 9.d5 a6, White is probably better off completing development with 10.Be2 rather than the rather hasty 10.d6. White gets attacking chances in all lines, but it is not clear if they are sufficient- in particular Mark Nieuweboer's suggestion 8...a5!?, causing queenside disruption immediately, is hard to crack.
3...Nf6 4.f3 exf3 5.Nxf3 c6
This is known as the Ziegler Defence, although Gerhart Gunderam contributed most to the theory of the line. White has a deviation in 6.Bd3 Bg4, whereupon White can sacrifice a second pawn with 7.h3 Bxf3 8.Qxf3 Qxd4, or play more conservatively with 7.Be3, although it is not clear if this is sufficient to give White enough compensation.
The main line is 6.Bc4 Bf5, which can also arise from 4...c6 5.Bc4 exf3 6.Nxf3 Bf5. Then the standard line 7.0-0 is insufficient after 7...e6 8.Ne5 Bg6 (not 8...Bxc2?! 9.Nxf7!) and 8.Ng5 Bg6, so White's best bet is probably 7.Bg5, intending Qe2 and queenside castling. Then if Black goes kingside, e.g. after 7...Nbd7 8.Qe2 e6 9.0-0-0 Be7 10.Rhf1 0-0, then White can attack Black by pushing the g and h-pawns. Black also has 7...e6 intending 8.Qe2 Bb4, preventing White from safely castling queenside, but then White has Lev Gutman's suggestion 8.Nh4, which may give White enough compensation for the pawn.
The main line is 6.Bc4 Bf5, which can also arise from 4...c6 5.Bc4 exf3 6.Nxf3 Bf5. Then the standard line 7.0-0 is insufficient after 7...e6 8.Ne5 Bg6 (not 8...Bxc2?! 9.Nxf7!) and 8.Ng5 Bg6, so White's best bet is probably 7.Bg5, intending Qe2 and queenside castling. Then if Black goes kingside, e.g. after 7...Nbd7 8.Qe2 e6 9.0-0-0 Be7 10.Rhf1 0-0, then White can attack Black by pushing the g and h-pawns. Black also has 7...e6 intending 8.Qe2 Bb4, preventing White from safely castling queenside, but then White has Lev Gutman's suggestion 8.Nh4, which may give White enough compensation for the pawn.