The Boden-Kieseritzky Gambit
The Boden-Kieseritzky Gambit can arise from the Bishop's Opening (1.e4 e5 2.Bc4 Nf6 3.Nf3) or the Petroff Defence (1.e4 e5 2.Nf3 Nf6 3.Bc4), where White offers a sacrifice of the pawn on e4.
It may look crazy at first sight, but White's idea is that after 3...Nxe4 4.Nc3 Nxc3 5.dxc3, Black's only way to hold onto the extra pawn is to play 5...f6, weakening the black kingside (5...c6 intending 6.Nxe5 d5 might equalise with accurate play, but is certainly no attempt to refute the gambit.)
From White's perspective I recommend the immediate 6.Nh4 here, threatening Qh5+ and preparing to meet ...g7-g6 with f2-f4-f5. It may not objectively be any better than 6.0-0, but it gives White more dangerous attacking chances on the kingside after 6...g6 7.f4 Qe7 8.f5 Qg7 9.fxg6, and in practice Black often goes wrong, as it is very difficult to extinguish White's initiative. Even here, though, if Black continues 9...hxg6 and meets 10.Qg4 with the accurate 10...Kd8, then Black is doing well both theoretically and in practice.
After 6.0-0, Black gets an extra move to prepare against White's kingside attack, and after a line such as 6...Nc6 7.Nh4 g6 8.f4 Qe7 (also good is 8...f5, as pointed out in Tim Harding's article on the gambit), White has to deal with the threat of ...Qc5+, and after, say, 9.Kh1 d6 10.f4 Qg7, 11.fxg6?! no longer works because Black gets too much pressure down the h-file against White's king. White can still get some hacking chances thanks to the active piece play, and if Black castles queenside White can start a queenside attack by launching the a and b-pawns forward, but theoretically it should not provide enough compensation for a pawn, and in practice these positions score well for Black.
The gambit also commonly arises via the Two Knights Defence (1.e4 e5 2.Nf3 Nc6 3.Bc4 Nf6 4.0-0 Nxe4 5.Nc3 Nxc3 6.dxc3). Here Black can return the pawn and reach approximate equality with 6...Be7 7.Qd5 0-0 8.Nxe5 Nxe5 9.Qxe5 Bf6, but many of the games in this line end in draws, so I am tempted to recommend that Black holds onto the pawn with 6...f6, which transposes into 6.0-0 lines, cutting out White's more dangerous possibility of 6.Nh4.
A problem from White's perspective, if using the move-order 1.e4 e5 2.Nf3 Nf6 3.Bc4 (or 2.Bc4 Nf6 3.Nf3) 3...Nxe4 4.Nc3, is that Black can play 4...Nc6 transposing into a line of the Two Knights Defence, then if 5.Nxe4 Black gets in the "fork trick" with 5...d5 (White might be able to equalise with accurate play after 6.Bd3 dxe4 7.Bxe4, but this is hardly the sort of outcome that White is typically aiming for after sacrificing the e4-pawn), while 5.0-0 Nxc3 6.dxc3 f6 again cuts out White's 6.Nh4 possibility.
Readers can also compare my coverage with Tim Harding's article on the gambit, which reaches similar conclusions.
Games and analysis
All three games focus on the accepted lines of the gambit in which Black holds onto the extra pawn with ...f7-f6, although I have included some discussion of ways to return the pawn and reach equality in the notes.
1. 3...Nxe4 4.Nc3 Nxc3 5.dxc3 f6 (or 5...c6) 6.Nh4
2. 3...Nxe4 4.Nc3 Nxc3 5.dxc3 f6 6.0-0, alternatives to 6...Nc6
3. 3...Nc6 (Two Knights Defence) 4.0-0 (also discussion of 4.Nc3 Nxe4 5.Nxe4 d5) 4...Nxe4 5.Nc3 Nxc3 6.dxc3 f6, transposing to 6.0-0 Nc6 above (with a note on 6...Be7).
1. 3...Nxe4 4.Nc3 Nxc3 5.dxc3 f6 (or 5...c6) 6.Nh4
2. 3...Nxe4 4.Nc3 Nxc3 5.dxc3 f6 6.0-0, alternatives to 6...Nc6
3. 3...Nc6 (Two Knights Defence) 4.0-0 (also discussion of 4.Nc3 Nxe4 5.Nxe4 d5) 4...Nxe4 5.Nc3 Nxc3 6.dxc3 f6, transposing to 6.0-0 Nc6 above (with a note on 6...Be7).
[Event "Pardubice op"]
[Site "Pardubice"]
[Date "1992.??.??"]
[Round "2"]
[White "Rublevsky, Sergei"]
[Black "Scetinin, Alexander"]
[Result "1-0"]
[ECO "C42"]
[WhiteElo "2535"]
[BlackElo "2350"]
[PlyCount "35"]
[EventDate "1992.07.??"]
[EventType "swiss"]
[EventRounds "9"]
[EventCountry "CZE"]
[Source "ChessBase"]
[SourceDate "1999.11.16"]
1. e4 e5 2. Nf3 (2. Bc4 Nf6 3. Nf3 {is another route to the Boden-Kieseritzky
Gambit, but the Bishop's Opening move-order gives White the additional option
of the Urusov Gambit (3.d4) which is a sounder way of offering a sacrifice of
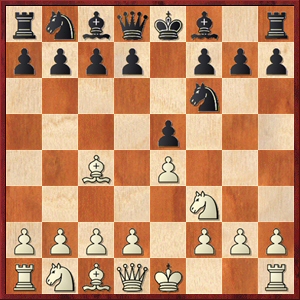
the e4-pawn.}) 2... Nf6 {The Petroff Defence.} 3. Bc4 $5 {Diagram [#] White
offers the e4-pawn as a gambit, aiming to gain compensation by generating play
against Black's e5-pawn and encouraging Black to weaken the kingside with ...
f7-f6.} Nxe4 {Black grabs the e4-pawn.} (3... Nc6 {transposes to the Two
Knights Defence.}) 4. Nc3 {The key starting move of the gambit, encouraging
Black to trade knights on c3 and open the d-file for White's queen.} (4. Nxe5 {
is a tempting alternative for White but it runs into the strong} d5 {, and if}
5. Qe2 Bc5) 4... Nxc3 (4... Nc6 {is sensible, transposing into the Two Knights
Defence with 4.Nc3 Nxe4.}) ({I am not convinced that Black can equalise fully
by returning the pawn with} 4... Nf6 5. Nxe5 d5 6. Bb3 {as White retains a
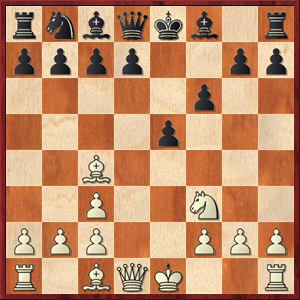
lead in development.}) 5. dxc3 f6 {Diagram [#] The most critical test of
White's gambit, defending the e5-pawn, but weakening the black kingside.} (5...
Nc6 $2 {, attempting to transpose back into Two Knights Defence lines, no
longer works because of} 6. Ng5 {and White has too much control over the
d5-square for approaches based on ...d7-d5 to work, even as a pawn sacrifice.})
({An alternative is to return the pawn with} 5... c6 6. Nxe5 d5 7. O-O Bd6 8.
Re1 O-O {, which may suffice for approximate equality, although I think White
can be satisfied with the long-term attacking possibilities on the kingside
following} 9. Bd3) ({The other way of protecting e5,} 5... Qe7 $2 {, is
virtually losing for Black after} 6. Ng5) 6. Nh4 {Castling kingside is the
main alternative, as features in the next two games, and it is the computer's
preference. However, White has the more aggressive option of pursuing
kingside action immediately. The main threat is Qd1-h5+.} (6. Be3 {is met by}
Qe7 {(Tim Harding, quoting analysis by Wornald)} 7. Nh4 (7. Qd2 {has been
tested in a couple of low-level games but is unlikely to give much
compensation for the pawn, e.g.} c6 8. O-O-O d5 {and Black is taking over the
centre.}) 7... g6 8. O-O d6 9. f4 Bh6 {and White does not have enough for the
pawn, Costa,F (2115)-Camejo Almeida,R (2295) Porto 1998} ({Instead,} 9... f5
10. Nf3 {gives White more in the way of kingside attacking chances.})) 6... g6
{Black prevents the white queen from coming out to h5 and also prevents Nh4-f5,
though the move weakens the black kingside.} (6... Qe7 {is, as Harding points
out, not a serious test of the gambit.} 7. Nf5 (7. Qh5+ {has been played in
low-level games with a 100% score for White, e.g.} Kd8 8. g4 {(Harding) gives
White good play.}) 7... Qc5 8. Bb3 g6 9. Be3 Qc6 10. Ng3 {and White enjoys
good compensation for the pawn, as Black still hasn't developed anything other
than the queen.}) 7. f4 {White's idea is to blast open the centre.} (7. O-O {
scores very badly for White in my database. The most critical response for
Black is} c6 {threatening to take over the centre by playing ...d7-d5. For
example,} 8. Bb3 d5 9. Qe2 Na6 {(with the idea ...Na6-c5) and I don't think
much of White's compensation for the pawn.}) 7... Qe7 (7... c6 {is again
critical, intending ...d7-d5. To avoid falling back upon the defensive, White
should go full steam ahead:} 8. f5 d5 9. fxg6 dxc4 10. Qh5 Kd7 {Diagram [#]
Here White has dangerous attacking chances, and although White is temporarily
a piece down, White can generally regain the piece in return for a pawn,
settling for a two-pawn deficit. However, it is not clear if White's attack
is objectively sufficient (computers tend to slightly prefer Black).} 11. g7 (
11. gxh7 Qe8 12. Ng6 Kc7 {leads to a complicated position but Black has
slightly the better chances.}) 11... Bxg7 12. Qg4+ Kd6 13. Qxg7 Qf8 14. Qg3 Be6
{and Black is surviving, but with Black's king stuck in the centre, White
retains long-term attacking chances for the two pawns, Rybak,M (2375)-Zidu,J
(2310) Czechia 2003}) 8. f5 Qg7 {Solid defence. Black is not developing
quickly, but the onus is still on White to prove sufficient attacking chances
for the pawn.} (8... c6 9. fxg6 d5 10. Qh5 {is somewhat unclear, and White
probably has sufficient attacking chances.}) 9. fxg6 {Usually played, and
recommended by Tim Harding in his article. White continues to press on with
the kingside offensive.} (9. O-O {is a more restrained option, which as
Harding notes, gives Black more time to organise a robust defence.} c6 $5 (9...
d6 {is most common, e.g.} 10. Be3 Nc6 11. Qd3 g5 {and it is doubtful if White
has enough for the pawn}) 10. b4 d5 11. Be2 Bd6 {and Black is better, although
White went on to win the game after some inaccuracies, Horvat,D (2197)
-Voiteanu,G (2304) Sarata Monteoru 2012}) 9... hxg6 10. Qg4 Kd8 {Giving up
castling rights, but making it too risky for White to take on g6.} (10... Nc6
11. Qxg6+ Qxg6 12. Nxg6 {and in spite of Black being a pawn ahead and having
exchanged queens, I prefer White, as Black's kingside has been blasted open,
Kuznecov,I (2210)-Potapov,A (2380) Russia 1992}) (10... g5 {is playable but
then White gets a powerful outpost for the knight with} 11. Nf5) 11. Qg3 ({Not
} 11. Nxg6 $6 d5 12. Qg3 dxc4 13. Nxh8 Qxh8 $17) 11... g5 12. Nf5 Qh7 13. O-O
c6 ({A good alternative for Black is} 13... d5 {, intending} 14. Bxd5 Bxf5 15.
Rxf5 ({A slight improvement for White may be the continuation} 15. Bxb7 Be4 16.
Bxa8 Bxa8 17. Rxf6 Nd7 18. Bxg5 Kc8 {with a rook and three pawns for two
pieces, although Black is probably still a little better, as Black has the
more dangerous piece play.}) 15... Bc5+ {with advantage for Black.}) 14. Bd3 {
Diagram [#] White threatens to discover an attack on the black queen by moving
the f5-knight out of the way.} d5 $2 {This doesn't address the threat.} (14...
Qh5 {gives a complicated position in which White still has to prove sufficient
attacking chances for the pawn, although Black's misplaced king will always
offer White some hope.} 15. Ne3 Be7 16. Ng4 Rf8 {is one possible continuation,
where Black remains quite solid.}) 15. Nd6 e4 16. Rxf6 exd3 17. Bxg5 Be7 18.
Nf7+ {Black's defences are completely destroyed.} 1-0
[Event "Mar del Plata op"]
[Site "Mar del Plata"]
[Date "1997.??.??"]
[Round "7"]
[White "Vasta, Eduardo"]
[Black "Pereyra Arcija, Diego"]
[Result "0-1"]
[ECO "C42"]
[WhiteElo "2395"]
[BlackElo "2450"]
[PlyCount "62"]
[EventDate "1997.03.??"]
[EventType "swiss"]
[EventRounds "9"]
[EventCountry "ARG"]
[Source "ChessBase"]
[SourceDate "1997.11.17"]
1. e4 e5 2. Bc4 Nf6 3. Nf3 Nxe4 4. Nc3 Nxc3 5. dxc3 f6 6. O-O {Diagram [#]
This is the main alternative to 6.Nh4, but as Tim Harding opines in his
article, it may be too slow to enable White to generate much of an attack in
return for the pawn.} Qe7 (6... Nc6 {transposes into a line of the Two Knights
Defence (1.e4 e5 2.Nf3 Nc6 3.Bc4 Nf6 4.Nc3 Nxe4 5.0-0 Nxc3 6.dxc3 f6) which
will be covered in the next game.}) (6... d6 {is the other main alternative.
White can generate a flurry of activity on the kingside.} 7. Nh4 ({Another
possible plan for White is rapid development with} 7. Re1 Nc6 8. Qd5 Qe7 9. Be3
{which gives White a fair amount of piece activity, though Black remains solid.
}) 7... g6 8. f4 Qe7 (8... f5 9. Nf3 {threatens to take on e5, and gives White
good compensation for the pawn}) 9. f5 Qg7 {but then it is hard to make
further progress.}) 7. Re1 (7. Nh4 {can be tried, with similar play to the
lines following 6.Nh4.} g6 8. Kh1 ({White doesn't have time for the immediate}
8. f4 $2 {because of} Qc5+ {[%cal Rc5c4,Rc5g1]}) (8. Re1 Nc6 {is better for
Black.}) 8... d6 9. f4 Nc6 10. f5 Qg7 {and it is difficult for White to make
further progress from here} ({However,} 10... g5 $6 11. Bxg5 $1 {is a strong
sacrifice, intending} fxg5 12. f6)) 7... Nc6 (7... c6 {is not a serious threat
to the soundness of White's gambit. It can lead to a forcing variation in
which White emerges with a rook and pawn for two pieces in a roughly equal
queenless middlegame:} 8. Nxe5 (8. Rxe5 $5 {is unsound according to Tim
Harding, but I think White may well be able to get enough compensation for the
material:} fxe5 9. Bg5 Qc5 10. Qe2 Be7 11. b4 Qd6 {(so far analysis by Harding)
} 12. Rd1 Qc7 13. Nxe5 $44) 8... fxe5 9. Qh5+ g6 10. Qxe5 d5 11. Qxe7+ Bxe7 12.
Bg5 O-O 13. Bxe7 dxc4 14. Bxf8 Kxf8) (7... d6 {is probably best here, avoiding
the drawbacks of 7...Nc6 and 7...c6.} 8. Nd4 (8. Nh4 g6 9. f4 Nc6 10. f5 Qg7 {
and White doesn't have a strong follow-up.}) 8... c5 9. Ne2 Be6 10. Bxe6 Qxe6
11. Nf4 Qf7 {and White has some compensation for the pawn, but it is not clear
if it is enough.}) 8. Nh4 (8. Nd4 {is a reasonable alternative and may well be
best in this position.} g6 9. b4 (9. f4 Qc5 {is awkward for White to deal with.
}) 9... Nxd4 (9... Qg7 10. f4 {gives White reasonable attacking chances, Besel,
W-Neuberger,D Giessen 1994}) 10. cxd4 c6 (10... Qxb4 11. Bb3 {followed by Rb1
allows White to work up a dangerous initiative.}) 11. dxe5 fxe5 12. f4 $44)
8... g6 9. b4 {White covers the c5-square in preparation for playing f2-f4
without allowing ...Qc5+.} d6 10. f4 Be6 11. Bd3 O-O-O {Diagram [#] Black has
castled to comparative safety on the queenside. White retains hacking chances
due to the possibility of storming the black queenside with the white
queenside pawns, but objectively White doesn't have much to show for being a
pawn down.} 12. Be3 Bh6 13. Nf3 ({If} 13. b5 {then Black can get away with}
exf4 14. bxc6 fxe3 15. cxb7+ Kb8 {which the computer assesses as clearly
better for Black, although Black has to take some care because of the lack of
defenders on the queenside.}) 13... Qf7 14. a4 Bxf4 15. Bxf4 exf4 16. a5 Ne5
17. b5 Rhe8 18. Re4 {Diagram [#] Objectively Black is clearly better, but the
white build-up on the queenside looks dangerous.} g5 19. Rea4 Nxd3 20. Qxd3 Bg4
21. b6 a6 22. bxc7 Rd7 {White's problem is that there is no convincing
follow-up to the initial queenside attack. Black's defences are holding firm.}
23. Nd2 Be2 24. Qd4 Qe6 25. Ne4 Bb5 26. Rb4 f5 27. Qa7 Rxc7 $2 (27... Kxc7 {
was necessary, which leaves White with insufficient queenside attacking
chances for being two pawns behind.}) 28. Rxb5 $2 {A spirited but insufficient
exchange sacrifice. However, White had a way to force concessions from Black
here..} (28. Nxd6+ Qxd6 (28... Kd7 29. Nxe8 Kxe8 {and if anything White has
slightly the better chances.}) 29. Rd4 {and Black cannot save the queen
because of the threat of Qa8 mate if the queen moves out of the way. Black's
best may well be to force a draw by perpetual check with} Rce7 30. Rxd6 Re1+
31. Kf2 R1e2+) 28... axb5 29. a6 Qxe4 30. Qa8+ Kd7 31. axb7 Qxb7 0-1
[Event "Blackpool op 38th"]
[Site "Blackpool"]
[Date "2014.03.08"]
[Round "3"]
[White "Fabri, Henrik"]
[Black "Ashton, Adam"]
[Result "0-1"]
[ECO "C55"]
[WhiteElo "1948"]
[BlackElo "2395"]
[PlyCount "72"]
[EventDate "2014.03.07"]
[EventType "swiss"]
[EventRounds "5"]
[EventCountry "ENG"]
[SourceDate "2014.03.12"]
1. e4 e5 2. Nf3 Nc6 3. Bc4 Nf6 4. O-O {One of two ways to offer the
Boden-Kieseritzky Gambit after Black plays the Two Knights Defence.} (4. Nc3
Nxe4 {initiates the famous "fork trick", a common motif in the Two Knights
Defence. It tends to transpose into the game continuation, but gives White
the independent possiblity of} 5. Nxe4 (5. Bxf7+ $6 Kxf7 6. Nxe4 d5 7. Neg5+
Kg8 {is better for Black in spite of the misplaced king and rook on the
kingside, Novikov,M (2519)-Afromeev,V (2628) Tula 2007}) 5... d5 {and then
White should continue with} 6. Bd3 (6. Bxd5 $6 Qxd5 7. d3 Bf5 {is good for
Black, and a combative game will often arise where White castles short and
Black castles long, giving Black good opportunities to storm the white
kingside by rolling the kingside pawns forward.}) 6... dxe4 7. Bxe4 {Diagram
[#]} Ne7 (7... Bd6 8. O-O O-O 9. Re1 {is not bad for White, and Black has to
play accurately to keep the game level, e.g.} Re8 10. d3 Bg4 11. h3 Bh5 12. c3
{with a slight advantage for White, Ivanchuk,V (2739)-Karjakin,S (2723) Moscow
2009}) 8. c3 f5 9. Bc2 e4 10. Nd4 c5 {with equal chances, but some initiative
for Black, Granz,T (2200)-Stubbe,F (2200) ICCF email 2010}) 4... Nxe4 5. Nc3 {
Using the 4.0-0 move-order there is nothing better (or comparably good) for
White.} (5. Re1 d5 6. Bb5 Bc5 {has occurred in a few of my online games.
White can inflict a weakness in Black's queenside pawn structure with} 7. Bxc6+
bxc6 8. d4 exd4 9. Nxd4 {but White has nothing else to show for the pawn after}
O-O) 5... Nxc3 ({I think White has chances of a slight advantage following}
5... Be7 6. Nxe4 d5 7. Bd3 dxe4 8. Bxe4) 6. dxc3 f6 {Diagram [#] Black holds
onto the extra pawn, but weakens the kingside. This position also arises
after 1.e4 e5 2.Nf3 Nf6 3.Bc4 Nxe4 4.Nc3 Nxc3 5.dxc3 f6 6.0-0 Nc6.} (6... Be7 {
is the quiet alternative, aiming to return the pawn after} 7. Qd5 (7. Qe2 d6 {
gives Black a very solid position and an extra pawn.}) 7... O-O 8. Nxe5 Nxe5 9.
Qxe5 Bf6 {whereupon chances are equal, although a high percentage of the games
end in draws.}) 7. Nh4 (7. Qd5 Qe7 8. Re1 d6 {gives White a lot of piece
activity, but how does White make progress from here?} 9. Be3 Bd7 10. a4 O-O-O
11. a5 a6 {is one plausible continuation, where White enjoys some hacking
chances on the queenside in return for the sacrificed pawn, but it should not
be enough.}) (7. Re1 d6 8. Nh4 (8. Nd4 {is met by} d5) 8... g6 9. f4 Qe7 10. f5
Qg7 $15 {is quite a typical continuation, where White has some hacking chances
on the kingside but no convincing follow-up.}) 7... g6 {Black prevents Qd1-h5+.
} 8. f4 Qe7 {John Emms's recommendation in Play the Open Games as Black, which
is simple and strong.} (8... f5 {is given an exclamantion mark by Tim Harding,
and also appears to give Black an advantage, though it allows White to get
into f7:} 9. Nf3 e4 10. Ng5 (10. Re1 Bc5+ 11. Be3 Bxe3+ 12. Rxe3 $15) 10...
Bc5+ 11. Kh1 Qf6 {and, surprisingly, White cannot achieve much by hopping a
piece into f7.} 12. Qd5 d6 13. Nxh7 (13. Nf7 Nd8 $17) 13... Qh4 14. Qf7+ Kd8
15. Qf6+ Qxf6 16. Nxf6 $15) 9. Be3 $6 (9. b4 {is often played, preventing ...
Qc5+, but then Black has the awkward response} a5) (9. Kh1 {is the other way
to guard against ...Qc5+.} d6 10. f5 Qg7 {and Black stands better, as White
has no strong follow-up. If} 11. fxg6 $6 hxg6 {Black gets too much play down
the h-file.}) 9... d6 $6 (9... exf4 {is strong, since White cannot take on f4
because of ...Qc5+.}) 10. f5 Qg7 {Diagram [#] This leads to the type of
position that we have seen in some of the sidelines in this and the previous
game. It is unclear how White is to make progress from here, although White
retains some piece activity in return for the pawn.} 11. Kh1 Bd7 12. Qf3 (12.
a4 {may be a slight improvement, intending to cause Black some discomfort if
Black's king heads over to the queenside, with} O-O-O 13. a5 a6 14. b4 {
although Black still has some advantage.}) 12... g5 $6 {This allows White to
catch the black king in the centre.} ({I prefer} 12... O-O-O {getting the king
to comparable safety on the queenside. True, White can get hacking chances by
advancing the queenside pawns, but it should not offer enough compensation for
the pawn.}) 13. Qh5+ Kd8 14. Nf3 {Diagram [#] In this position White has fair
hacking chances in return for the pawn, as Black's king is misplaced on d8.}
Be8 15. Qg4 h5 16. Qe4 h4 17. Rad1 (17. h3 {is probably better, preventing the
black h-pawn from advancing any further, though Black can strive for the ...
g5-g4 push.}) 17... h3 18. g3 g4 19. Ne1 (19. Nd2 {is a more active move,
since the knight can come out to c4 after the c4-bishop moves.}) 19... Ne7 {
Diagram [#] Preparing ...Bc6, and leaving White with insufficient compensation
for the pawn.} 20. Kg1 Bc6 21. Qd3 Rh5 22. Be6 Qh7 23. Bc5 e4 {Black starts to
let White back into the game over the next few moves.} (23... Bh6 $17 {is
pretty good, covvering some key central squares.}) 24. Qe2 Qg7 25. b4 {With
the threat of b4-b5., giving White reasonable attacking chances.} a6 26. a4 ({
Also good would have been} 26. c4) 26... b5 {Diagram [#]} 27. Bb6 $5 {Probably
not best, as White had a strong alternative, but this sacrifice may well be a
good practical try if followed up correctly. In the game, however, White
erred badly a couple of moves later.} (27. Rf4 {intending to take on e4 or g4
may if anything give White the superior chances.}) 27... cxb6 28. Rxd6+ Kc7 29.
Rxc6+ $2 {A sacrifice too far.} (29. Qd2 Rc8 {gives White reasonable hacking
chances after} 30. axb5 axb5 (30... Bxb5 31. Qf4) 31. Qd4) 29... Nxc6 30. Qxe4
Bd6 31. Bd5 Qd7 32. Be6 Qe7 33. Nd3 Rd8 34. c4 bxc4 35. Qxc4 Bxb4 36. Nf4 Qc5+
0-1