Scotch Gambit 4...Nf6 5.0-0
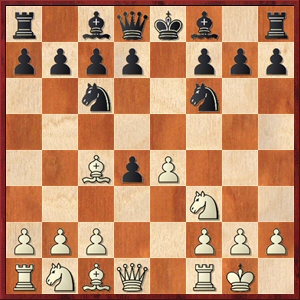
This is the other important line of the 4.d4 Two Knights Defence (often reached via 1.e4 e5 2.Nf3 Nc6 3.Bc4 Nf6 4.d4 exd4 5.0-0). White gets the king off the e-file and thus potentially makes e4-e5 more of a serious threat to Black. Black can try to neutralise this threat by playing 5...d6, or perhaps 5...Be7 (after which 6.e5 Ng4 is playable, transposing to the interesting line 5.e5 Ng4 6.0-0 Be7) but White then continues simply with 6.Nxd4 transposing into lines of the Hungarian Defence which are normally slightly better for White.
Black sometimes plays 5...Bc5 inviting White to play the Max Lange Attack with 6.e5 d5 7.exf6 dxc4 8.Re1+ Be6 9.Ng5?! Qd5, after which Black tends to get the better of a very complicated middlegame. However, White can improve with 8.fxg7! Rg8 9.Re1+ Be6 10.Bg5, after which Black's best is 10...Be7 11.Bxe7 Kxe7. White generally gets the better chances in this version of the Max Lange thanks to Black's problems finding a safe home for the king.
Therefore Black's most reliable counter is 5...Nxe4, snapping off an important central pawn. Then the Canal Variation, 6.Re1 d5 7.Nc3?!, falls short if Black is happy to settle for just being one pawn ahead following 7...dxc3 (or 7...Be6 8.Bxd5 dxc3, transposing) 8.Bxd5 Be6 9.Be4 Qxd1 10.Rxd1 cxb2 11.Bxb2 f6. This is quite a forcing sequence- White has no good way to deviate at any point after move 7- and with queens off the board, White will struggle to generate enough compensation for the sacrificed pawn.
Thus White's best response to 5...Nxe4 is the "visual" tactical sequence 6.Re1 d5 7.Bxd5 Qxd5 8.Nc3, exploiting the pins on the d and e-files.
Black now has to choose where to put the queen. After the solid but passive 8...Qd8, White's best is 9.Rxe4+, and after 9...Be7 10.Nxd4 f5, the exchange sacrifice 11.Rxe7+!? is playable and good. More critical are 8...Qa5 and 8...Qh5, after which White should continue with 9.Nxe4 and Stefan Bücker has suggested an interesting pawn sacrifice line stemming from 9...Be6 10.Neg5 0-0-0 11.Nxe6 fxe6 12.Bg5!?, intending 12...Re8 13.Re4 (see his article, Rook With a View). It does not promise White a theoretical advantage but is a good way to avoid a quick burn-out. Although 8...Qh5, in particular, can lead to very level situations due to the possible exchange of queens if White's f3-knight moves out of the way, there are also alternative ways for both sides to keep some attacking chances going after both 8...Qh5 and 8...Qa5, as demonstrated in the games and analysis section.
Games and analysis
The coverage is divided as follows:
1. 5...Be7 6.Nxd4 Nxe4!? (Black's only decent attempt to avoid a direct transposition into Hungarian Defence lines)
2. 5...Bc5 6.e5 d5 7.exf6 dxc4 8.Re1+ Be6 9.Ng5 (old main line of the Max Lange)
3. 5...Bc5 6.e5 d5 7.exf6 dxc4 8.fxg7! (modern main line of the Max Lange, gives Black trouble with king safety)
4. 5...Nxe4 6.Re1 d5 7.Nc3?! (Canal Variation)
5. 5...Nxe4 6.Re1 d5 7.Bxd5 Qxd5 8.Nc3 Qd8 9.Rxe4+!
6. 5...Nxe4 6.Re1 d5 7.Bxd5 Qxd5 8.Nc3 Qd8 9.Nxe4?!
7. 5...Nxe4 6.Re1 d5 7.Bxd5 Qxd5 8.Nc3 Qh5 9.Nxe4 Be6 10.Bg5 (with notes on 10.Neg5) Bd6
8. 5...Nxe4 6.Re1 d5 7.Bxd5 Qxd5 8.Nc3 Qh5 9.Nxe4 Be6 10.Bg5 Bb4
9. 5...Nxe4 6.Re1 d5 7.Bxd5 Qxd5 8.Nc3 Qa5 9.Nxe4 Be6 10.Bd2
10. 5...Nxe4 6.Re1 d5 7.Bxd5 Qxd5 8.Nc3 Qa5 9.Nxe4 Be6 10.Neg5
[Event "FIN-chT2 0304"]
[Site "Finland"]
[Date "2004.03.13"]
[Round "7"]
[White "Saarinen, Timo A"]
[Black "Vanttaja, Ilkka"]
[Result "1-0"]
[ECO "C56"]
[PlyCount "55"]
[EventDate "2003.09.??"]
[EventRounds "7"]
[EventCountry "FIN"]
[Source "ChessBase"]
[SourceDate "2004.11.15"]
1. e4 e5 2. Nf3 Nc6 3. d4 exd4 4. Bc4 Nf6 5. O-O {Diagram [#] White castles
short, offering a sacrifice of the e-pawn in order to blast open the e-file.
It transpires that taking on e4 is actually Black's safest and most reliable
response if followed up correctly, but Black goes for a rather eccentric
approach in this game.} Be7 {This normally leads to passive but solid
positions that can arise from the Hungarian Defence (1.e4 e5 2.Nf3 Nc6 3.Bc4
Be7).} 6. Nxd4 (6. e5 Ng4 {transposes to the line 5.e5 Ng4 6.0-0 Be7, which is
quite acceptable for Black- a key idea is} 7. Bf4 g5) (6. Re1 d6 7. Nxd4 {
commits the rook to e1 rather early- in some lines it may be better off on f1
to support the f2-f4 push.}) 6... Nxe4 $5 {This is a way for Black to try and
mix things, although White should be slightly better.} (6... d6 {transposes to
the line 4...d6 5.Nxd4 Nf6 6.0-0 Be7, which is slightly better for White.}) 7.
Nf5 {This looks strong for White, but as noted in an analysis started by
"ChessFlash" at the Chesspublishing.com forum, White probably gets just a
small advantage with best play.} Bf6 (7... O-O 8. Qg4 {is quite strong. A
couple of sample lines:} Bg5 (8... Bf6 9. Nh6+ Kh8 10. Nxf7+) 9. Bd5 g6 10.
Qxe4 Bxc1 11. Rxc1 gxf5 12. Qxf5 {and Black's king is rather exposed.}) 8. Qd5
{Forking e4 and f7, but Black can get out of this by castling out of it and
then playing ...d5.} (8. Nh6 {is an interesting, though probably unsound,
piece sacrifice:} Nd6 {(defending f7)} 9. Re1+ Kf8 10. Qh5 gxh6 11. Qxh6+ Bg7)
(8. Bd5 Nc5 9. Re1+ Ne6 10. Nc3 $44 {leaves White with enough for a pawn due
to the active pieces, but nothing particularly devastating.}) 8... O-O 9. Qxe4
(9. Nh6+ gxh6 10. Qxe4 {again leaves White with good compensation for a pawn,
but no more.} Re8 11. Qg4+ Bg5 12. Bd3 d5) 9... d5 10. Bxd5 {Diagram [#]} Re8
$6 (10... Bxf5 {is best, as pointed out by "ChessFlash" at the Chesspublishing.
com forum.} 11. Qxf5 Nd4 (11... Ne7 12. Bxf7+ Rxf7 13. Qg4 {leaves Black with
scant compensation for a pawn.}) 12. Qh5 Nxc2 13. Nc3 (13. Be4 g6 14. Qf3 Nxa1
15. Nc3 {transposes to 13.Nc3 Nxa1 14.Be4 g6 15.Qf3}) 13... Nxa1 14. Be4 (14.
Bxb7 {was suggested by "micawber" giving the continuation} Rb8 15. Be4 g6 16.
Qf3 Re8 17. Rd1 $1) 14... g6 15. Qf3 {and White will get two pieces and some
attacking chances for rook and pawn.}) 11. Nh6+ $6 (11. Bxc6 Rxe4 12. Bxe4 {
gives White a rook and two pieces for the queen, which should give White a
significant advantage, though I can understand White not wanting to part with
the queen.}) 11... gxh6 12. Qf3 Ne5 (12... Nd4 {may be a slight improvement.})
13. Qg3+ Kh8 (13... Ng6 {would have helped to shore up the kingside.} 14. Qb3
Qe7 15. Bxh6 {is met by} c6 16. Bf3 Nh4 $44) 14. Nc3 Rg8 15. Qf4 Ng6 16. Qc4
Ne5 17. Qb3 {Diagram [#]} Qf8 $2 {Passively defending h6, but this was not
necessary. There is the idea of putting pressure on g2 with ...Qg7, but this
does not come to much.} (17... c6 18. Be4 Qc7 {would have been a stronger
defence, then White must avoid} 19. Bxh6 $2 Ng4) 18. Ne4 Be7 19. Bf4 Qg7 20.
Ng3 c6 21. Nh5 {Black is now lost.} Qg6 22. Bxe5+ f6 23. Bxg8 fxe5 24. Bf7 Qg5
25. Qg3 Bg4 26. h3 Bxh5 27. Qxg5 hxg5 28. Bxh5 1-0
[Event "BCF-chT2 0910 (4NCL)"]
[Site "England"]
[Date "2010.05.01"]
[Round "9"]
[White "Thomas, Nicholas"]
[Black "Ris, Robert"]
[Result "0-1"]
[ECO "C56"]
[WhiteElo "2291"]
[BlackElo "2422"]
[PlyCount "60"]
[EventDate "2009.10.24"]
[EventRounds "11"]
[EventCountry "ENG"]
[Source "ChessBase"]
[SourceDate "2004.11.15"]
1. e4 e5 2. Nf3 Nc6 3. d4 exd4 4. Bc4 Nf6 5. O-O Bc5 {Diagram [#] This popular
response allows White to enter the Max Lange Attack with 6.e5. White probably
does best to take this up, but chooses the old main line, which is not White's
best follow-up.} 6. e5 (6. c3 {transposes to the line 4.Bc4 Bc5 5.c3 Nf6 6.0-0,
which is fully playable, but less likely to give White an advantage.}) 6... d5
{Here the knight moves are dubious.} (6... Ng4 7. Bf4 {leaves Black under
threat of h2-h3, chasing the g4-knight to h6.} d6 (7... O-O 8. h3 Nh6 9. Bxh6
gxh6 10. c3) 8. exd6 Bxd6 9. Re1+ Be7 10. c3 $14) (6... Ne4 $6 7. Qe2 {is very
difficult for Black.} d5 8. exd6 f5 {avoids losing a piece, but White gets a
large advantage anyway, e.g.} 9. Nbd2 Qxd6 10. Re1 $16) 7. exf6 (7. Bb5 Ne4 8.
Nxd4 {transposes to the line 5.e5 d5 6.Bb5 Ne4 7.Nxd4 Bc5 8.0-0. This is not
really a good idea for White- in that variation 8.Be3 offers White better
chances than 8.0-0.}) 7... dxc4 8. Re1+ (8. fxg7 $1 Rg8 9. Re1+ Be6 10. Bg5 {
features in the next game and offers White better chances.}) 8... Be6 (8... Kf8
{is a good alternative.} 9. Ng5 $1 {This recommendation of Lev Gutman appears
to be untested.} (9. Bg5 gxf6 10. Bh6+ Kg8 {leaves White with some, but not
enough, compensation for two pawns, S.Domogaev-A.Arakeljan, Donskoj 2005.}) (9.
fxg7+ Kxg7 {leaves the king surprisingly safe on g7.}) 9... Qxf6 10. Ne4 Qf5
11. Nxc5 Qxc5 12. b4 {is then pretty unclear.}) 9. Ng5 $6 {This is the old
main line, which leads to fascinating complications, but Black has a large
share of the attacking chances and is scoring just above 50%.} (9. fxg7 Rg8 10.
Bg5 {transposes to the note to 8.fxg7.}) 9... Qd5 10. Nc3 Qf5 {Diagram [#]} 11.
Nce4 (11. g4 {is the main alternative.} Qg6 12. Nce4 Bb6 {is the usual
continuation.} 13. f4 (13. Nxe6 fxe6 14. f7+ Kf8 {doesn't give White much.})
13... O-O-O 14. f5 Bxf5 15. gxf5 Qxf5 $44 {gives Black dangerous compensation
for a piece, as recommended by John Emms in "Play the Open Games as Black".})
11... O-O-O 12. g4 Qe5 13. Nxe6 (13. Nf3 {is the main alternative option.} Qd5
14. fxg7 Rhg8 (14... Bxg4 $5 15. gxh8=Q Rxh8 {is a fully sound rook sacrifice,
though this probably also leads to a quick draw if White finds some accurate
moves.}) 15. Nf6 {can lead to a quick draw by repetition after} Qd6 16. Ne4 (
16. Nxg8 Rxg8 17. Ng5 Rxg7 {gives Black dangerous compensation for the
exchange.}) 16... Qd5) 13... fxe6 14. fxg7 Rhg8 15. Bh6 d3 16. c3 {Diagram [#]}
Bd6 $5 {This is unusual, but I can't see a refutation.} (16... d2 {is more
common, as recommended by John Emms in "Play the Open Games as Black".} 17. Re2
Rd3 {leads to considerable complications, although some lines have been worked
out to a forced draw, e.g.} 18. Qf1 Qd5 19. Rd1 Ne5 20. Nf6 Qf3 21. Nxg8 Qxg4+
22. Kh1 Qf3+ {is another draw by repetition.}) 17. f4 ({Another line, which is
quite scary-looking for White, is} 17. Nxd6+ Qxd6 18. Qf3 d2 19. Red1 Ne5)
17... Qd5 18. Qf3 {Here I think the chances are about equal.} Be7 19. Rad1 $2 (
19. Qe3 {prevents Black's tactic of ...Bf6 followed by ...Bxg7 because the
e4-knight is no longer pinned against the queen.}) 19... Bf6 20. Qe3 Bxg7 21.
Bxg7 Rxg7 {Now Black is better, and goes on to win.} 22. h3 Rf8 23. Ng5 Nd8 24.
b3 b5 25. bxc4 bxc4 26. Nf3 Nc6 (26... h5 {appeals to me, trying to open up
the kingside.} 27. g5 Rgf7 28. g6 Rxf4 29. g7 Rxf3 30. gxf8=Q Rxf8 {is one
strong line for Black.}) 27. Ng5 Nd8 28. Rb1 $2 (28. Rf1) 28... Rxg5 $1 29.
fxg5 Rf3 30. Qe4 d2 0-1
[Event "Bundesliga 0607"]
[Site "Germany"]
[Date "2007.02.25"]
[Round "11.5"]
[White "Mueller, Karsten"]
[Black "Hoffmann, Michael"]
[Result "1-0"]
[ECO "C56"]
[WhiteElo "2500"]
[BlackElo "2477"]
[PlyCount "51"]
[EventDate "2006.10.28"]
[EventRounds "15"]
[EventCountry "GER"]
[Source "ChessBase"]
[SourceDate "2004.11.15"]
[WhiteTeam "Hamburger SK"]
[BlackTeam "Solingen"]
[WhiteTeamCountry "GER"]
[BlackTeamCountry "GER"]
1. e4 e5 2. Nf3 Nc6 3. Bc4 Bc5 4. O-O Nf6 5. d4 exd4 6. e5 d5 7. exf6 dxc4 8.
fxg7 $1 {This is White's most convincing way of conducting the Max Lange
Attack. Lev Gutman, Stefan Bücker and Michael Goeller have all promoted
White's chances in the line, with success. Even if Black can manage to
equalise with accurate play (which is quite a big "if"), Black's problems
finding a safe home for the king in this line give White the preferable
practical chances.} Rg8 {Diagram [#]} 9. Re1+ ({Stefan Bücker notes that the
alternative move-order} 9. Bg5 {can be met by} f6 (9... Be7 10. Bxe7 Kxe7 11.
Re1+ {gives Black the interesting alternative} Kf6 $5 {although in that line I
think White is still on top, e.g.} 12. Re4 Kxg7 13. Nxd4 f5 14. Rf4) 10. Re1+
Kf7 11. Bh6 Kg6 $1 {(again Black seems able to get away with bringing the king
out into the open)} 12. Qc1 Qd5 {(Volker Hergert) with a very sharp and
unclear position.}) 9... Be6 (9... Be7 10. Bg5 Rxg7 (10... Be6 {transposes to
the game continuation.}) 11. Bxe7 (11. Bf6 $5 {is also worth investigating.})
11... Nxe7 12. Na3 {gives White the better chances, since Black still hasn't
got a safe spot for the king.}) 10. Bg5 Be7 (10... Qd7 {is a reasonable
alternative, with the idea of castling queenside to comparative safety, but
White's chances are preferable. For example,} 11. Nbd2 Rxg7 12. Ne4 {(a key
resource for White, threatening Nf6+ and Nxc5)} Be7 13. Bxe7 Qxe7 14. Nxd4
O-O-O 15. Nxc6 bxc6 {and Black's king is no longer particularly safe on the
queenside with the pawn shelter shattered.}) 11. Bxe7 Kxe7 {Diagram [#] Black
forgoes castling rights, but the king appears to be no less safe on e7 than
anywhere else, and Black keeps the d4-pawn defended for now.} (11... Qxe7 12.
Nxd4 {is slightly better for White.} Rd8 (12... O-O-O $6 13. Nxc6 bxc6 14. Qf3)
13. c3 {and Black still has the problem of being unable to find a safe spot
for the king.}) 12. Nbd2 (12. Re4 {is the main recommendation of Lev Gutman
and Stefan Bücker. White adds more pressure to d4 and, if the d4-pawn moves,
c4.} d3 13. Nbd2 Qd5 (13... f5 14. Re3 {does not help Black}) 14. Rxc4 Rxg7 15.
cxd3 Qxd3 16. Rc3 {Diagram [#] leaves White with the better chances, again as
a result of Black's potentially-exposed king, though White has to take some
care against Black's potential counterattacks down the g-file, H.Keller-I.
Mackintosh, email 2007.}) 12... Qd5 13. b3 cxb3 14. axb3 Rxg7 15. Ne4 {In this
line White again has good attacking chances thanks to Black's exposed king,
but Black is a pawn ahead, which means that White is less likely to have a
theoretical advantage here than in the line starting with 12.Re4.} Rag8 {Black
attacks down the g-file.} (15... Kf8 {is the main alternative, given by Stefan
Bücker and Lev Gutman.} 16. Qc1 {(threatening to come into h6)} Qf5 17. Ng3 (
17. Qh6 $2 Qg6) 17... Qd5 18. h4 (18. h3 {is met by the tactic} Bxh3) 18... Kg8
19. Ng5 $44) 16. g3 b6 (16... Rg4 {is a good active move.}) 17. Ra4 Rd8 18. Qc1
{Diagram [#] Now Black is in trouble.} f6 19. Qf4 Rf7 20. c4 Qd7 21. Ra2 d3 22.
Rd2 a5 23. Qh4 Qe8 (23... Nd4 {would have been a stronger defence:} 24. Rxd3 (
24. Nxd4 Qxd4 25. Qh6 Rd7) 24... Ne2+ 25. Rxe2 Qxd3 26. Re3 Qd1+ 27. Kg2) 24.
Re3 Qg8 25. Nc3 Kd7 26. Qe4 {Black resigned, since White has an overwhelming
attack.} 1-0
[Event "IECG CM.2003.0.00226 email"]
[Site "IECG email"]
[Date "2003.07.05"]
[Round "?"]
[White "Lifshitz, Samuel"]
[Black "Francisco, Raul R"]
[Result "1/2-1/2"]
[ECO "C56"]
[WhiteElo "2211"]
[BlackElo "2207"]
[PlyCount "67"]
[EventDate "2003.07.05"]
[EventType "corr"]
[EventRounds "6"]
[Source "ChessBase"]
[SourceDate "2004.11.15"]
1. e4 e5 2. Bc4 Nf6 3. d4 exd4 4. Nf3 Nc6 5. O-O Nxe4 {Diagram [#] This is
Black's most reliable method of meeting 5.0-0. Until quite recently it was
often regarded as leading to drawish situations if Black desires, but
investigations by Stefan Bücker and Lev Gutman have uncovered ways for White
to unbalance the play in all variations. However, the move definitely
equalises.} 6. Re1 (6. Nxd4 d5 7. Bb5 Bd7 {leaves White with insufficient
compensation for a pawn.} 8. Re1 (8. Nc3 Nxc3 9. bxc3 Be7 $15) (8. Bxc6 bxc6 9.
f3 Nc5 10. Re1+ Ne6 $15) 8... Bd6) 6... d5 (6... f5 $6 {doesn't work for Black.
} 7. Nxd4 d5 8. Bb5 {leaves Black unable to defend the e4-knight. Black's best
is probably to sacrifice it for insufficient attacking chances, e.g.} Bc5 9. f3
O-O 10. Bxc6 bxc6 11. fxe4 fxe4 12. Nc3 $14) 7. Nc3 $6 {This is the wild, but
unsound, Canal Variation. It works quite well if Black tries to hold onto an
extra piece, but unfortunately for White, Black has a solid response that
heads into a simplified position with an extra pawn.} dxc3 (7... Be6 8. Bxd5 (
8. Nxe4 dxc4 9. Nfg5 Be7 {leaves White with insufficient compensation for two
pawns.}) 8... dxc3 9. Bxe4 {transposes to the game continuation.}) (7... dxc4
8. Rxe4+ Be6 (8... Be7 9. Nxd4 f5 10. Rf4 O-O 11. Nxc6 Qxd1+ 12. Nxd1 bxc6 {
gives a level endgame where Black's bishop-pair offset the inferior pawn
structure.}) 9. Nxd4 Nxd4 10. Rxd4 Qf6 11. Nd5 {This move (improving on the 11.
Nb5?! given by John Emms in "Play the Open Games as Black") is fine for White-
Lev Gutman.}) 8. Bxd5 Be6 (8... f5 {holds onto an extra piece but White gets
very dangerous compensation, for example,} 9. Ng5 cxb2 10. Nxe4 fxe4 11. Rxe4+
Be7 12. Bxb2 $44) 9. Bxe4 Qxd1 (9... Bb4 10. b3 Qxd1 11. Rxd1 {is less
convincing because Black's extra pawn on c3 is of little use in this position.}
) 10. Rxd1 cxb2 11. Bxb2 f6 {Diagram [#] In this position White has some
compensation for the pawn due to the active pieces and the idea of pushing the
a-pawn, but it should not really be enough.} 12. Re1 {Setting up threats down
the e-file.} (12. Bc3 {is the main alternative, with the idea of utilising the
half-open b-file immediately. For example,} Bd7 13. Rab1 O-O-O 14. Nd4 Re8 $15
{P.Blatny-J.Smejkal, Prague 1986.}) 12... Kf7 {This move is necessary to get
out of any tricks on the e-file. Black could also consider ...Kd7 but the king
is more exposed there.} 13. Bc3 Be7 (13... Ba3 $1 {is problematic for White,
preventing the advance of the a-pawn- Stefan Bücker and Lev Gutman in
Kaissiber 35.}) (13... Bb4 $2 14. Bxb4 Nxb4 15. Rab1 {left Black in a lot of
trouble in T.Harding-D.Campbell, corr. 1987.}) 14. Rab1 Rab8 15. a4 a6 16. a5
Bc5 $15 {Diagram [#] Black has an extra pawn, but White's long-term pressure
down the open b, d and e-files offers partial compensation.} 17. h3 g6 18. g4 (
{White has a tactical trick in} 18. Ng5+ fxg5 19. Bxh8 Rxh8 20. Rxb7 {which
will net rook and pawn for two pieces, but Black still has an edge after} Ne7
21. Rxc7 Bb4) 18... Rhd8 19. g5 Be7 20. gxf6 {This begins a forcing
simplification into a pawn-down endgame in which White has favourable drawing
chances.} Bxf6 21. Bxf6 Kxf6 22. Ng5 Kxg5 23. Bxc6 Bxh3 24. Rxb7 Rxb7 25. Bxb7
Kf6 26. Re3 Bc8 27. Bxc8 Rxc8 28. Rb3 Ke5 29. Rb7 g5 (29... Rd8 30. Rxc7 h5 {
may be a better winning try.}) 30. Ra7 Rd8 31. Rxa6 Rd1+ 32. Kg2 Ra1 33. Ra8
Kd6 34. a6 1/2-1/2
[Event "EU-ch U16 19th"]
[Site "Fermo"]
[Date "2009.09.01"]
[Round "2"]
[White "Seegert, Kristian"]
[Black "Hartl, Daniel"]
[Result "1-0"]
[ECO "C56"]
[WhiteElo "2103"]
[BlackElo "2249"]
[PlyCount "39"]
[EventDate "2009.08.31"]
[EventRounds "9"]
[EventCountry "ITA"]
[Source "ChessBase"]
[SourceDate "2004.11.15"]
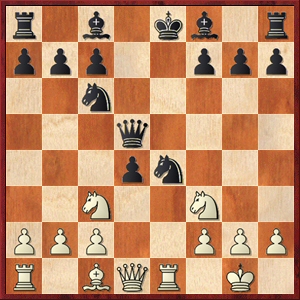
1. e4 e5 2. Nf3 Nc6 3. Bc4 Nf6 4. d4 exd4 5. O-O Nxe4 6. Re1 d5 7. Bxd5 {This
is White's strongest choice.} Qxd5 8. Nc3 {Diagram [#] This move wins the
piece back by force due to the pins on the d4-pawn and the e4-knight. Some
players are attracted to this line by the highly "visual" nature of White's
play. Black must now decide where to put the queen.} Qd8 {This is Black's most
conservative option. 8...Qa5 and 8...Qh5 equalise with greater certainty.} (
8... Qc4 $6 {allows White to work up a powerful attack by gaining time on the
exposed queen:} 9. Nd2 Qa6 10. Nd5 Qa5 11. c4 {B.Dauth-I. Brener, Berlin 2004.}
) (8... Qf5 {permits White a small advantage due to piece activity.} 9. Nxe4
Be7 (9... Be6 10. Nxd4 Nxd4 11. Qxd4) 10. Bg5 f6 11. Nxd4 Nxd4 12. Qxd4 $14) (
8... Qd7 {also gives White an edge with} 9. Rxe4+ Be7 10. Nb5) 9. Rxe4+ {This
is White's most reliable response. The alternative 9.Nxe4 features in the next
game.} Be7 (9... Be6 $6 10. Nxd4 Nxd4 11. Rxd4 Qf6 12. Be3 {gives White
powerful central control.}) 10. Nxd4 f5 {Diagram [#]} 11. Rxe7+ $5 {This
exchange sacrifice appears to be sound and gives White long-term attacking
chances.} (11. Bh6 $6 {was a favourite of Max Zavanelli, but Stefan Bücker
pointed out the defence} Kf8 $1 (11... fxe4 12. Bxg7 Rf8 (12... Rg8 $2 13. Qh5+
Kd7 14. Qd5+) 13. Qh5+ {gives White a rook's worth of compensation.}) 12. Rxe7
(12. Nxc6 Qxd1+ 13. Rxd1 fxe4 14. Nxe7 gxh6 {is a dreary endgame for White, an
exchange for a pawn down.}) 12... Qxe7 13. Bf4 {and White doesn't have enough
compensation for the exchange, but at least keeps more pieces on the board
than in the 12.Nxc6 variation.}) (11. Rf4 O-O 12. Nxc6 Qxd1+ 13. Nxd1 bxc6 14.
Ra4 {gives White good chances of an edge according to Stefan Bücker although
I'm not sure that White can really make much of this.}) 11... Nxe7 (11... Qxe7
12. Nd5 {is very dangerous for Black.}) 12. Qh5+ (12. Bg5 {was given by Stefan
Bücker and Lev Gutman in Kaissiber 28, and this also appears fine, but is more
likely to lead to a quick queen trade.} O-O 13. Ndb5 Qxd1+ 14. Rxd1 Ng6 15.
Nxc7 {leaves White with piece activity and a pawn as compensation for the
exchange.}) 12... g6 (12... Ng6 {is probably more reliable.} 13. Nf3 (13. Nxf5
$6 {loses the initiative after} O-O) 13... O-O 14. Ng5 h6 15. Qxg6 hxg5 16.
Bxg5 $44 {is quite a forcing line, where White retains enough of an attack for
the sacrificed exchange.}) 13. Qh4 Nc6 14. Bg5 Qxd4 15. Re1+ {Diagram [#]} Be6
$2 (15... Kf7 16. Re7+ Kg8 17. Re8+ (17. Qxd4 Nxd4 18. Bh6 {is likely to lead
to a draw.}) 17... Kf7 18. Qxd4 Rxe8 (18... Nxd4 19. Rxh8 $16) 19. Qd5+ {gives
White a queen and attacking chances for two rooks.}) 16. Rxe6+ Kd7 {This move
loses.} (16... Kf8 17. Bh6+ Kg8 18. Qxd4 Nxd4 19. Re7 $16) 17. Re7+ Kc8 18.
Rxc7+ Kb8 19. Bf4 Re8 20. Rxc6+ 1-0
[Event "Spiltan & Pelaro op"]
[Site "Sweden"]
[Date "2003.06.13"]
[Round "3"]
[White "Gamback, Bjorn"]
[Black "Pilgaard, Kim"]
[Result "0-1"]
[ECO "C56"]
[WhiteElo "2201"]
[BlackElo "2440"]
[PlyCount "74"]
[EventDate "2003.06.12"]
[EventRounds "7"]
[EventCountry "SWE"]
[Source "ChessBase"]
[SourceDate "2004.11.15"]
1. e4 e5 2. Nf3 Nc6 3. Bc4 Nf6 4. d4 exd4 5. O-O Nxe4 6. Re1 d5 7. Bxd5 Qxd5 8.
Nc3 Qd8 9. Nxe4 {This is less reliable than 9.Rxe4+.} Be7 10. Bg5 f6 {Diagram
[#]} 11. Bf4 (11. Nxf6+ $6 gxf6 12. Bxf6 O-O {is an unsound piece sacrifice.
In the game B. Stein-J.Smejkal, Bundesliga 1987, White resigned after just 17
moves:} 13. Bxe7 Nxe7 14. c3 Ng6 15. Re4 dxc3 16. Qb3+ Kh8 17. Qxc3+ Qf6 {0-1})
11... O-O {Here White will struggle to prove sufficient compensation for the
pawn.} 12. Qd3 (12. c3 {is best met by} g5 $1 (12... dxc3 13. Qb3+ Kh8 14. Nxc3
$44) 13. Qb3+ Kh8 14. Bd2 d3) 12... Kh8 (12... g5 {at once may be even
stronger.}) 13. h3 {This takes the sting out of Black's ...g5-g4 threat,
clears the h2-square for the f4-bishop, and encourages Black to push the
f-pawn to support it, which is loosening.} g5 14. Bh2 f5 15. Ned2 Bf6 16. Nb3
f4 {Diagram [#] Black shuts the h2-bishop out of play and retains some
advantage due to the extra pawn.} 17. Rad1 Qd5 18. Nfxd4 Nxd4 19. Nxd4 Qxa2 20.
Qb5 Qf7 21. h4 c6 22. Qc5 h6 23. hxg5 hxg5 24. Nf3 b6 25. Qd6 $6 ({Presumably
White was worried about the shattering of the kingside pawn structure following
} 25. Qxc6 Bb7 26. Qb5 Bxf3 27. gxf3 $15) 25... Bf5 26. Ne5 Qg7 27. Nxc6 Bxc2
28. Rd5 $6 (28. Rd2 Bf5 29. Qb4 Rac8 $17) 28... Rae8 29. Rf1 Be4 30. Rd2 Qb7 {
White is now in serious trouble and goes on to lose due to the pressure
against g2.} 31. Rc1 Bxc6 32. Rd3 Bxg2 33. f3 Bxf3 34. Rf1 Bh1 35. Rh3+ Kg8 36.
Qd2 Bd4+ 37. Qxd4 Qg2# 0-1
[Event "Wch U14"]
[Site "Vung Tau"]
[Date "2008.10.26"]
[Round "7"]
[White "Chan, Yi Ren Daniel"]
[Black "Hasenohr, Benedict"]
[Result "1-0"]
[ECO "C56"]
[WhiteElo "2260"]
[BlackElo "2008"]
[PlyCount "73"]
[EventDate "2008.10.20"]
[EventRounds "11"]
[EventCountry "VIE"]
[Source "ChessBase"]
[SourceDate "2004.11.15"]
1. e4 e5 2. Nf3 Nc6 3. d4 exd4 4. Bc4 Nf6 5. O-O Nxe4 6. Re1 d5 7. Bxd5 Qxd5 8.
Nc3 Qh5 {Diagram [#] This is one of Black's two most challenging responses
(the other being 8...Qa5). Many sources, including Mark Morss, Jan Pinski and
Tim Harding, have recommended this move over 8...Qa5 as it makes it harder for
White to work up complications against it. 8...Qh5 appears aggressive, bearing
down on White's king, but can also lead to fast simplification because of the
likely queen trade if White's f3-knight moves out of the way. However,
although there are many "drawing lines", it seems that both sides have ways to
keep life in the position against all responses.} 9. Nxe4 (9. Rxe4+ $6 Be6 {
leaves White with problems due to the way Nf3xd4 leads to a quick queen swap
and White cannot recapture with a rook.} 10. Nxd4 (10. Ne2 Bd6 11. Rh4 Qg6 12.
Nexd4 Nxd4 13. Rxd4 O-O-O {is also good for Black, as Black's bishop-pair
provides promising attacking chances on the kingside.}) 10... Qxd1+ 11. Nxd1
O-O-O {is much better for Black.}) 9... Be6 (9... Be7 10. Bg5 {is good for
White here, e. g.} Bg4 (10... f6 $2 11. Bxf6) 11. Bxe7 Bxf3 12. gxf3 Nxe7 13.
Qxd4) 10. Bg5 {This threatens Bg5-f6, since the bishop on f6 then cannot be
taken because of Nxf6+ forking the king on e8 and the queen on h5.} (10. Nxd4
Qxd1 11. Rxd1 O-O-O {leaves Black with a slight edge due to the bishop-pair.}
12. Be3 Nxd4 13. Bxd4 Bf5 14. Ng5 Bg6 $15 {"promising a long afternoon"- Jude
Acers in his Italian Gambit book.}) ({The continuation} 10. Neg5 O-O-O 11. Nxe6
fxe6 {This has long been regarded as good for Black, though Stefan Bücker has
pointed out an interesting gambit idea for White which makes the line playable.
} 12. Bg5 $5 (12. Rxe6 Bd6 {is one line which highlights the aggressive points
behind 8...Qh5, as the queen is perfectly placed on the kingside to assist
Black's attacking threats against h2 and the idea of pushing the g and h-pawns.
} 13. Qd3 {(best, as recently pointed out by Mark Morss- this move prevents ...
d4-d3 which is a major resource for Black in other variations.)} Nb4 (13...
Rde8 14. Rxe8+ Rxe8 15. Bd2 $15 {forces White to concede the e-file but is not
a disaster for White.}) (13... Rhf8 {is met by} 14. h4 $1 {(M.Morss) which
hinders Black's ideas of pushing the g and h-pawns.}) 14. Qe4 Na6 15. b4 Nxb4
16. Bg5 Rde8 17. h4 $15 {(M.Morss)}) 12... Rd5 {This continuation is the
recommendation of Mark Morss.} (12... Re8 13. Re4 $1 {is Stefan Bücker's idea,
tying Black down to the defence of the d4-pawn and aiming to generate an
attack by pushing the queenside pawns.}) 13. Rxe6 Bd6 (13... Rxg5 $6 14. Nxg5
Qxg5 15. Re8+ Kd7 16. Qe2 {is very dangerous for Black.}) 14. Bh4 Qg4 15. Re1
g5 16. c4 $5 {Diagram [#] This is one of the many plausible continuations
stemming from this Bg5/Re4 gambit idea, suggested by Morss and Bücker, with
equal chances.}) 10... Bd6 {Diagram [#] This is Black's most secure
continuation. For the main alternative 10... Bb4 see the next game.} (10... h6
$6 11. Bf6 $1 {is very dangerous for Black.} Qg6 12. Nh4 Qg4 13. Qd3 $1 $16 {
D.Smerdon-G.Saw, Melbourne 2002.}) 11. Nxd6+ (11. Bf6 $2 Bxh2+ {is one of the
key points behind 10...Bd6.} 12. Nxh2 Qxd1 13. Raxd1 gxf6 14. Nxf6+ Kf8 $17 {
gives Black a solid extra pawn, L.Van Wely-A.Van de Oudeweetering, Rotterdam
1990.}) (11. c4 {can be safely met by} h6 $5 {as suggested by John Emms in
"Play the Open Games as Black".} (11... O-O 12. c5 Be5 13. Nxe5 Qxd1 14. Raxd1
Nxe5 15. Rxd4 Nc6 {is a relatively dull equaliser, if Black is happy to settle
for a draw.}) 12. Nxd6+ cxd6 13. Bf4 Qc5 14. Rc1 O-O {and Black is at least
equal.}) 11... cxd6 12. Bf4 Qd5 (12... Qc5 13. Ng5 {followed by Ne4 leaves the
queen a bit misplaced on c5.}) 13. Ng5 {With the idea Ne4 putting more
pressure on Black's centre.} (13. c3 Rc8 {tends to lead to a quick draw:} (
13... Qf5 $5 {was suggested by Craig Evans at the Chesspublishing.com forum as
a way for Black to keep some life in the position, e.g.} 14. cxd4 O-O-O ({Or}
14... Qxf4 15. d5 O-O 16. dxe6 fxe6 17. Rxe6 $11 {B.Dauth-J.Sawatzki, Berlin
2009.}) 15. Qd2 {with a combative game.}) 14. b3 O-O 15. Nxd4 Nxd4 16. Qxd4
Qxd4 17. cxd4 d5 $11) 13... O-O (13... O-O-O 14. Ne4 Kc7 {is also playable,
but riskier.}) 14. Ne4 {Diagram [#]} Rae8 $6 (14... Rfd8 {was successfully
played in two other games, but White didn't continue with} 15. b3 {which is
probably best here, preparing c2-c4.} Nb4 16. Qd2 a5 17. a3 Nc6 18. Rad1 {
offers equal chances.}) 15. Qf3 $6 (15. Bxd6 {appears stronger to me, trapping
the rook on f8, and if} Ne7 16. Qd3 {then Black has had to go passive.}) 15...
Ne5 16. Qg3 (16. Qa3 {is better.}) 16... f6 17. Rad1 Bf5 {Black now has the
upper hand, thanks to the imposing central pieces.} 18. Nc3 (18. c4 Qa5 19. Qb3
{would have been stronger.}) 18... Qc4 19. Ne2 d3 20. b3 Qa6 21. Nd4 Bg4 22.
Rd2 dxc2 (22... Nc4 {is very strong for Black due to the back-rank mate
threats at e1. Both sides seriously underestimate the idea of the back-rank
mate over the next few moves.}) 23. Nxc2 Bc8 24. Nb4 $4 (24. Ne3) 24... Qa5 $4
(24... Nf3+ {forces checkmate:} 25. gxf3 Rxe1+ 26. Kg2 Qf1#) 25. Nd5 $2 (25.
Nc2) 25... Rf7 $2 (25... Nf3+ 26. gxf3 Rxe1+ 27. Kg2 Rf7) 26. Red1 {Now there
is no mate, and although Black is a pawn ahead, Whhite has some compensation
due to the active pieces.} Kf8 (26... Bg4 {is stronger.}) 27. Qh4 Bf5 28. a4
Nd3 $2 (28... Kg8) 29. Ne3 $2 (29. Bxd6+ Kg8 30. Ne3 {leaves White a pawn
better off than with the game continuation.}) 29... g5 $2 (29... Nxf4 30. Qxf4
Be6 31. Qxd6+ Kg8 {is not too bad for Black.}) 30. Qh6+ Ke7 $2 {Black is now
lost.} (30... Kg8 {was a better defence, though White is now clearly better
and has a strong attack, e.g.} 31. Bxg5 Bg6 32. Bxf6 Rxf6 33. Rxd3) 31. Bxg5 ({
White misses a powerful tactical shot with} 31. Bxd6+ Kd7 (31... Kxd6 32. Nc4+)
32. b4 $1 {and Black cannot hold onto the bishop on f5.}) 31... Bg6 32. Bh4 d5
33. Rxd3 Bxd3 34. Rxd3 d4 35. Nf1 Qe1 36. Qf4 Qa1 37. Qe5+ 1-0
[Event "San Francisco TNM Spring op"]
[Site "San Francisco"]
[Date "2011.04.05"]
[Round "4"]
[White "Jones, James"]
[Black "Grey, Peter G"]
[Result "1-0"]
[ECO "C56"]
[WhiteElo "2077"]
[BlackElo "2003"]
[PlyCount "59"]
[EventDate "2011.03.??"]
[EventRounds "8"]
[EventCountry "USA"]
[Source "ChessBase"]
[SourceDate "2004.11.15"]
1. e4 e5 2. Bc4 Nf6 3. d4 exd4 4. Nf3 Nc6 5. O-O Nxe4 6. Re1 d5 7. Bxd5 Qxd5 8.
Nc3 Qh5 9. Nxe4 Be6 10. Bg5 Bb4 {This is the main alternative to 10...Bd6,
though from Black's perspective I would strongly recommend the former, as the
text move gives White the choice between a niggling edge in an endgame, and
the gambit line played in the game.} 11. c3 $5 {White sacrifices a pawn.} (11.
Nxd4 Qxd1 12. Rexd1 Nxd4 13. Rxd4 Be7 14. Re1 {Diagram [#] This gives White a
small, nagging endgame plus due to the superior piece activity.} Rd8 15. Ra4 a6
16. Bxe7 Kxe7 {is the most usual continuation, although in practice most games
end in draws.}) 11... dxc3 12. bxc3 Ba5 {Diagram [#] Black keeps the c3-pawn
pinned to the e1-rook and can use the bishop to guard the queenside.} (12...
Be7 13. Bxe7 Nxe7 14. Rb1 $14) 13. Nd6+ $1 {Probably the only way to justify
White's pawn sacrifice.} (13. h4 $6 Qg4 {leaves White in trouble. In the game
Yudin-Plisetsky, Russia 1979, White tried the spirited attacking continuation}
14. Ng3 Bb6 15. Rb1 Qc4 16. Re4 Qxa2 17. Re2 Qc4 18. Nh5 O-O 19. Bf6 {but this
fell short after} Bf5) (13. Ng3 Qg6 14. h4 {is an improved version but I am
still not convinced by White's compensation after} h6 15. h5 Qh7 16. Qb3 O-O {
since the spirited exchange sacrifice} 17. Rxe6 fxe6 18. Qxe6+ {of S.
Saverymuttu-J.Kristiansen, Arosa 1972, seems to me to be refuted by} Rf7) (13.
Bf6 O-O {also makes it hard for White to progress further with the attack.}) ({
Or} 13. Qc1 O-O 14. Ng3 Qg6 15. Nh4 Qd3 $17 {G.Kamsky-V.Kupreichik, Baleares
1989. White went on to win the game, but the win had nothing to do with the
opening.}) 13... cxd6 14. Qxd6 Bxc3 (14... Bc7 15. Qxc7 (15. Rxe6+ $2 fxe6 16.
Qxe6+ Kf8 {turns out to be somewhat unsound.}) 15... O-O {is the main snag
with this variation for White- Black can return the piece and reach equality.})
15. Rac1 $6 (15. Rab1 {gives White at least sufficient compensation for the
material. For example,} Rd8 (15... Bxe1 16. Rxb7 Bb4 17. Qxc6+ Kf8 18. Rxb4 Re8
19. Rb7 $14) 16. Bxd8 Nxd8 17. Rbd1 Bf6 18. Qd7+ Kf8 19. Qc7 $44) 15... Bf6 $2
(15... h6 {is awkward for White to meet, since} 16. Rxe6+ fxe6 17. Qxe6+ Kf8 {
probably doesn't give White enough for a rook.}) 16. Bxf6 (16. Rxc6 {is also
very strong.}) 16... gxf6 17. Rxe6+ $2 {White was right to sacrifice the
exchange, but sacrificed the wrong rook.} (17. Rxc6 $1 {gives White a very
strong, possibly winning, attack, e.g.} bxc6 18. Qxc6+ Ke7 19. Qb7+ Kd6 20.
Rd1+ Bd5 21. Qb4+ Kc6 22. Qe7) 17... fxe6 18. Qxe6+ Ne7 19. Rc7 Qf7 20. Qd7+
Kf8 21. Nd4 Re8 22. Ne6+ Kg8 23. Nd8 {So far Black has defended well and kept
an extra rook, but now Black cracks.} Qd5 $4 (23... Qg6 {was the right move, e.
g.} 24. Qe6+ Kf8 25. Rxb7 h5 {and the h-pawn will give Black some counterplay
against White's king and allow Black to bring the extra rook into play.}) 24.
Qxe8+ Kg7 25. Rxe7+ Kh6 26. Nf7+ Kh5 27. Nxh8+ Kh6 28. Nf7+ Kh5 29. Ne5+ Kg5
30. Nf3+ 1-0
[Event "Rijeka op"]
[Site "Rijeka"]
[Date "2001.12.06"]
[Round "6"]
[White "Jurkovic, Hrvoje"]
[Black "Yemelin, Vasily"]
[Result "0-1"]
[ECO "C56"]
[WhiteElo "2389"]
[BlackElo "2490"]
[PlyCount "60"]
[EventDate "2001.12.01"]
[EventRounds "9"]
[EventCountry "CRO"]
[Source "ChessBase"]
[SourceDate "2004.11.15"]
1. e4 e5 2. Nf3 Nc6 3. Bc4 Nf6 4. d4 exd4 5. O-O Nxe4 6. Re1 d5 7. Bxd5 Qxd5 8.
Nc3 Qa5 {Diagram [#] This is the most popular continuation and leads to
positions that offer equal chances for both sides.} 9. Nxe4 (9. Rxe4+ $6 Be6
10. Nxd4 O-O-O {leaves White in some trouble.}) 9... Be6 (9... Be7 {is less
effective.} 10. Bg5 O-O (10... f6 11. Nxf6+ gxf6 12. Bxf6 {is a fully sound
sacrifice here.} O-O (12... Rg8 $6 13. Rxe7+ Nxe7 14. Qe2 Qc5 15. Re1 Rg6 16.
Bxe7 Qd5 17. Bg5+ {is one of the many ways that Black can go down quickly.})
13. Bxe7 $14) 11. Bxe7 Nxe7 12. Nxd4 {with a slight advantage for White.}) 10.
Bd2 {I don't recommend this move because it gives Black a large array of
options ranging from the ultra-sharp to the ultra-drawish.} (10. Bg5 $6 {
doesn't work for White in this line.} h6 11. Bh4 Bb4 (11... g5 $5 {is also
good for Black, e.g.} 12. Nf6+ Ke7 13. b4 Qf5) 12. c3 (12. Re2 g5 13. Bg3 (13.
Nf6+ $2 Ke7 {and White has two pieces attacked.}) 13... O-O-O) 12... dxc3 13.
bxc3 Bxc3 14. Nxc3 Qxc3 {might leave White with enough compensation for one
pawn, but not two.}) 10... Bb4 (10... Qd5 {is the drawish option.} 11. Bg5 Bd6
12. Bf6 (12. c3 O-O 13. cxd4 Bg4 $15) 12... O-O (12... gxf6 $4 13. Nxf6+) 13.
Nxd4 Nxd4 14. Qxd4 Qxd4 15. Bxd4 $11 {and the players agreed a draw in D.
Bronstein-M.Tal, Keres Memorial 1979.}) (10... Qh5 11. Neg5 (11. Bg5 {
transposes to 8...Qh5 9.Nxe4 Be6 10.Bg5}) 11... O-O-O 12. Nxe6 fxe6 13. Ng5
Qxd1 14. Raxd1) (10... Qa4 $5 {is very double-edged and has been favoured by
Valeri Yandemirov.} 11. Neg5 ({or} 11. b3 Qa6 12. Neg5 O-O-O 13. Nxe6 fxe6 14.
Ng5 Rd7 15. Rxe6 Bd6 {T.Harding-J.Noria Silverstre, corr. 1987}) 11... O-O-O
12. Nxe6 fxe6 13. Rxe6 Bd6 {gave equal chances in A.Stambulian-V.Yandemirov,
Russia 1998.}) ({Finally} 10... Qf5 {tends to lead to complications, e.g.} 11.
Bg5 h6 12. Bh4 Bc5 13. b4 ({Or} 13. Bf6 $5 gxf6 14. Nh4 Qf4 15. Ng6 fxg6 16.
Nxc5 Kf7 17. Nxe6) 13... Bxb4 14. Nxd4 Nxd4 15. Qxd4 Bxe1 16. Qxg7 Bxf2+ 17.
Nxf2 Kd7 18. Rd1+ Kc6 $13 {H.Messing-H. Stevic, Croatia 2008.}) 11. Nxd4 {This
is a "fork trick", luring Black's c6-knight to a square where it can be forked
with the c2-pawn.} Nxd4 12. c3 O-O-O $5 (12... Be7 {is most popular, but less
challenging.} 13. cxd4 Qd5 14. Bb4 Bxb4 15. Qa4+ Qc6 16. Qxb4 O-O-O {gives an
equal position. White's active pieces compensate for the isolated pawn on d4.})
13. cxb4 Qf5 {Diagram [#] This is a very double-edged position, since as John
Emms pointed out in "Play the Open Games as Black", both kings can come under
fire.} 14. Rc1 Bxa2 {A risky pawn grab, but Black seems to be able to get away
with it.} (14... Bd5 15. Ng3 Qg6 {is Black's most popular continuation but then
} 16. Be3 {gives White promising attacking chances on the queenside.}) 15. Rc5
(15. Bc3 {is another idea, e.g.} Bb3 16. Qd3 Nb5 17. Qg3 Rhe8 18. Bxg7 Rxe4 19.
Qxb3 $11 {E.Benatar-A.Ros, email 2000.}) (15. Ra1 Bb3 16. Qc1 Kb8 {gives White
some queenside hacking chances but Black has the better control of the centre.}
) 15... Bd5 16. Bc3 {This allows Black to trap the rook on c5.} (16. Ng3 Qd7
17. Bg5 Rde8 {is also good for Black.}) 16... b6 17. Ng3 Qf4 $6 (17... Qd7 18.
Qxd4 bxc5 19. bxc5 {leaves White with insufficient compensation for the
exchange, though Black has to be quite careful.}) 18. Bd2 $2 ({Missing the
tactic} 18. Rxd5 Rxd5 19. Re4) 18... Qd6 19. Rc3 Bb7 20. Qg4+ Ne6 21. Bg5 h5
22. Qh3 Rd7 23. Nf5 Qxb4 24. Bc1 g6 25. Ne3 Ng5 26. Qg3 Ne4 27. Qf4 a5 28. Nc4
Nxc3 29. bxc3 Qxc3 30. Bd2 Rxd2 0-1
[Event "Baltic Sea tt8 B07 email"]
[Site "ICCF email"]
[Date "2008.03.01"]
[Round "?"]
[White "Schilling, Frank"]
[Black "Kriksciunas, Bronislavas"]
[Result "1/2-1/2"]
[ECO "C56"]
[WhiteElo "2379"]
[BlackElo "2324"]
[PlyCount "73"]
[EventDate "2008.??.??"]
[EventType "corr"]
[EventRounds "16"]
[Source "ChessBase"]
[SourceDate "2004.11.15"]
1. e4 e5 2. Nf3 Nc6 3. d4 exd4 4. Bc4 Nf6 5. O-O Nxe4 6. Re1 d5 7. Bxd5 Qxd5 8.
Nc3 Qa5 9. Nxe4 Be6 10. Neg5 {This is White's most popular continuation, which
gives White some scope to dictate how play will pan out (unlike 10.Bd2 which
allows Black to dictate proceedings).} O-O-O 11. Nxe6 fxe6 12. Rxe6 {Diagram
[#] White intends to follow up by centralising the major pieces with Qe2, Bg5
(or Bd2) and Re1.} (12. Bg5 $5 {is fine if followed up by Stefan Bücker's
gambit idea} Re8 13. Re4 {, for example,} e5 14. Qe2 Bd6 15. Bd2 Qb6 16. b4 $44
) (12. Ng5 {is met by} d3 {which causes White problems, e.g.} 13. c3 Qf5 14.
Nxe6 Rd6 $15) 12... Bd6 (12... Qf5 {is also playable, e.g.} 13. Qe2 h6 14. Re4
(14. Bd2 Qxc2 15. Rc1 Qxb2 16. Rexc6 bxc6 17. Qe6+ Kb8 18. Qe4 $44 {is a
reasonably sound sacrificial alternative for White.}) 14... g5 15. Bd2 Bg7 16.
Re1 {C.Guizar-J. Sawatzki, corr. 2001, where White's centralisation offsets
Black's hacking chances on the kingside.}) (12... h6 {is also interesting,
preventing Bg5 and preparing ...g7-g5.} 13. Qe2 Bd6 14. Bd2 Qh5 $11 {was the
continuatiion of M. Van Delft-B.Bok, Amsterdam 2011.}) 13. Bg5 (13. Qe2 $6 Qh5
{leaves Black with the majority of the attacking chances.}) 13... Rde8 (13...
Rdf8 {is a good alternative, if Black would rather avoid exchanges.} 14. Qe2 h6
15. Bh4 Qd5 16. Bg3 Bxg3 17. hxg3 {is one plausible continuation, leading to
equal chances.}) 14. Qe2 (14. Qe1 {offers an en-masse trade into an equal, but
sharp, endgame, as played numerous times by Max Zavanelli.} Qxe1+ 15. Raxe1 Kd7
16. Rxe8 Rxe8 17. Rxe8 Kxe8 18. Kf1 Kd7 19. Bd2 {Diagram [#] This ending gives
equal chances for both sides, due to the rival pawn majorities.}) 14... Kd7 {
This leaves Black's king misplaced, but this is quite hard for White to
exploit.} (14... Rxe6 15. Qxe6+ Kb8 16. Bd2 $11 {T.Lovholt-K.Elison, email
2008.}) 15. Rxe8 Rxe8 16. Qd3 h6 {Diagram [#]} 17. Bh4 (17. Bd2 {is the main
alternative and is safer, since the text allows Black to gain time in pushing
the kingside pawns towards White's king.}) 17... g5 18. Bg3 g4 19. Nd2 Bxg3 20.
hxg3 Qe5 21. Nb3 (21. Qh7+ Kc8 22. Qxh6 Qf5 {is a risky continuation for White.
Black threatens ...Re8-e2.}) 21... Kc8 22. a3 h5 {The h-pawn rolls forward,
adding more impetus to the attack, while White hasn't got a lot going on the
queenside. However, with careful defence White can hold.} 23. Rd1 a6 24. Kf1 h4
25. Nxd4 Nxd4 26. Qxd4 Qe2+ 27. Kg1 hxg3 28. fxg3 {Diagram [#] Black has
broken through to White's king, but too many pieces have been exchanged off to
put White under much threat, and the game was soon drawn.} Kb8 29. Qd3 Qe6 30.
Qd4 Qc6 31. Qf2 Qh6 32. Qc5 Rh8 33. Re1 b6 34. Qb4 Qh2+ 35. Kf2 Qh7 36. Qe4 Qd7
37. Qf4 1/2-1/2