Black declines the gambit with 4...d5
With 4...d5, Black declines the gambit pawn, instead focusing on the mobilisation of the black pieces. In most variations, White ends up with an isolated pawn on d4, but aims to compensate by generating considerable piece activity into the middlegame, and while Black initially gets a lead in development, Black has to be quite careful, as White's forces can spring into life very quickly.
Many authors recommend the 4...d5 variation with the aim of reaching a drawish endgame using an approach introduced by Capablanca in the game Marshall-Capablanca, Lake Hopatcong 1926. The line runs 5.exd5 Qxd5 6.cxd4 Bg4 7.Be2 (or 7.Nc3 Bb4 8.Be2 Bxf3 9.Bxf3 Qc4) 7...Bb4+ 8.Nc3 Bxf3 9.Bxf3 Qc4.
Many authors recommend the 4...d5 variation with the aim of reaching a drawish endgame using an approach introduced by Capablanca in the game Marshall-Capablanca, Lake Hopatcong 1926. The line runs 5.exd5 Qxd5 6.cxd4 Bg4 7.Be2 (or 7.Nc3 Bb4 8.Be2 Bxf3 9.Bxf3 Qc4) 7...Bb4+ 8.Nc3 Bxf3 9.Bxf3 Qc4.
Black threatens to take twice on c3 and force White to give up castling rights, and to avoid this, White ends up having to exchange queens into an equal endgame, via 10.Qb3 or 10.Bxc6+ bxc6 11.Qe2+. These sort of endings are unattractive for most fans of this type of gambit. Therefore, I recommend that White avoids this line.
One reliable counter is Mark Nieuweboer's suggestion of 7.Nc3 Bb4 8.Be3 (I don't, however, trust Martin Voigt's 8.a3) which typically leads to "isolated queen's pawn" positions. White should be aware of Black's deviation 7...Bxf3, which leads to a sharp ending with equal chances for both sides, and theoretically White is doing fine, although in practice White has tended to play sub-optimally and has got into difficulties, so it is worth getting a feel for the key ideas for White.
Another deviation is 5.Bd3, which amounts to a double-pawn sacrifice in view of the line 5...dxc3 6.exd5 cxb2 7.Bxb2 Qxd5, although in practice Black often persists in declining the gambit with 5...Nf6 6.e5 Ne4, or 5...dxe4 6.Bxe4 Nf6 7.Bxc6+ bxc6.
Games and analysis
The coverage/games are divided as follows:
5.Bd3
1. The rare 5.Bd3, looking especially at 5...dxc3 6.exd5 cxb2 7.Bxb2 Qxd5, but 5...dxe4 is also examined, which may be Black's best way of declining any gambits.
2. 5.Bd3 Nf6, which is an important response for Black, and often results in White sacrificing a pawn for compensation after 6.e5 Ne4 7.0-0 dxc3 8.Nxc3 Nxc3 9.bxc3.
5.exd5 Qxd5 6.cxd4
3. 6...Nf6, with a close look at 7.Nc3 Bb4 8.Be2 Ne4, which is active-looking for Black, but may concede a small advantage to White.
The Capablanca Variation
4. The Capablanca Variation with 6...Bg4 7.Be2 Bb4+ 8.Nc3 Bxf3 9.Bxf3 Qc4. Marshall tried 10.Be3 against Capablanca, but the main game Bryson-Flear, Edinburgh 1985, and the notes, suggest that it is dubious for White.
5. White instead tries 10.Qb3 and ends up in an equal endgame.
6. White can also try 10.Bxc6+ bxc6 11.Qe2+, but the resulting endgame is even more drawish and is not recommended.
White avoids the Capablanca Variation
7. White plays 7.Nc3 Bb4 8.a3, which appears to be dubious.
8. Discussion of the sort of positions that typically arise after 7.Nc3 Bb4 8.Be3, which leaves Black with no good alternative to heading for the standard "isolated queen's pawn" type situations.
[Event "SA-2010-0-00166"]
[Site "Lechenicher SchachServer"]
[Date "2010.11.24"]
[Round "?"]
[White "Llorente, Jose Luis"]
[Black "Korchut, Adam"]
[Result "1/2-1/2"]
[ECO "C44"]
[WhiteElo "2044"]
[BlackElo "1979"]
[PlyCount "100"]
[EventDate "2010.10.30"]
[Source "ChessBase"]
[SourceDate "2012.03.16"]
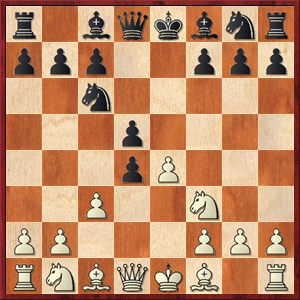
1. e4 e5 2. Nf3 Nc6 3. d4 exd4 4. c3 d5 {Diagram [#] Black declines the gambit
and aims for the rapid mobilisation of the black pieces, bringing the bishops
out to aggressive posts, and saddling White with an isolated pawn on d4. The
line fully equalizes, but White has ways to prevent the position from becoming
sterile. White normally continues with 5.exd5 here, which is fine, but here
White tries an interesting deviation at move 5 which is not very well-covered
in openings books.} 5. Bd3 $5 {White defends the pawn on e4. It is true that
the bishop is usually better-placed on c4 in the accepted lines of the gambit,
but the point here is that in order to accept the gambit pawn, Black has to
let White bring the black queen into the open, where it becomes a target for
attack.} dxc3 {It takes some courage to accept the gambit after all, after
having declined with 4...d5, but this is Black's most theoretically critical
response.} (5... dxe4 6. Bxe4 Nf6 {counterattacks against the bishop on e4 but
then} 7. Bxc6+ bxc6 8. O-O {Diagram [#] gives equal chances.} (8. Nxd4 $6 c5
$15) 8... Be7 (8... dxc3 {allows White to get a strong attack:} 9. Re1+ Be7 (
9... Be6 10. Qa4) 10. Qxd8+ Kxd8 11. Nxc3 $44) 9. cxd4 {and White's isolated
pawn on d4, Black's weak c-pawns, White's piece activity and Black's
bishop-pair cancel each other out, leaving the chances level.}) 6. exd5 (6.
Nxc3 $6 dxe4 7. Nxe4 Bb4+ {is better for Black.}) 6... cxb2 $5 {This is the
critical response but it is also risky as it accelerates White's development.}
(6... Qxd5 7. Nxc3 {gives White reasonable compensation for the pawn due to
the lead in development and open lines. For example,} Bb4 8. O-O Bxc3 9. bxc3
Nge7 {(L.Sobolevsky-U.Gebhardt, Jena Fair 2008)} 10. c4 $44) 7. Bxb2 Qxd5 8.
O-O {Diagram [#]} (8. Nc3 $6 Qe6+ 9. Kf1 {is an interesting line as the white
knights can become very active, but I doubt that White can justify the
misplaced king. For example,} Bd6 10. Ng5 Qe7 11. Nce4 Nf6) 8... Be6 (8... Bg4
9. Nc3 Qd7 10. Re1+ Nge7 {This was the continuation suggested for Black by
Gary Lane. I think that White can get away with} 11. Be4 $5 {since after} Qxd1
(11... O-O-O 12. Qb3 Qe6 13. Qa4 {is probably better, though White can work up
a dangerous queenside attack.}) 12. Raxd1 $44 {it is surprisingly hard for
Black to deal with White's pressure down the central files. Black also has
weak points at b7, c7 and f7 to look after.}) 9. Nc3 Qa5 (9... Qd7 {is the
main alternative and may be a slightly better move, for Black's queen becomes
limited in scope on a5.}) 10. Nb5 {This closes off the black queen from
influencing along the fifth rank.} O-O-O 11. Bc3 Qb6 (11... Nb4 {would
probably have been better, e.g.} 12. Nfd4 Qb6 13. Qa4 $44) 12. Rb1 Qc5 13. Ne5
{White starts generating dangerous piece activity in return for the two
sacrificed pawns.} Nge7 14. Qa4 Nd5 15. Nxc6 Nxc3 16. Ncxa7+ Kb8 17. Nxc3 Qxa7
18. Rxb7+ Qxb7 19. Rb1 {Black will get two rooks for the queen, but White has
dangerous attacking chances againstt the exposed black king, so White is
substantially better in this position.} Qxb1+ 20. Bxb1 f5 21. Qb5+ Ka7 22. g3 {
Defending against potential back-rank mates.} (22. Bxf5 $6 Bxf5 23. Qxf5 g6 {
wins a pawn, but exchanges off an important attacking piece.}) 22... Bd6 23.
Bd3 Bd7 24. Qa6+ Kb8 25. Be2 Bc5 26. Bf3 c6 27. Bxc6 Bxc6 28. Qxc6 Rc8 29. Qb5+
Ka8 30. Qa4+ Kb7 31. Qb3+ Ka7 32. Na4 (32. Qf7+ {picks up another pawn or two,
and would have been a better winning try.}) 32... Rhd8 33. Qf7+ Kb8 34. Nxc5
Rxc5 35. Qxg7 {From here, Black manages to set up a fortress with the two
rooks.} Rc7 36. Qb2+ Kc8 37. Qb5 Rf8 38. a4 Rf6 39. a5 Rcc6 40. Kg2 h6 41. f4
Rc2+ 42. Kh3 Rcc6 43. Kh4 Kc7 44. h3 Kc8 45. g4 fxg4 46. hxg4 Rfe6 47. g5 Kc7
48. Kg4 hxg5 49. f5 Red6 50. Kxg5 Kc8 1/2-1/2
[Event "EU-ch 8th"]
[Site "Dresden"]
[Date "2007.04.03"]
[Round "1"]
[White "Sobolevsky, Leonid"]
[Black "Halkias, Stelios"]
[Result "0-1"]
[ECO "C44"]
[WhiteElo "2332"]
[BlackElo "2569"]
[PlyCount "89"]
[EventDate "2007.04.03"]
[EventRounds "11"]
[EventCountry "GER"]
[Source "ChessBase"]
[SourceDate "2012.03.16"]
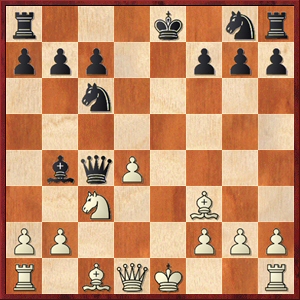
1. e4 e5 2. Nf3 Nc6 3. d4 exd4 4. c3 d5 5. Bd3 Nf6 {Rather than taking on c3,
Black counterattacks against the e4-pawn, which obliges White to push.
However, Black soon ends up on the receiving end of a gambit anyway.} 6. e5 Ne4
7. O-O {White persists in offering a gambit.} (7. cxd4 Bb4+ {is rather good
for Black.}) 7... dxc3 (7... Be7 8. cxd4 {is quite comfortable for Black, but
White can hope for a small edge thanks to the strong central pawns and the
potential instability of the position of the e4-knight.} O-O 9. Nc3 Bf5 10. Re1
Nxc3 11. bxc3 Qd7 12. h3 $14 {gave White a small edge in L.Sobolevsky-T.
Schmitz, Rhein Main 2010.}) 8. Nxc3 Nxc3 9. bxc3 Be7 {Diagram [#] White has
compensation for the pawn due to the various open lines for the white pieces
and the strong-point on e5.} 10. Re1 (10. Rb1 {is the main alternative, though
it will often transpose after a subsequent Rf1-e1.}) 10... Be6 11. Rb1 Rb8 12.
Qc2 h6 13. Nd4 Nxd4 14. cxd4 $44 {White has definite compensation here, due to
the pressure on the queenside, the strong central pawns, and the possibility
of pushing the f-pawn.} Qc8 {Diagram [#]} (14... O-O {may be objectively best,
though Black was probably wary of "castling into the attack" that arises via
White pushing the f-pawn.}) 15. f4 (15. Ba3 {was a good alternative,
threatening to catch the black king in the centre with Bxe7, e.g.} Bxa3 16.
Qa4+ c6 17. Qxa3 $44 {and White still has a lot of pressure on the queenside,
while Black is currently unable to castle short.}) 15... g6 16. Be3 ({The
immediate} 16. f5 $5 {was also worth considering, e.g.} Bxf5 17. Bxf5 gxf5 18.
Bf4 $44 {and White has a lot of pressure for the two pawns.}) 16... c6 17. Rec1
h5 18. Bd2 Bf5 19. Bxf5 gxf5 20. Bb4 Bxb4 21. Rxb4 {White is still doing fine
here, although with the reduced material, it is harder for White to generate
serious winning chances.} Rh6 22. Rb3 h4 23. Rh3 {I'm guessing that White was
afraid of ...h4-h3, but with Black tied up on the queenside, that isn't really
much of a threat here.} (23. a4 {with the idea of disrupting the black
queenside with a4-a5-a6 is one way in which White could have generated some
chances, and if Black parries the threat with ...a7-a6 then it creates a hole
on b6.}) 23... Qd7 24. Qf2 Qe7 25. Qc2 {White was clearly happy with a draw
here. Objectively Black should probably have taken the draw, but Black's
decision to play on worked well in the game.} Qe6 26. Qf2 Qe7 27. Qc2 Rh5 28.
Qe2 (28. Rb3) 28... Rh8 29. Qc2 Qe6 {Diagram [#]} 30. Qf2 (30. Qc5 {is pretty
strong for White here.}) 30... Qh6 31. Rf1 Kd7 32. Qc2 Qg6 33. Rb1 b6 34. Rc1
Rbc8 35. Rf3 {With all these time-wasting moves, White has allowed Black to
untangle on the queenside, and now Black can set about trying to win with the
extra pawn.} Qe6 36. a4 c5 37. dxc5 $6 {This allows Black to create a passed
pawn on the d-file.} (37. a5 {undermining Black's queenside pawn mass would
have been a better try.}) 37... Rxc5 38. Rc3 Rhc8 39. Qd3 Rxc3 40. Rxc3 Rxc3
41. Qxc3 Qc6 42. Qa3 Qc5+ 43. Qxc5 bxc5 44. Kf2 d4 45. g3 0-1
[Event "Ros Miro mem Europe email"]
[Site "ICCF email"]
[Date "2004.04.15"]
[Round "?"]
[White "Ketola, Ville"]
[Black "Suarez Sedeno, Manuel"]
[Result "1-0"]
[ECO "C44"]
[WhiteElo "2392"]
[BlackElo "2426"]
[PlyCount "83"]
[EventDate "2004.??.??"]
[EventType "corr"]
[EventRounds "14"]
[Source "ChessBase"]
[SourceDate "2012.03.16"]
1. e4 e5 2. Nf3 Nc6 3. d4 exd4 4. c3 d5 5. exd5 {This is the normal
continuation for White. White accepts an isolated pawn on d4, while bringing
the black queen out into the open.} Qxd5 6. cxd4 {Diagram [#]} Nf6 {A sensible
option, developing a piece and increasing Black's influence on the centre.} 7.
Nc3 {Probably best, since 7.Be2 gives Black rather more options. This move
prepares to play d4-d5 if Black's queen moves out of the way.} Bb4 {Pinning
the c3-knight to the white king, which gives Black time to arrange to move the
queen away from d5 without allowing White to play d4-d5.} (7... Qa5 $6 8. d5 $1
{is the advance that White typically strives for in these positions with an
isolated pawn on d4. For example,} Nb4 9. Bb5+ Bd7 10. Bxd7+ Nxd7 11. O-O $16)
8. Be2 Ne4 {This is an active move, but probably not the best.} (8... Qa5 9.
O-O {leads to typical "isolated queen's pawn" situations. For example,} Bg4 10.
Be3 O-O 11. Qb3 Be6 12. Bc4 Bxc4 13. Qxc4 {with equal chances, V. Bakhrakh-A.
Angaforov, St Petersburg 1994.}) 9. Bd2 {Although White looks passive, White
has threats to the queen on d5 and knight on e4, forcing Black to make
concessions.} Bxc3 10. bxc3 O-O 11. O-O Nxd2 12. Nxd2 {Diagram [#] White now
has an edge thanks to the pawns on c3 and d4, controlling some key central
squares.} Qa5 13. Qc1 Qg5 (13... Re8 {is sensible, making use of the open
e-file.} 14. Re1 Bf5 15. Nb3 Qb6 16. Qg5 $14 {is then one plausible
continuation, with some attacking chances for White.}) 14. Re1 Bd7 15. Bd3 Rae8
16. Qc2 {White now starts to build up a kingside attack.} Qh6 17. Nf3 Rxe1+ 18.
Rxe1 Re8 19. Rxe8+ Bxe8 {The trade of rooks on the open file have not led to a
drawish situation because White still has the strong centre.} 20. h4 Ne7 21.
Qb2 Bc6 22. Ne5 Kf8 23. Bc4 b6 24. Bxf7 Qxh4 {Material is still level but
Black's king is now rather exposed.} 25. Bc4 Qe4 26. Bf1 a5 27. Qd2 h6 28. a3
Bb7 29. f3 Qh4 30. Qa2 Qf4 31. Qe6 Qf5 32. Qc4 Nd5 33. Qb5 Qe6 34. Qb3 Nf4 35.
Qb1 Kg8 36. Kh2 Qe8 37. g3 Nd5 (37... Qh5+ 38. Kg1 Qg5 39. Kf2 Nd5 {is a more
counterattacking continuation but Black is still in some trouble after} 40. f4)
38. Bc4 a4 39. Kg1 Ba8 {I find it hard to believe that this is Black's best
move, but the alternatives are also hardly appealing.} (39... Qe6 40. Qc2 $16)
40. Qe4 c6 41. Qb1 b5 42. Bd3 1-0
[Event "BCF-ch"]
[Site "Edinburgh"]
[Date "1985.??.??"]
[Round "5"]
[White "Bryson, Douglas M"]
[Black "Flear, Glenn C"]
[Result "1/2-1/2"]
[ECO "C44"]
[WhiteElo "2275"]
[BlackElo "2475"]
[PlyCount "135"]
[EventDate "1985.08.??"]
[EventRounds "11"]
[EventCountry "SCO"]
[Source "ChessBase"]
[SourceDate "2012.03.16"]
1. e4 e5 2. Nf3 Nc6 3. d4 exd4 4. c3 d5 5. exd5 Qxd5 6. cxd4 Bg4 {This is a
critical response, threatening to take on f3 and encouraging Bf1-e2 to break
the pin.} (6... Bb4+ 7. Nc3 {generally transposes to the game continuation
after} Bg4 (7... Be6 8. Be2 Nf6 9. O-O {is less challenging for White, for
once the black queen moves from d5, White can set about activating the pieces
and can probably claim a slight advantage.})) 7. Nc3 {White ignores the threat
to take on f3.} (7. Be2 {can be met by} Bb4+ 8. Nc3 Bxf3 9. Bxf3 Qc4 {
transposing into the game continuation.}) 7... Bb4 (7... Bxf3 $5 {is Black's
only way to try and exploit White's move-order, which leads to a sharp endgame
that offers equal chances for both sides.} 8. Nxd5 Bxd1 9. Nxc7+ Kd7 10. Nxa8 {
Diagram [#] is the normal continuation, in which Black will grab two pieces
for the rook (as White's a8-knight will not escape if Black is careful) but
White can generate compensation by activating the pair of rooks.} Bh5 (10...
Bc2 $5 {appears to be untested, but is a good alternative, e.g.} 11. d5 Nd4 12.
Be3 Bb4+ 13. Bd2 Bxd2+ 14. Kxd2 Ne7) 11. d5 Nd4 12. Bd3 Bg6 13. Bxg6 hxg6 14.
Kd1 Nh6 15. Be3 Nhf5 16. Rf1 $1 {(correctly recommended in Danish Dynamite)}
Nxe3+ 17. fxe3 $13) 8. Be2 (8. Be3 {, pointed out to me by Mark Nieuweboer, is
a perfectly good alternative, which avoids the Capablanca Variation. Black's
best is then to transpose back to regular 6...Nf6 lines with} Qa5 (8... Nf6 9.
Be2 {gives White more options, since} Qa5 {can now be met by} 10. O-O {
whereupon grabbing a pawn on c3 is now too risky for Black.}) 9. Qb3 Nf6 10.
Be2 {with equal chances for both sides.}) (8. a3 {features in the game M.
Voigt-M.Chandler, Bundesliga 2002.}) 8... Bxf3 9. Bxf3 Qc4 {Diagram [#] This
is the Capablanca Variation, as introduced in the game Marshall-Capablanca,
Lake Hopatcong 1926.} 10. Be3 $6 {This was also Marshall's response, but I
don't think that it is sound. White has no good alternative to exchanging
queens, which is why Capablanca's defence has traditionally been a major
problem for fans of the Danish and Göring Gambits, but note the deviation 8.
Be3.} Bxc3+ 11. bxc3 Qxc3+ {There is no good reason for Black not to take on
c3 and deprive White of castling rights.} 12. Kf1 {Diagram [#]} (12. Bd2 {
should be met by} Qd3 {refusing to allow White to castle kingside. White can
avoid the queen exchange with} 13. Rc1 O-O-O 14. Bxc6 bxc6 15. Qg4+ (15. Rxc6
$4 Qe4+) 15... Kb7 16. Qxg7 Ne7 {but then Black has the majority of the
attacking chances.}) 12... Qc4+ (12... Nge7 {may be stronger since I don't
think White can get enough for the pawn.} 13. Rc1 Qa3 (13... Qa5 14. Qb3 {is
more believable for White}) 14. Qc2 O-O $15) 13. Kg1 (13. Be2 {is probably
stronger, inviting a repetition of moves after} Qd5 14. Bf3) 13... Nge7 14. Rc1
Qxa2 15. Ra1 Qc4 16. Rc1 {In Marshall-Capablanca, Lake Hopatcong 1926, the
players agreed to a draw, but Black can, and objectively should, play on.} Qa2
17. Ra1 Qc4 18. Rc1 {Diagram [#]} Qb4 {This is Black's best way to avoid the
draw. White can regain one of the two sacrificed pawns, but does not get
enough compensation for the other pawn.} 19. Rb1 (19. d5 Ne5 20. Rxc7 Nxf3+ 21.
gxf3 O-O {is also unappealing for White.}) 19... Qd6 20. Rxb7 O-O {White does
not have enough compensation for the pawn in this position.} 21. g3 Nd5 22. Kg2
Rab8 23. Rxb8 Nxe3+ 24. fxe3 Rxb8 25. Qa1 g6 26. Rc1 Ne7 27. Qxa7 {Here White
regains the pawn, but is left facing a strong attack.} Rb2+ 28. Kg1 (28. Kh1 {
is stronger, as pointed out by Michael Goeller, but I think Black still has
the edge, e.g.} Qb4 29. Qxc7 (29. Rd1 Nf5) 29... Qd2 30. g4 Qxe3 $15) 28... Qb4
29. Rd1 Qc3 30. Qa8+ Kg7 31. Qe4 Nf5 32. Qd3 Qb4 (32... Qxd3 $6 33. Rxd3 {with
the idea of e3-e4 gives White a fair amount of compensation for the pawn, in
spite of the queen trade.}) (32... Rb3 {would have been quite a good way to
trade queens though:} 33. Qxc3 Rxc3 34. e4 Rxf3 35. exf5 Rxf5 {leaves Black
with an extra pawn in the rook ending, but it may be tough to convert this
into a win.}) 33. Bd5 h5 34. e4 Nh6 35. Qf3 c6 36. Bxc6 Qc4 37. Bd7 $2 (37. Bd5
Qc2 38. h4 {was necessary, when I'm not sure that Black has much of an
advantage.} Qh2+ 39. Kf1 Ng4 $4 {doesn't work here due to White's double
attack on f7.}) 37... Qc2 38. h3 (38. h4 $2 Qh2+ 39. Kf1 Ng4 {leads to a
forced checkmate.}) 38... Qh2+ 39. Kf1 f5 40. exf5 Qxh3+ 41. Ke1 gxf5 $2 (41...
Qh2 {would have led to a winning advantage due to the deadly threat of ...Qg1+.
} 42. f6+ Kh7 43. Bb5 Rxb5 44. f7 Rb2 {leaves White with no time to promote on
f8.}) 42. Rd2 Rb1+ 43. Rd1 Rxd1+ 44. Kxd1 h4 45. Bxf5 {White opts to simplify
into a queen and knight vs. queen ending. Most such endings are drawn but the
side with the lone queen has to be very careful.} Nxf5 46. Qb7+ Kf6 47. Qb6+
Kg5 48. gxh4+ Kf4 49. Qf6 Qd3+ 50. Kc1 Ke4 51. Qe6+ Kf3 52. Qc6+ Ke3 53. Qc2
Qa3+ 54. Qb2 Qa5 55. Qb3+ Kf4 56. Qb8+ Kg4 57. Qc8 Kxh4 58. d5 Qa1+ 59. Kc2
Qa4+ 60. Kb2 Qb4+ 61. Kc2 Qe4+ 62. Kb2 Ne3 63. Qh8+ Kg4 64. d6 Qb4+ 65. Kc1
Qxd6 66. Qg7+ Kf3 67. Qc3 Ke4 68. Qb4+ {This stalemate-based defence forces an
exchange of queens and, correspondingly, a dead draw.} 1/2-1/2
[Event "IBM"]
[Site "Amsterdam"]
[Date "1972.??.??"]
[Round "?"]
[White "Ljubojevic, Ljubomir"]
[Black "Ree, Hans"]
[Result "1/2-1/2"]
[ECO "C44"]
[WhiteElo "2510"]
[BlackElo "2430"]
[PlyCount "41"]
[EventDate "1972.??.??"]
[EventRounds "15"]
[EventCountry "NED"]
[EventCategory "10"]
[Source "ChessBase"]
[SourceDate "2012.03.16"]
{This is one of the main "stem games" in the Capablanca Variation and is a
good illustration of why White should probably avoid this line.} 1. e4 e5 2.
Nf3 Nc6 3. d4 exd4 4. c3 d5 5. exd5 Qxd5 6. cxd4 Bg4 7. Be2 Bb4+ (7... O-O-O {
is tempting and active, but White is able to generate good play down the
c-file against Black's king, e.g.} 8. Nc3 Bb4 9. O-O Qa5 10. Be3 Nf6 {
transposes to the 6...Nf6 variation, with Black having chosen to castle long.})
8. Nc3 Bxf3 9. Bxf3 Qc4 {The starting position of the Capablanca Variation.} (
9... Qxd4 $4 10. Bxc6+ {wins the queen, D.Levy-Vaca, corr. 1982}) 10. Qb3 {
White covers the threat against c3, but this move has the downside of bringing
about an immediate exchange of queens.} Qxb3 11. axb3 Nge7 {Diagram [#]} (11...
Nxd4 {initiates complications, but I don't think it is objectively as good.}
12. Bxb7 Nc2+ 13. Ke2 Nxa1 14. Bc6+ Kf8 15. Bxa8 Nxb3 16. Be3 {was agreed
drawn in D.Velimirovic-M.Tal, Yugoslavia 1979, but White has more than enough
compensation for the pawn in this position, as Black's extra pawn is isolated
and White has the more active pieces.}) 12. O-O {White brings the king to
comparative safety, arguing that there are still plenty of pieces left on the
board, so leaving the king short of pawn cover could backfire.} (12. Bg5 f6 13.
Be3 {is worth considering, with the idea of leaving the king in the centre or
castling to the queenside in some lines to help protect the weak queenside
pawns.}) 12... a6 13. Ra4 {With the threat of d4-d5, chasing the c6-knight
away, followed by winning a piece with Rxb4.} Bd6 {Black moves the bishop out
of the way. White now starts a flurry of activity against the black king, but
Black's defences are fully adequate.} 14. Bg5 f6 15. Bh5+ Ng6 16. Re1+ Nce7 17.
Bd2 O-O-O 18. g3 Kb8 19. Ne4 Nd5 {Diagram [#]} 20. Ra5 {This may be a slight
inaccuracy, as it allows Black to get in ...Bb4.} (20. Bf3 {as in L.Mischke-R.
Montecatine, corr. 1992, putting the bishop on a better diagonal, would have
been better.}) 20... Bb4 21. Bxb4 $15 {The game was agreed drawn at this point,
but after 21...Nxb4, Black is slightly better, because of the well-placed
knight on b4 and the pressure against d4.} 1/2-1/2
[Event "EU-ch GMN/002 email"]
[Site "ICCF email"]
[Date "2002.03.01"]
[Round "?"]
[White "Dolgov, Igor Mikhailovich"]
[Black "Schuster, Peter"]
[Result "1/2-1/2"]
[ECO "C44"]
[WhiteElo "2453"]
[BlackElo "2475"]
[PlyCount "40"]
[EventDate "2002.??.??"]
[EventType "corr"]
[EventRounds "10"]
[Source "ChessBase"]
[SourceDate "2012.03.16"]
{White has an alternative way of handling the Capablanca Variation, but I
think it is even more drawish than 10.Qb3.} 1. e4 e5 2. Nf3 Nc6 3. d4 exd4 4.
c3 d5 5. exd5 Qxd5 6. cxd4 Bg4 7. Be2 Bb4+ 8. Nc3 Bxf3 9. Bxf3 Qc4 10. Bxc6+ {
White encourages Black to shift the queen away from c4.} bxc6 {Diagram [#]
Black refuses to shift the queen on c4, even at the cost of pawn structure.} (
10... Qxc6 11. O-O {gives White good chances of an edge, as White is well set
up to get in d4-d5, an important advance in many positions with an isolated
pawn on d4.}) 11. Qe2+ (11. Qc2 {is one way to try to avoid the queen exchange,
but it is hard to shift the queen on c4, so White's king ends up either stuck
in the centre, or on the rather draughty queenside.} Ne7 12. a3 Bd6 13. Be3 O-O
14. O-O-O Nd5 {is slightly better for Black.}) 11... Qxe2+ 12. Kxe2 O-O-O 13.
Be3 Ne7 {Here Black is preparing to attack the isolated pawn on d4, so White
should advance the king to c4 via d3 to help defend it.} 14. Kd3 {Diagram [#]}
c5 {Probably not best.} (14... Nf5 15. Kc4 Ba5 16. Rad1 {gives a level
position. Heppell,I (2136)-Rogobete,N (2273) Bad Woerishofen 2010}) 15. Kc4
cxd4 16. Bxd4 {Here White has a slight advantage due to the superior pawn
structure and centralised king, but it is hard to make much use of it.} Nc6 17.
Be3 Ba5 18. Rad1 Ne5+ 19. Kb3 Bb6 {With this move Black forces White to either
accept a weakened kingside pawn structure, or correct Black's weakened
queenside structure by exchanging on b6, after which the position is deal
level.} 20. Bxb6 axb6 {Yes, this line is pretty drawish.} 1/2-1/2
[Event "Bundesliga 0102"]
[Site "Germany"]
[Date "2002.02.03"]
[Round "7.5"]
[White "Voigt, Martin"]
[Black "Chandler, Murray G"]
[Result "1/2-1/2"]
[ECO "C44"]
[WhiteElo "2300"]
[BlackElo "2540"]
[PlyCount "69"]
[EventDate "2001.10.06"]
[EventRounds "15"]
[EventCountry "GER"]
[Source "ChessBase"]
[SourceDate "2012.03.16"]
[WhiteTeam "Hamburg Koenigsspringer"]
[BlackTeam "Solingen"]
[WhiteTeamCountry "GER"]
[BlackTeamCountry "GER"]
1. e4 e5 2. d4 exd4 3. c3 d5 4. exd5 Qxd5 5. cxd4 Nc6 6. Nf3 Bg4 7. Nc3 Bb4 8.
a3 {Diagram [#] This is one way for White to avoid Capablanca's defence but it
is not as reliable as 8.Be3.} Bxf3 (8... Bxc3+ 9. bxc3 O-O-O {has not been
played in any high-level games but looks to me to be the critical test,
striving to take advantage of White's weakened queenside light squares. I
doubt that White can level the chances, e.g.} 10. Be2 (10. Bd3 Ne5 11. dxe5
Qxd3 12. Qxd3 Rxd3 $15) 10... Bxf3 11. gxf3 (11. Bxf3 Qc4 {and White cannot
even shift the queen on c4 by trading queens.}) 11... Nge7 $15 {Diagram [#]
With queens still on the board, White's bishop-pair does not provide enough
compensation for the poor pawn structure and lack of a safe home for the king.}
) 9. axb4 (9. gxf3 Bxc3+ 10. bxc3 O-O-O {again leaves White with problems
using the bishop-pair to generate enough compensation for the vulnerable king.}
) 9... Qe6+ (9... Bxd1 10. Nxd5 O-O-O 11. Bc4 Bg4 {is another option for Black
but White is left with at least equality due to the active pieces.} 12. Bg5 f6
13. Be3) 10. Be2 (10. Ne2 {is well met by} Bd5) 10... Bxe2 11. Nxe2 Nf6 {
Diagram [#] Here White has some difficulty in generating enough piece play to
offset the weak queenside pawn structure.} 12. O-O O-O (12... Nxb4 $6 13. Nf4
Qb6 14. Re1+ {is too dangerous for Black. Black should instead concentrate on
getting castled.}) 13. b5 Nb4 14. Re1 Rfe8 15. Bd2 (15. Bg5 Nfd5 {is also good
for Black.}) 15... Nbd5 (15... Nd3 {is quite awkward to meet here.} 16. Nf4 Qc4
17. Nxd3 Qxd3 {and I think Black is slightly better.}) 16. Nc3 Qb6 17. Qa4
Rxe1+ 18. Rxe1 {White probably has enough piece play to compensate for the
weak pawn structure here.} h6 19. Re5 Qd6 20. Qa3 Qd7 21. h3 c6 22. Qc5 a6 23.
bxc6 bxc6 24. Na4 Qb7 25. Qc2 Qb5 (25... Rb8 {should hold the balance in this
position, discouraging Na4-c5 because of the pressure against b2.}) 26. Nc5 {
Now White has some advantage as it is hard for Black to shift White's knight.}
Re8 27. b3 Rxe5 28. dxe5 Ne8 29. e6 Nef6 30. exf7+ Kxf7 31. Nd3 Kg8 32. Ne5 (
32. Bc1 {is probably best here, planning to re-route the bishop to b2 and
enable the white queen to cover the second rank.}) 32... Qe2 {Black's
impending attack with ...Ne4 encourages White to settle for perpetual check.}
33. Qf5 Qxd2 34. Qc8+ Kh7 35. Qf5+ 1/2-1/2
[Event "SVK-chT2A 1112"]
[Site "Slovakia"]
[Date "2012.01.07"]
[Round "7.4"]
[White "Petrik, Karol"]
[Black "Fabry, Robert"]
[Result "1-0"]
[ECO "C44"]
[WhiteElo "2082"]
[BlackElo "2177"]
[PlyCount "45"]
[EventDate "2011.10.08"]
[EventRounds "11"]
[EventCountry "SVK"]
[Source "ChessBase"]
[SourceDate "2012.03.16"]
1. e4 e5 2. Nf3 Nc6 3. d4 exd4 4. c3 d5 5. exd5 Qxd5 6. cxd4 Bg4 7. Be2 (7. Nc3
{avoids Capablanca's defence.} Bb4 8. Be3 O-O-O (8... Qa5 {is Black's only way
to try to take advantage of White's move-order, as it forces White to play} 9.
Qb3 {but Qd1-b3 is commonly played in these variations anyway. For example,}
Nf6 10. Be2 O-O-O 11. O-O Be6 12. Bc4 Bxc4 13. Qxc4 {with equal chances.}) 9.
Be2 Qa5 10. O-O Nf6 {would then transpose into the game continuation.}) 7...
O-O-O {Black misses an opportunity to head into the Capablanca Variation here.}
(7... Bb4+ 8. Nc3 Bxf3 9. Bxf3 Qc4) 8. Nc3 Bb4 9. O-O Qa5 10. Be3 Nf6 {Diagram
[#] This is a very common position in the Göring Gambit Declined. Black has
opted to castle queenside, which is an active option which steers play towards
an unbalanced and combative middlegame, but Black must be careful of White's
long-term attacking chances down the half-open c-file.} 11. h3 Bh5 (11... h5 {
rather appeals to me, trying to open the h-file against White's king, but it
isn't sound:} 12. hxg4 hxg4 13. Ng5 Nxd4 14. Bxg4+ Nxg4 15. Qxg4+ f5 16. Qd1
$14) 12. Qb3 Rhe8 13. a3 (13. Rac1 {looks quite good, putting the rook
opposite Black's king on the c-file.} Bxc3 14. Rxc3 Ne4 15. Rc4 {gave
appoximately equal chances although White went on to win soon afterwards with
a queenside attack in the following miniature:} f6 16. Ra4 Qb6 17. Qa3 Rd5 $2 (
17... Nd2 18. d5 $14) 18. Bc4 Ra5 19. d5 Rxa4 20. Qxa4 Qa5 21. Bb5 {1-0 (21)
Velimirovic,D-Tomic,D Vinkovci 1970}) 13... Bxc3 14. bxc3 Nd5 15. Rab1 {
Diagram [#]} Nxc3 $2 {A serious error. Black had to attend to the threat to b7.
} (15... b6 {leaves Black with light-square weaknesses around the king, but in
the meantime White is facing problem in the centre. Another game in this line
led to a quick win for Black:} 16. Qc4 Nxc3 17. Qa6+ $2 Kb8 18. Rbc1 Bxf3 19.
gxf3 Nxd4 {and White resigned in M.Abdo-M.Kamel, Egypt 2009.}) 16. Qxb7+ Kd7
17. Bb5 Bxf3 18. gxf3 Nxb5 19. Rxb5 Qa4 20. Rc1 Re6 21. d5 Rg6+ 22. Kh2 Nb8 23.
Qxc7+ 1-0