Introduction
The Göring Gambit is a 19th-century style gambit beginning with 1.e4 e5 2.Nf3 Nc6 3.d4 exd4 4.c3!? (or 2.d4 exd4 3.Nf3 Nc6 4.c3).
White can of course recapture with 4.Nxd4, the Scotch Game, but in the Göring Gambit White instead offers the d-pawn as a gambit - this opening is essentially a Danish Gambit (1.e4 e5 2.d4 exd4 3.c3) with Nf3 and ...Nc6 inserted. After 4...dxc3 White can settle for sacrificing one pawn with 5.Nxc3, or sacrifice a second pawn at b2 with 5.Bc4, which is more dangerous but of more marginal soundness.
The idea is to open up lines for the white pieces and increase the white lead in development, which will typically be used as a basis for launching a quick attack on the black king.
The gambit was first played at high levels by Howard Staunton in the 1840s, but Carl Theodor Göring, who was the first player to introduce it into master play, got it named after him. Although the Göring Gambit has never gained much popularity at the highest levels of play, some players rated in the 2300-2600 Elo bracket have used it frequently at some point, e.g. Jonathan Penrose, Ljubomir Ljubojević, Douglas Bryson, Igor Dolgov and Dimitrios Mastrovasilis. There was a rare GM outing in the gambit in 2011, when Yu Yangyi used it successfully against Rimat Jumabayev. Alexander Alekhine often played 1.e4 e5 2.d4 exd4 3.c3 dxc3 4.Nxc3 in casual games, which often transposed after a subsequent ...Nc6 and Nf3.
The most common objection to playing this gambit is that 4.c3 does not contribute directly to the development of white's pieces and so Black can equalise by declining the gambit and undermining White's e4-pawn, which is currently undefended. 4...d5 is the most reliable way of doing so, while 4...Nf6 is also quite good. 4...Nge7 intending 5...d5 is also tricky, but I think 5.Bc4 d5 6.exd5 Nxd5 7.0-0 gives White good chances of getting an advantage out of the opening, and "pushing past" with 4...d3 tends to consign Black to passive positions.
My feeling is that this gambit is less definitely sound than the Scotch Gambit (4.Bc4), especially if White sacrifices the second pawn with 4...dxc3 5.Bc4. But even so, White scores a very respectable 57% with 4.c3 in practice - the same as White scores with the Ruy Lopez - and scores 62% with 4...dxc3 5.Bc4.
An interesting pronunciation quirk is that (in Britain and North America at least) this opening is most often pronounced in a way that rhymes with "boring", as if the name Göring didn't contain an umlaut. I am guessing that this is probably to distance it from risk of being tarnished by association with the infamous Hermann Göring, who probably had nothing to do with this gambit.
Repertoire/transposition issues
If White uses the move-order 1.e4 e5 2.Nf3 Nc6 3.d4 exd4 4.c3, then White has to be ready for the Petroff Defence (2...Nf6) and the Philidor Defence (2...d6) and the dubious but tricky Elephant (2...d5) and Latvian (2...f5) gambits.
After 2...Nc6 3.d4, however, Black has no good way to maintain the strong-point on e5. 3...d6 is well met by 4.dxe5, or 4.Bb5 (transposing into the Steinitz variation of the Ruy Lopez, which is quite passive for Black), or 4.Bc4 which tends to lead into the Hungarian Defence.
If White tries 1.e4 e5 2.d4 exd4 3.Nf3 Nc6 4.c3, then Black has no particularly strong alternative to 2...exd4, although 2...Nc6 (transposing to a line of the Nimzowitsch Defence, 1.e4 Nc6 2.d4 e5) is playable. 2...d6 as mentioned earlier can lead to a Philidor Defence after 3.Nf3, when Black's most reliable is probably 3...exd4 after all, as 3...Nf6 4.dxe5 Nxe4 5.Qd5 gives White a persistent initiative. Instead 3.dxe5 dxe5 4.Qxd8+ Kxd8 leaves White with some initiative in the queenless middlegame but White does not score as well as in the similar lines arising from 1.e4 e5 2.Nf3 Nc6 3.d4 Nf6 4.dxe5. Black can bring the king to comparative safety with ...c6 and ...Kc7. Thus I am inclined to recommend 2...d6 3.Nf3.
At move 3, 3...Nf6 transposes into the Old Petroff (here White can consider heading into the Urusov Gambit with 4.Bc4, which is actually how I have most commonly reached it in practice). 3...Bb4+ leaves both sides with nothing better than to head into one of the main accepted lines of the Göring with 4.c3 dxc3 5.Nxc3 Nc6 (transposing to 4...dxc3 5.Nxc3 Bb4).
Common ideas
 White must move the queen, allowing Black to exchange off the Bc4. White must move the queen, allowing Black to exchange off the Bc4.
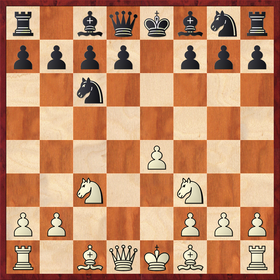
When putting pressure on Black's f7-pawn with Bc4 and Qb3, White must beware of the ...Nc6-a5 "fork", which can force the exchange of White's light-squared bishop (an important attacking piece in the Göring Gambit) for the black knight on c6. The position on the left can arise from the common sequence 4.c3 dxc3 5.Bc4 d6 6.Nxc3 (or 5.Nxc3 d6 6.Bc4) Nf6 7.Qb3 Qd7. The queen move looks awkward, blocking in the bishop on c8, but as well as defending f7, it blocks possible checks on the a4-e8 diagonal and so prepares ...Nc6-a5.
In that line White should increase the pressure on the f7-pawn with 8.Ng5, which typically leads to board-wide chaos, but instead White has rather naively castled, 8.0-0?!, allowing 8...Na5. |
 Here White can complicate matters with f2-f4 rather than retreating the knight on g5. Here White can complicate matters with f2-f4 rather than retreating the knight on g5.
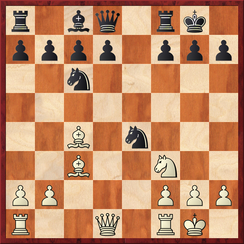
Another common motif is that White must often complicate matters to maintain the initiative. The position on the left arises from 4.c3 dxc3 5.Nxc3 Bb4 6.Bc4 d6 7.Ng5 Ne5 8.Bb3 h6. Black gets this h-pawn push in just in time, because otherwise White is threatening 9.f4, kicking the knight away from e5 and then crashing through on f7.
Black is hoping for 9.Nf3, which allows Black a relatively comfortable game, but here White can complicate matters by pressing forward with 9.f4 anyway, attacking the knight on e5. This sort of sequence is very common in the accepted lines of the Göring Gambit in which White plays Bc4 and Ng5 without playing Qb3 first. It can lead to an exchange of knights, but it also opens up more lines and makes the position more crazy. |
 Black has developed the knight on g8 to f6 too early. e4-e5 is a significant menace. Black has developed the knight on g8 to f6 too early. e4-e5 is a significant menace.
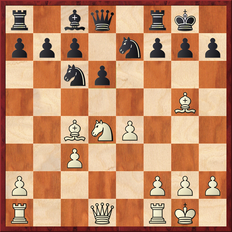
Black has to be wary of playing ...Nf6 without preparing it with ...d6 first, because White's initiative often accelerates after hitting the knight on f6 with the e4-e5 pawn push. This position is a particularly bad version for Black, arising from 4.c3 dxc3 5.Nxc3 Be7?! 6.Bc4 Nf6?!. After 7.e5, Black can lash out with ...d7-d5 in some situations, counterattacking against the bishop on c4, but then lines open up and the position becomes messy and generally favourable for White.
Probably the best version of this sort of line for Black is 4.c3 dxc3 5.Nxc3 Bb4 6.Bc4 Nf6 7.e5, when after 7...d5!, White has nothing better than to head into a queenless middlegame with 8.exf6 dxc4 9.Qxd8+, but even here, the black king tends to get stuck in the centre, and it is not clear if Black can reach equality. In any case, White tends to score well. |
 A typical isolated queen's pawn position. A typical isolated queen's pawn position.
If Black declines the gambit, White often ends up with an isolated pawn on d4. The diagram on the left results from the 4...d5 declining variation, which initially gives Black the more active piece play, but if Black is not careful, the white pieces can become very active into the early middlegame.
Black will typically aim to play against the potentially weak pawn on d4, and exchanges of pieces generally help Black because the pawn would prove to be a weakness in the endgame. Black can also consider castling queenside and launching a kingside attack, but this leaves the black king exposed to attack down the half-open c-file. White will generally strive to keep pieces on the board and, after completing development, set about generating piece activity. The half-open c-file is also a useful avenue of attack for White, especially if Black boldly castles to the queenside. White will also hope to get in the d4-d5 push at some stage. |
Variations
Accepted I: 4...dxc3 5.Nxc3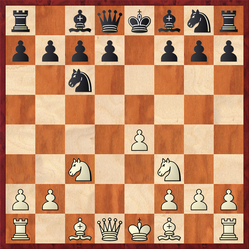
|
Accepted I: 4...dxc3 5.Bc4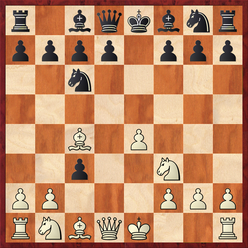
|
|
5...Bb4 6.Bc4 d6
Black intends to swap off the knight on c3, and plays 6...d6 so as to prepare ...Ng8-f6 without the knight getting kicked with e4-e5. White's most reliable reply is to attack f7 with 7.Ng5. 7.Qb3 and 7.0-0 lead to complications but may not give White enough compensation. 5...Bb4 others 6.Bg5 is an interesting alternative, but 6...Be7!? is hard to meet. After 6.Bc4, 6...Bxc3+ 7.bxc3 d6 will transpose to 6...d6 in most cases. Alternatives are not as challenging. 5...d6 6.Bc4 Nf6 Black aims to use the bishop on f8 more defensively, putting it on e7. White's most reliable response is to attack f7 with 7.Qb3 here, and complications quickly break out. 5...d6 others White has good chances of an advantage if Black doesn't play 6...Nf6. Instead of 6.Bc4, 6.Bb5 contains a few tricks, but is less likely to give full compensation for the pawn. 5...Bc5 6.Bc4 d6 This Giuoco Piano-style defence has generally been underestimated. 6.Bc4 sets up the threat of Bxf7+ followed by Qd5+ and Qxc5. 6...d6 prevents this by protecting the bishop. Here the usual attacks on f7 don't work so well for White but White can get compensation for the pawn by attacking on the dark squares with 7.Bg5, or 7.0-0 and then 8.Bg5. 5...Bc5 others Again if 6.Bg5 Be7!?. After 6.Bc4, alternatives to 6...d6 are rather sub-optimal. 5th move alternatives for Black Black has some other decent options but none of them are a serious test of White's gambit. |
5...cxb2 6.Bxb2 Bb4+
The most theoretically critical response, but tricky to navigate over the board. White's best is 7.Nc3 Nf6 and White then chooses between 8.Qc2 with the aim of castling queenside and a h-pawn hack, or 8.0-0 with a more positional approach, aimed at pressuring the black kingside. 5...cxb2 6.Bxb2 d6 Passive but more solid. I think White probably has two pawns' worth of compensation after 7.Qb3, 7.0-0 or 7.Nc3, but the resulting positions are hard to assess. 5...cxb2 6.Bxb2 others Other options do not seriously test White's double pawn sacrifice. 5...Bb4 This doesn't work too well as both 6.0-0 and 6.bxc3 are stronger than 6.Nxc3. 5...Bc5 Here 6.Bxf7+ followed by Qd5+ and Qxc5 may be superior to 6.Nxc3. 5...Be7 Here 6.Qd5 is tempting, but it is not clear if it is any better than 6.Nxc3. Both moves are probably slightly better for White. 5...d6, 5...Nf6 Here White should transpose into Accepted I lines with 6.Nxc3. Otherwise the plan of ...Nf6/d6, ...Be7 and ...0-0 gives Black a solid position. |
4...d5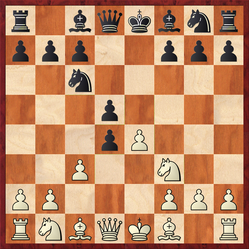
Capablanca Variation - 5.exd5 Qxd5 6.cxd4 Bg4 7.Be2 Bb4+ 8.Nc3 Bxf3 9.Bxf3 Qc4
As introduced in Marshall-Capablanca, Lake Hopatcong 1926. White should arguably avoid this line as it tends to lead to rather level endings. White avoids Capablanca's line: 7.Nc3, and if 7...Bb4 not 8.Be2 A way of avoiding this line for White, which should also be equal with best play. It can lead to a tricky and double-edged ending if Black goes 7...Bxf3. 6th and 7th move alternatives for Black Coverage of what happens if Black doesn't aim for Capablanca's line. White tends to score well in practice in these lines, even though some of them are objectively equal. 5th move alternatives 5.Bd3 may be playable for White and may have a fair amount of surprise value. Other moves such as 5.e5 and 5.cxd4 are somewhat dubious. |
4...others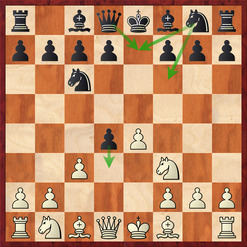
4...Nf6 5.e5 Nd5
Probably the most solid alternative declining line to 4...d5, though it doesn't equalise with as much certainty. 6.Bb5, 6.cxd4 and 6.Qb3 are the main replies. 4...Nf6 others Mostly focusing on the double-edged line 5.e5 Ne4!?, which is counterattacking but White can get some advantage against it. Alternatives to 5.e5 are not convincing. 4...Nge7 Black intends 5...d5, and after 5.cxd4 d5 Black equalises, but with 5.Bc4 d5 6.exd5 Nxd5 7.0-0 White can get some initiative, and possibly a slight edge. 4...d3 This "pushing past" move is solid but leads to passive positions for Black. 4...others Other moves are not challenging for White, and most of them allow White to get a strong two-pawn centre. 4...Qe7 is well met by 5.Bd3, and 5.cxd4 Qxe4+ is also fine for White. |
Sources and further reading
Internet articles
John Watson's book review #62, Danish Dynamite
Mark Morss, Hard Chess, The Importance of the Open Games, the Goering Gambit
Gary Good, The Goring Gambit- A Return to the Romantic
(ChessCafe.com links have been removed because the site went behind a paywall).
A special thanks also goes to Mark Nieuweboer for contributing a large number of ideas.
Books
Karsten Müller & Martin Voigt, Danish Dynamite, Russel Enterprises 2003.
John Emms, Play the Open Games as Black, Gambit 2000.
Jude Acers, George Laven, The Italian Gambit System and a Guiding Repertoire for White - E4!, Trafford Publishing 2006.