Morra Gambit Accepted
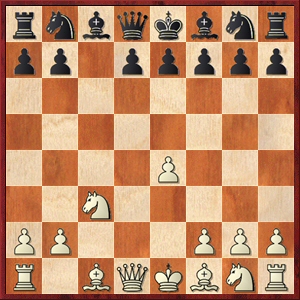
Most theoretically critical and popular is for Black to accept the gambit with 1.e4 c5 2.d4 cxd4 3.c3 dxc3. Now White normally recaptures with the b1-knight, with 4.Nxc3, since 4.Bc4 cxb2 5.Bxb2 e6, blocking out the bishop on c4, makes it very tough for White to demonstrate adequate compensation for two pawns.
White will aim to use the lead in development to generate attacking chances against the black king, and force concessions from Black, while denying Black the sort of counterplay that is traditionally associated with the Open Sicilian with d4, Nf3 and Nxd4. The gambit can be used to pull off many fine attacking wins, and if Black delays kingside castling and pursues queenside counterplay then White can sometimes get in a strong knight sacrifice on d5 or e6.
White will aim to use the lead in development to generate attacking chances against the black king, and force concessions from Black, while denying Black the sort of counterplay that is traditionally associated with the Open Sicilian with d4, Nf3 and Nxd4. The gambit can be used to pull off many fine attacking wins, and if Black delays kingside castling and pursues queenside counterplay then White can sometimes get in a strong knight sacrifice on d5 or e6.
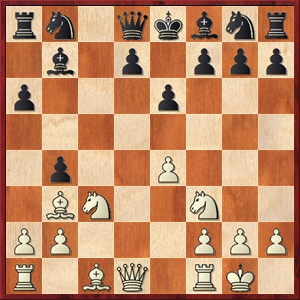
This position is a classic example, where Black has neglected kingside development and has tried to kick White's c3-knight away from defending e4, but the sacrifice 9.Nd5 turns out to be fully sound in this position.
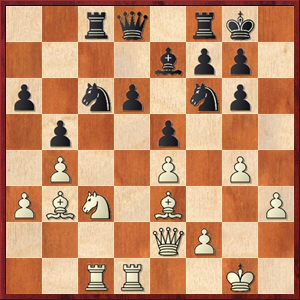
In some other lines, White needs to go for longer-term positional pressure, putting Black under pressure through the centre and on the queenside. Some of the most popular Black setups are best met by an approach with Qe2, Rd1 and Rc1, putting pressure on Black's d6-pawn and threatening e4-e5, and if Black plays ...e6-e5 to block this threat, then this leaves a hole on d5 for White's pieces, such as in the following position:
In some other lines, White needs to go for longer-term positional pressure, putting Black under pressure through the centre and on the queenside. Some of the most popular Black setups are best met by an approach with Qe2, Rd1 and Rc1, putting pressure on Black's d6-pawn and threatening e4-e5, and if Black plays ...e6-e5 to block this threat, then this leaves a hole on d5 for White's pieces, such as in the following position:
The main downside of playing the Morra is that Black has a large number of good defences, some of which require White to play accurately in order to prove full compensation for the pawn, and it is important for White to have some idea of what to do against them if playing prepared opponents. For this reason the Morra Gambit is not a good way of attempting to avoid the heavy theory associated with the Open Sicilian.
Games and analysis
White has to be prepared to vary his/her approach in order to get reasonable compensation for the pawn against every defence, but one general rule of thumb, proposed by Esserman, is that White's development should generally be geared against the position of the black queen. I am a believer in learning key ideas rather than memorizing a lot of theory and think that at club level, if you know the key ideas for White against each of Black's main defences, chances are you will emerge with decent compensation for the pawn without needing to know much theory. But if you want to know about the theory and/or get an extensive analysis of the possibilities for both sides, there are a number of good books on the opening and I can especially recommend Marc Esserman's Mayhem in the Morra and/or Hannes Langrock's The Modern Morra Gambit (in the latter case, get the second edition rather than the first, as it contains some important updates).
In the meantime Michael Goeller's extensive Smith-Morra Gambit bibliography is also worth looking through.
Here is the division of the coverage:
1. Classical Main Line- Black plays ...d6, ...e6, ...Nf6, ...Be7, and then meets the standard Qe2, Rd1 approach with ...e6-e5. Here Black threatens to pin the f3-knight with ...Bc8-g4, which White should not try to prevent with the slow 10.h3?! as in the game.
2. Classical Main Line- 10.Be3. White does not need to fear the pin with ...Bg4.
3. Scheveningen setup. Black plays an early ...a6 and ...Qc7, in order to keep the ...d6, ...e6 pawn formation intact, but White has a strong plan in response with Bc1-f4, preparing e4-e5 and also Ra1-c1, putting the rook opposite the queen on c7.
4. Siberian Trap. Black's idea is to play ...Qc7, ...Nf6 and ...Ng4, attacking White's sensitive spot on h2. (Yes, I recall one internet game where I fell for this one!) White can, however, severely disrupt Black's plan with Nc3-b5 followed by e4-e5.
5. Dragon formation with ...g6. Some sources have regarded this as dubious but I think it is one of Black's best defences. White continues with Bc4, and if Black doesn't get in ...Nc6 and ...Bg7, then Qb3 follows, while otherwise White should go for e4-e5, disrupting Black's plans.
6. The early ...Nge7 defences. These intend to gain a solid position with ...Ne7-g6, taking the sting out of any e4-e5 ideas. White should generally meet these with Bc1-g5.
7. The Taylor Defence with ...a6, ...e6, ...d6 and ...Nf6, intending ...Bc8-g4xf3 and ...Nc6-e5, exchanging off two pairs of minor pieces. White can disrupt this plan by playing Bc1-f4, covering the e5-square, and has tricks based on meeting ...Bc8-g4 with Qd1-b3. Here I also cover the inaccurate move-order with 1.e4 c5 2.d4 cxd4 3.c3 dxc3 4.Nxc3 e6 5.Nf3 d6 6.Bc4 Nf6, which is well met by 7.e5.
8. Chicago Defence. Black plays an early ...a6 and ...b5, followed by ...Ra7-d7, reinforcing the d6-pawn and blocking White's threats down the d-file. However, this leaves Black a long way behind in development, which White can exploit with the aid of various knight sacrifices on b5 and e6.
9. The early ...b7-b5-b4, threatening to undermine the e4-pawn. This idea walks into a strong knight sacrifice on d5.
10. The Finegold Defence with an early ...b5 and ...Nbd7, intending to set up a solid formation reminiscent of the Sicilian Najdorf. White disrupts this plan with a quick e4-e5. I think both the Taylor and Finegold Defences suffice to level the chances, but are no refutation.
11. Finally, for a "lighter" end to the coverage, I discuss some examples of Black's defences involving an early ...e7-e5, which typically leave Black's f7-square vulnerable as Black cannot blunt Bf1-c4 with ...e7-e6, while if Black plays ...f7-f6 this leaves the kingside light squares weak and leaves tasty outposts for White's knights. It is not as bad as commonly thought, but White should be able to get some advantage.
Morra Gambit Accepted coverage